
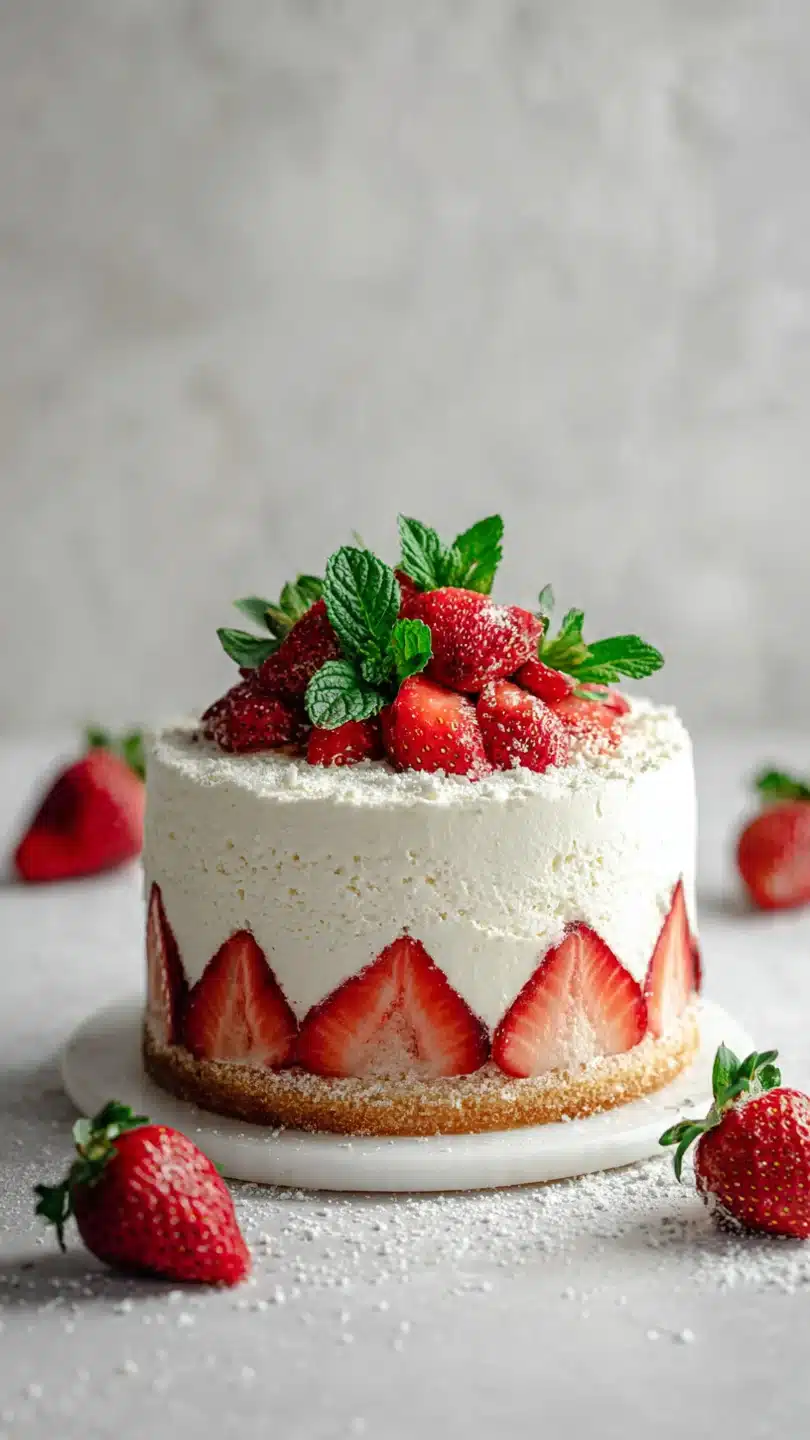
Strawberry smash cake
There’s something uniquely joyful about handing a tiny human their very first cake. It’s not about a perfectly piped border or intricate sugar flowers—it’s about the pure, unadulterated delight of discovery. The squish of cake between fingers, the surprise of sweet flavor, the triumphant smash that sends crumbs flying.
As a chef, I’ve plated thousands of desserts, but none bring a smile as instantly as a well-made smash cake. This strawberry version is my go-to: it’s moist, naturally sweet from real fruit, and sturdy enough to hold a simple frosting, yet soft enough for little gums. It’s a celebration cake that’s as wholesome as it is fun.
- Naturally Sweetened: The primary sweetness comes from ripe strawberry puree and applesauce, with no refined sugars added, making it a gentler option for little ones.
- Incredibly Moist: The combination of fruit puree, yogurt, and oil creates a supremely tender crumb that won’t dry out, even if the photo session runs long.
- One-Bowl Simplicity: You essentially mix wet ingredients, add dry ingredients, and bake. It’s designed for efficiency, not fuss, on a busy celebration day.
- Perfect Smash Texture: This cake has the ideal density—it holds its shape for frosting but crumbles easily under tiny hands for maximum smash-ability.
- Endlessly Customizable: The base recipe is a blank canvas. You can change the fruit, use different frostings, or add a hint of spice for variety.
- Parent-Approved Ingredients: You can recognize and pronounce every item on the list, giving you peace of mind about what your child is exploring.
Ingredients You’ll Need
Let’s gather our simple ingredients—this is where the magic starts. Using ripe, in-season strawberries will give you the best flavor and natural sweetness. Don’t worry about perfect aesthetics; we’re blending them up!
The applesauce acts as both a sweetener and a fat-replacer, keeping the cake wonderfully moist. I prefer a plain, whole-milk yogurt for its fat content and tang, but Greek yogurt works beautifully for extra protein. If you need a dairy-free version, a plain, unsweetened plant-based yogurt is a great swap.
The melted coconut oil adds a subtle richness, but any neutral oil like avocado or grapeseed will do. Trust me, the simplicity of this list is its strength.

Note: You’ll find the complete list of ingredients, along with their exact measurements, in the printable recipe card at the bottom of this post.
Kitchen Equipment Needed
You don’t need any specialty equipment. A standard 6-inch round cake pan is essential for the classic smash cake size and proportions. I highly recommend using parchment paper to line the bottom—it guarantees a clean release every time.
A blender or food processor is needed to create a smooth strawberry puree. Beyond that, you’ll need basic mixing bowls, a whisk, a spatula, and a wire cooling rack. If you don’t have a 6-inch pan, you can use a loaf pan or even make cupcakes, adjusting the bake time accordingly.
How to Make Strawberry Smash Cake Recipe
Step 1: Prep and Puree
Begin by preheating your oven to 350°F (175°C). Properly prepare your pan: grease it well and line the bottom with a parchment circle. This step is your insurance policy against a broken cake.
Now, hull and chop your strawberries before blending them into a completely smooth, vibrant pink puree. You’re looking for about 2/3 cup of liquid. This puree is the heart of your cake’s flavor and color, so make sure there are no large chunks remaining.
Step 2: Combine the Wet Ingredients
Pour your beautiful strawberry puree into a large mixing bowl. Add the applesauce, yogurt, slightly cooled melted coconut oil, room-temperature egg, and vanilla. Here’s a pro tip: whisk these together vigorously until the mixture looks homogenous and slightly thickened.
You’re creating an emulsion, which means binding the oil and water-based ingredients together. This is the secret to a cake with an even, tender texture throughout, without any greasy spots.
Step 3: Fold in the Dry Ingredients
In a separate bowl, whisk together your flour, baking powder, baking soda, and salt. This aerates the flour and ensures the leaveners are evenly distributed. Now, add these dry ingredients to your wet mixture.
Using a spatula, fold gently. The goal is to just combine them until no dry pockets of flour remain. Believe me, overmixing at this stage develops the gluten in the flour and can lead to a dense, tough cake—a few small lumps are perfectly fine.
Step 4: Bake to Perfection
Pour the batter into your prepared pan and gently tap it on the counter to release any large air bubbles. Bake for 22-27 minutes. Start checking at the 22-minute mark.
The cake is done when the top is set and springs back lightly when touched, and a toothpick inserted into the center comes out clean or with a few moist crumbs. It will have a lovely golden-pink hue around the edges.
Step 5: Cool and Frost
Let the cake cool in the pan for exactly 10 minutes. This allows it to set slightly so it doesn’t fall apart. Then, run a knife around the edge, invert it onto your hand, peel off the parchment, and place it right-side-up on a wire rack to cool completely.
This is crucial—frosting a warm cake is a recipe for a melted, sliding mess. Once cool, you can frost it with a simple yogurt frosting, whipped cream, or a thin layer of mascarpone.
- Strawberry Selection: For the deepest pink color and sweetest flavor, use the ripest, reddest strawberries you can find. Frozen strawberries (thawed and drained) work in a pinch but may result in a slightly denser cake and a paler color.
- Room Temperature Matters: Using a room-temperature egg helps it incorporate smoothly into the batter. A cold egg can cause the melted oil to solidify on contact, creating small lumps.
- The Toothpick Test: Don’t rely solely on time. Ovens vary. The toothpick should come out clean, but if it has a few sticky crumbs attached, that’s okay—it will continue to cook slightly from residual heat as it cools. An over-baked smash cake is less fun to smash.
- Cooling is Key: Patience is a virtue here. A completely cool cake is much easier to handle and frost. You can speed this up by placing the cooled cake (unfrosted) in the refrigerator for 30 minutes before decorating.
- Frosting for Function: For a classic smash cake look, a simple “frosting” of plain Greek yogurt or a mix of cream cheese and a touch of maple syrup works wonderfully. It’s tasty, photogenic, and easy for babies to manage. Avoid overly sweet buttercreams.
Recipe Variations
- Blueberry Lemon: Substitute the strawberry puree with blueberry puree and add the zest of one lemon to the wet ingredients for a bright, tangy twist.
- Banana Oat: Replace the strawberry puree with 1 cup of mashed ripe banana and substitute 1/2 cup of the all-purpose flour with oat flour for a heartier texture.
- Pumpkin Spice: Use 1 cup of canned pumpkin puree instead of strawberry, and add 1 teaspoon of pumpkin pie spice to the dry ingredients for a perfect fall-themed smash cake.
- Dairy-Free & Vegan: Use a plant-based yogurt and replace the egg with a “flax egg” (1 tbsp ground flaxseed mixed with 2.5 tbsp water, let sit for 5 mins). Ensure your baking powder is aluminum-free.
- Mini Smash Cupcakes: Divide the batter into a lined muffin tin, filling each cup halfway. Bake for 18-20 minutes. This is perfect for individual servings or if you don’t have a small cake pan.
- Add-In for Toddlers: For an older child, you can gently fold 1/4 cup of mini chocolate chips or very finely chopped soft fruit into the batter before baking.
What to Serve With This Recipe
The smash cake is undoubtedly the star of the show, but you can create a delightful little dessert spread. For adults and older siblings, consider baking a full-sized version of this cake using the same recipe doubled in an 8-inch pan. Serve it with freshly whipped cream and extra sliced strawberries.
For a balanced party plate, offer some soft, easy-to-grasp finger foods like banana spears, very ripe avocado slices, or soft cheese cubes. To drink, keep it simple with water, milk, or for a special baby-friendly “punch,” offer small cups of chilled, diluted fruit juice.
Storage & Make-Ahead Instructions
- Make-Ahead: You can bake the cake up to 24 hours in advance. Once completely cooled, wrap it tightly in plastic wrap and store it at room temperature overnight. Frost it just before the celebration.
- Short-Term Storage: If frosted with a dairy-based topping like yogurt, the assembled cake must be refrigerated and is best consumed within 24 hours. Store it in a cake carrier or loosely covered with a dome.
- Freezing: The unfrosted cake freezes exceptionally well. Wrap the completely cooled cake tightly in plastic wrap, then a layer of aluminum foil. Freeze for up to 2 months. Thaw overnight in the refrigerator before frosting.
- Reheating: This cake is served at room temperature or cool. Do not microwave it, as this will make the texture gummy.
Frequently Asked Questions
Q: Can I make this cake without any added sugar?
A: Absolutely. This recipe is designed to be naturally sweetened by the strawberries and applesauce. There is no refined sugar in the cake itself.
The sweetness level is perfect for a baby’s first exposure.
Q: My cake turned out a little dense. What happened?
A: The most common causes are overmixing the batter (which develops gluten) or using frozen strawberries that retained too much liquid, throwing off the wet-to-dry ratio. Gently fold the batter until just combined and ensure your puree measures about 2/3 cup.
Q: Can I use a different fruit?
A: Yes! The recipe is very adaptable. Mango, peach, raspberry, or pear purees all work well.
Just aim for about 2/3 cup of smooth puree. Be aware that fruits with high water content (like watermelon) are not suitable.
Q: What’s the best frosting for a baby that’s easy to make?
A: My top recommendation is a simple mix of plain, whole-milk Greek yogurt or mascarpone cheese. You can sweeten it minimally with a teaspoon of maple syrup or fruit puree if desired. It’s soft, not too sweet, and easy for them to eat.
Q: How do I know the cake is fully baked?
A: Use the visual and tactile tests. The edges will pull slightly away from the pan, the top will be springy to a light touch, and a toothpick inserted into the center will come out clean or with a few dry crumbs.
Q: Is this cake suitable for baby-led weaning?
A: Yes, when served appropriately. Ensure the cake is soft and crumbly, and always supervise your baby during the smash session. This cake is a fun, occasional food, not a regular meal.
Q: Can I double this recipe?
A: You can easily double all ingredients to make a standard 8-inch or 9-inch layer cake for the rest of the party. Bake time will increase to 30-35 minutes. Always use the toothpick test for doneness.
Final Thoughts
Creating a smash cake is about so much more than baking; it’s about crafting a moment of pure, messy joy. This strawberry smash cake recipe is the result of years in professional kitchens, distilled down to its most reliable, wholesome, and joyful form. It’s a cake that celebrates a huge milestone with simple, real ingredients.
I hope it brings as much laughter and sweetness to your celebration as it has to mine. Don’t stress about the mess—that’s the whole point! Capture the memories, then simply scoop up the happy, crumb-covered baby for a bath.
I’d love to hear how your smash session goes. Share your photos and experiences, and if you have any questions, don’t hesitate to ask. Happy baking, and happy smashing
Easy Strawberry Smash Cake
Ingredients
Equipment
Method
- Preheat your oven to 350°F (175°C). Generously grease a 6-inch round cake pan with oil or butter and line the bottom with a circle of parchment paper. This is non-negotiable for easy release—trust me, you don’t want the cake sticking on the big day.
- In a medium bowl, whisk together the flour, baking powder, baking soda, and salt. In a blender or food processor, puree the strawberries until completely smooth. You should have about 2/3 cup of puree. Pour this into a large mixing bowl.
- To the strawberry puree, add the applesauce, yogurt, melted coconut oil, egg, and vanilla extract. Whisk vigorously until the mixture is completely smooth and emulsified—no streaks of oil should remain. This ensures an even crumb.
- Add the dry ingredients to the wet ingredients. Using a spatula, fold gently until just combined and no dry flour pockets remain. Do not overmix; a few small lumps are perfectly fine. Overmixing leads to a tough cake.
- Pour the batter into your prepared pan and smooth the top. Bake for 22-27 minutes, or until a toothpick inserted into the center comes out clean and the top springs back lightly when touched. Let the cake cool in the pan for 10 minutes, then turn it out onto a wire rack to cool completely before frosting.


