
Strawberry layer cake
There’s something undeniably special about a homemade layer cake. It’s a centerpiece, a gesture of celebration, and a true labor of love. This strawberry layer cake, with its tender crumb, bursts of fresh berry flavor, and silky frosting, is the one I turn to when I want to create a memorable dessert.
Forget dry, overly sweet cakes—this recipe is built on professional techniques to ensure a moist, flavorful, and stunning result every time. Let’s bake a cake that tastes as beautiful as it looks.
- Professional-Quality Results: This isn’t a box-mix cake. Using techniques like reducing strawberry puree and Swiss meringue buttercream delivers bakery-level flavor and texture right in your kitchen.
- Perfectly Balanced Sweetness: The frosting is a Swiss meringue buttercream, which is significantly less sweet than American buttercream, allowing the natural tartness of the strawberries to shine through.
- Moist & Tender Crumb: The combination of buttermilk and a carefully calibrated mixing method guarantees a cake that stays soft for days.
- Make-Ahead Friendly: You can bake the layers, make the puree, and even prepare the frosting components a day in advance, making assembly a breeze.
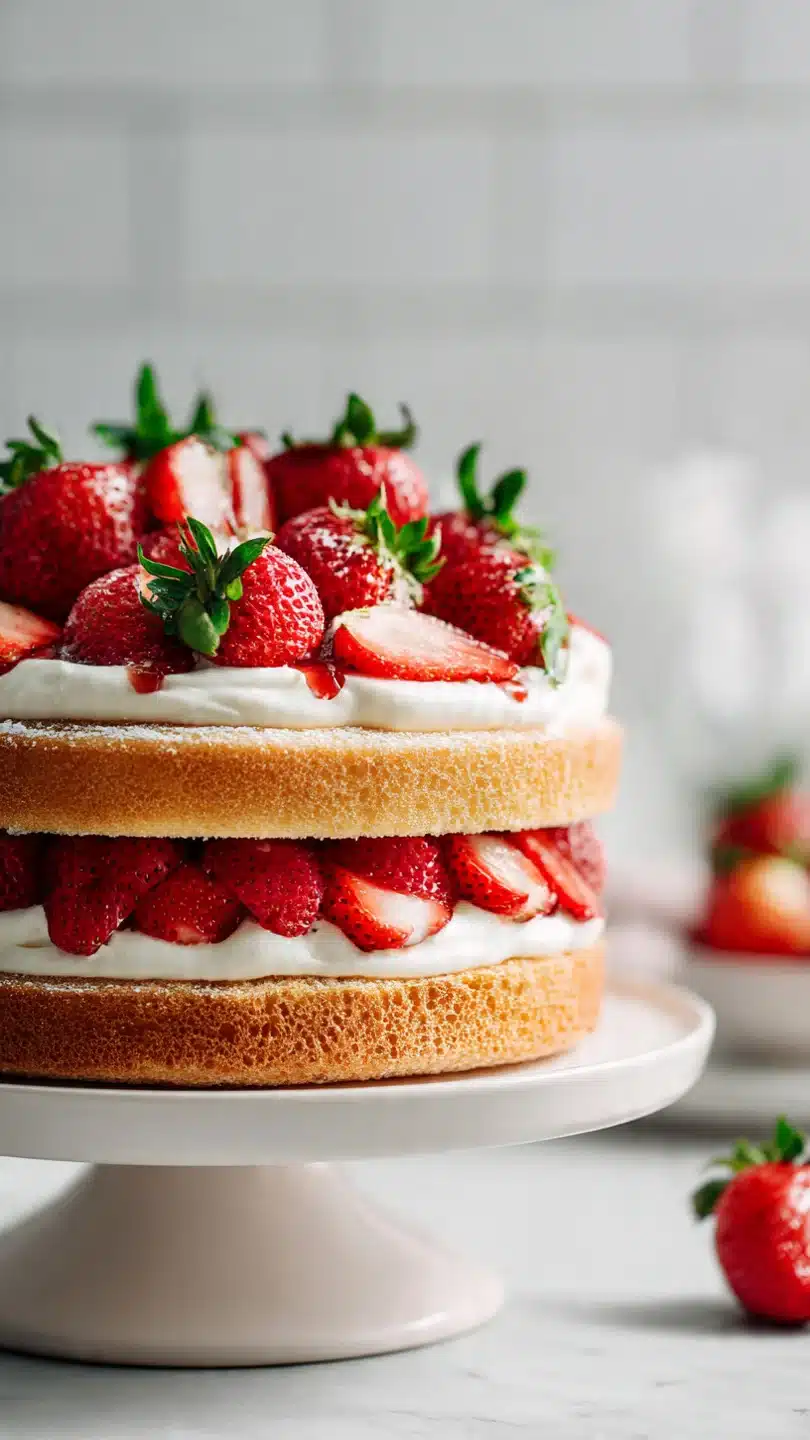
- Stunning Visual Appeal: The natural pink hue of the frosting and fresh berry garnish create a show-stopping dessert perfect for birthdays, Mother’s Day, or any summer gathering.
- Customizable Foundation: Master this vanilla-strawberry base, and you can adapt it endlessly with different fruits, extracts, and fillings.
Ingredients You’ll Need
Let’s gather our ingredients—this is where quality truly matters. Using fresh, ripe strawberries is key, and ensuring your dairy and eggs are at room temperature is non-negotiable for proper emulsification and volume. Trust me, taking those ingredients out of the fridge an hour before you start is the single best thing you can do for your cake’s texture.
For the cake, you’ll need standard pantry staples like all-purpose flour, baking powder, and sugar. I highly recommend using a digital scale for the flour; scooping directly can add too much and lead to a dry cake. The buttermilk adds essential tang and tenderness.
For the star component, you’ll need a full pound of fresh strawberries. Look for berries that are fragrant and uniformly red. We’ll cook them down into a concentrated puree, which packs more flavor than simply adding chopped berries to the batter.
The frosting is a Swiss meringue buttercream, which sounds fancy but is incredibly stable and not too sweet. It requires egg whites, sugar, and a generous amount of butter. Using unsalted butter allows you to control the salt level.
Believe me, the silky, almost whipped-cream-like texture of this frosting is worth the extra step.

Note: You’ll find the complete list of ingredients, along with their exact measurements, in the printable recipe card at the bottom of this post.
Kitchen Equipment Needed
You don’t need a fully stocked professional bakery, but a few key tools will make the process smoother. Essential items include three 8-inch round cake pans, parchment paper for easy release, and a stand mixer (a hand mixer can work but requires more patience). A fine-mesh sieve is crucial for straining the strawberry seeds from the puree for a smooth frosting.
A serrated knife or cake leveler will help you create flat, even layers. While not strictly necessary, a cake turntable and an offset spatula are game-changers for frosting. A digital kitchen scale ensures accuracy, and a candy thermometer helps you nail the Swiss meringue stage.
How to Make Strawberry Layer Cake Recipe
Step 1: Create the Strawberry Essence
This step builds the foundation of flavor. Macerating the strawberries with sugar draws out their juices, and then gently simmering and reducing that liquid concentrates their taste and removes excess water. Water is the enemy of cake structure and frosting stability.
Tip from me: press the cooked puree through that fine-mesh sieve diligently. Removing the seeds gives you a luxuriously smooth puree for both the cake batter and the frosting, creating a professional mouthfeel.
Step 2: Build the Cake Batter Structure
Precision is your friend here. Whisk your dry ingredients thoroughly to evenly distribute the leavening agents. Now, the creaming process: beating the room-temperature butter and sugar for a full 4-5 minutes is critical.
You’re not just mixing; you’re incorporating millions of tiny air bubbles that will expand in the oven, giving you a light, fluffy cake. Add the eggs one at a time, letting each fully incorporate to maintain the emulsion. The alternating addition of dry ingredients and buttermilk prevents overmixing, which develops gluten and leads to toughness.
Step 3: Bake for Perfect Layers
Dividing the batter evenly is the secret to layers that stack neatly. I always use my scale for this—it’s foolproof. The prepared pans with parchment ensure clean release.
Bake until the cakes are just set; a toothpick should have a moist crumb or two, not be bone dry. Overbaking is the quickest path to a dry cake. Let them cool in the pans for only 10 minutes before turning them out.
Any longer and they can steam and become soggy.
Step 4: Craft the Silky Buttercream
The Swiss meringue method cooks the egg whites and sugar to a safe temperature, resulting in a stable, glossy meringue. Whipping until the bowl is completely cool is essential—if the meringue is warm when you add the butter, it will melt. Adding the butter slowly is an act of faith.
The mixture will likely look soupy or curdled halfway through. Don’t panic! Keep adding the butter and whipping; it will magically transform into a smooth, spreadable cloud.
Finally, stream in your reduced and cooled strawberry puree.
Step 5: Assemble with Confidence and Serve
Now comes the satisfying part. Using a dab of frosting as “glue,” secure your first layer. The buttercream dam is a pro trick: pipe a thick ring of frosting around the edge of the layer before adding the puree filling.
This acts as a barrier, preventing the juicy filling from seeping out and making the cake soggy. A thin crumb coat seals in any loose crumbs. After a brief chill, apply the final coat of frosting.
Use your offset spatula and turntable to create smooth sides or playful swirls. Garnish with fresh strawberry slices, step back, and admire your creation. For the best experience, let the cake sit at room temperature for about 30 minutes before slicing to soften the frosting.
- Ingredient Temperature is Key: Room temperature butter, eggs, and buttermilk emulsify properly, creating a batter with better volume and a finer crumb. Cold ingredients can cause the batter to break or result in a dense cake.
- Reduce That Puree: Do not skip reducing the strawberry puree on the stove. Using raw puree adds too much liquid, which can weigh down the cake and make the frosting runny. Cooking it down concentrates the flavor and evaporates excess water.
- The Buttercream “Break”: When making Swiss meringue buttercream, it will often look curdled or separated when you’re about halfway through adding the butter. This is normal! Just keep whipping on medium speed; it will come together into a smooth, silky frosting. If your kitchen is very warm and the buttercream becomes soupy, chill the bowl for 10 minutes and re-whip.
- Level Your Layers: Once the cakes are completely cool, use a serrated knife or cake leveler to trim any domed tops. This creates flat, stable surfaces for stacking and prevents a lopsided cake.
- Crumb Coat is Your Friend: Applying a thin layer of frosting (the crumb coat) and chilling it seals in all the loose crumbs. This ensures your final layer of frosting is perfectly smooth and crumb-free.
Recipe Variations
- Lemon Strawberry Cake: Add the zest of two lemons to the cake batter and substitute 2 tablespoons of the buttermilk with fresh lemon juice. Add a tablespoon of lemon juice to the frosting along with the strawberry puree.
- Chocolate-Dipped Strawberry Cake: Substitute 3/4 cup of the all-purpose flour in the cake with Dutch-process cocoa powder. Frost as directed, then garnish with chocolate-dipped whole strawberries.
- Strawberry Shortcake Style: For a less sweet option, replace the buttercream with lightly sweetened whipped cream. Assemble the cake just before serving, as the whipped cream is less stable.
- Jam Filling: If you’re short on time, you can use a high-quality, thick strawberry jam or preserves for the filling instead of the homemade puree. Still use a buttercream dam to contain it.
- Almond Strawberry Cake: Substitute 1/2 teaspoon of the vanilla extract in the cake with pure almond extract. Garnish the frosted cake with toasted sliced almonds.
- Mini Layer Cakes: Bake the batter in 6-inch cake pans for a taller, more intimate cake, or even in a sheet pan to cut out rounds for individual mini layer cakes.
What to Serve With This Recipe
This strawberry layer cake is a celebration in itself, but it can be part of a beautiful dessert spread. For a summer party, pair it with lighter fare like a fruit salad or lemon sorbet. It pairs wonderfully with sparkling beverages—try a glass of Prosecco, a strawberry-infused sparkling water, or a cup of lightly sweetened iced tea.
For a more formal dinner, serve it after a meal featuring spring or summer flavors, such as grilled salmon, herbed chicken, or a fresh pea risotto. It’s the perfect finale for birthdays, bridal showers, Mother’s Day brunch, or as a stunning centerpiece for a holiday like the Fourth of July.
Storage & Make-Ahead Instructions
- Storage: Due to the fresh fruit and dairy-based frosting, this cake must be stored in the refrigerator. Cover it with a cake dome or place it in an airtight container. It will keep beautifully for up to 4 days.
- Freezing: You can freeze the unfrosted, cooled cake layers tightly wrapped in plastic wrap and then aluminum foil for up to 2 months. Thaw overnight in the refrigerator. The finished, frosted cake does not freeze well, as the texture of the buttercream can become grainy.
- Make-Ahead Strategy: This cake is ideal for making in stages. The strawberry puree can be made and refrigerated for up to 3 days. The cake layers can be baked, cooled, wrapped tightly, and kept at room temperature for 1 day or frozen. The Swiss meringue buttercream can be made and refrigerated in an airtight container for up to 5 days. Before using, let it come to room temperature and re-whip in the stand mixer until smooth and spreadable.
- Serving Tip: Always let the refrigerated cake sit at room temperature for 30-45 minutes before serving. This allows the frosting to soften to its ideal silky texture and the cake to lose its chill, maximizing flavor.
Frequently Asked Questions
Q: Can I use frozen strawberries?
A: Yes, you can. Thaw them completely and drain off any excess liquid before macerating and cooking. The flavor may be slightly less bright than fresh, in-season berries, but it will still be delicious.
Q: My buttercream is runny and won’t thicken. What happened?
A: This usually means your meringue was not cool enough before adding the butter, or your kitchen/ingredients were too warm. Place the entire bowl in the refrigerator for 15-20 minutes, then re-whip. It should come together.
Q: Can I make this cake with all-purpose gluten-free flour?
A: I have tested it with a 1:1 gluten-free baking flour blend with good results. The texture may be slightly more delicate, so handle the layers with care during assembly.
Q: Why did my cake layers sink in the middle?
A: This is typically caused by underbaking, opening the oven door too early (before the structure has set), or an incorrect measurement of leavening agents. Ensure your baking powder and soda are fresh and use the toothpick test for doneness.
Q: How do I get my frosting so smooth?
A: The crumb coat and chill step is essential. After the final coat of frosting, dip your offset spatula in hot water, wipe it dry, and gently smooth the surface. The heat helps melt the buttercream slightly for a glass-like finish.
Q: Can I use a different type of frosting?
A: Absolutely. An American buttercream (butter and powdered sugar) or cream cheese frosting would also work. Note that both are sweeter and may require less strawberry puree to avoid becoming too soft.
Q: Do I have to strain the strawberry puree?
A: For the frosting, yes, I highly recommend it to achieve a perfectly smooth texture. For the puree you fold into the cake batter, it’s optional, but the seeds can be noticeable.
Q: How far in advance can I assemble the whole cake?
A: You can fully assemble and frost the cake 1 day ahead. Store it in the refrigerator, loosely covered. The flavors will meld beautifully.
Final Thoughts
This strawberry layer cake represents everything I love about baking: the transformation of simple ingredients into something extraordinary, the joy of a mastered technique, and the shared happiness it brings to the table. It’s a recipe that rewards attention to detail with spectacular results. Whether it’s your first layer cake or your fiftieth, the process of creating it—from reducing the strawberry essence to swirling on the final bit of frosting—is deeply satisfying.
I encourage you to give this recipe a try. Embrace the steps, trust the process, and don’t be intimidated by the buttercream. The look on your friends’ and family’s faces when you present this homemade beauty will make it all worthwhile.
I’d love to hear how it turns out for you—share your creations and any questions in the comments below. Happy baking
Classic Strawberry Layer Cake
Ingredients
Equipment
Method
- Prepare the Strawberry Puree: Hull and quarter 1 lb of strawberries. Place them in a bowl, toss with 1/4 cup sugar, and let macerate for 30 minutes. Transfer to a saucepan, bring to a simmer, and cook for 10-12 minutes until thickened. Blend until smooth, then press through a fine-mesh sieve to remove seeds. You need 1/3 cup for the frosting; reserve the rest for the cake layers. Let cool completely.
- Make the Cake Layers: Preheat oven to 350°F (175°C). Grease and line three 8-inch round cake pans with parchment. In a medium bowl, whisk together flour, baking powder, baking soda, and salt. In a stand mixer fitted with the paddle, cream butter and sugar on medium-high for 4-5 minutes until pale and fluffy.
- Add eggs one at a time, mixing well after each. Mix in vanilla. With mixer on low, add dry ingredients in three additions, alternating with buttermilk in two additions, beginning and ending with dry ingredients. Fold in 1/2 cup of the cooled strawberry puree until just combined.
- Divide batter evenly among prepared pans (use a scale for accuracy). Bake for 25-30 minutes, until a toothpick inserted in the center comes out clean. Cool in pans for 10 minutes, then turn out onto a wire rack to cool completely. Level the tops with a serrated knife if needed.
- Make the Swiss Meringue Buttercream: Place egg whites and sugar in the clean bowl of a stand mixer. Set over a pot of simmering water (double boiler), whisking constantly until sugar dissolves and mixture reaches 160°F. Attach bowl to mixer with whisk attachment and whip on high until stiff, glossy peaks form and bowl is cool to touch, about 10 minutes.
- Switch to paddle attachment. With mixer on medium-low, add room temperature butter one cube at a time, waiting until incorporated before adding the next. It may look curdled but will become smooth. Once all butter is added, mix in salt and the 1/3 cup reduced strawberry puree. Whip on medium-high for 2-3 minutes until silky.
- Assemble the Cake: Place one cake layer on a serving plate or turntable. Spread with a thin layer of buttercream, then pipe a dam around the edge. Spread about 2 tablespoons of the reserved strawberry puree inside the dam. Top with second layer and repeat. Place final layer top-side down. Apply a thin crumb coat of frosting and chill for 20 minutes. Frost the entire cake with remaining buttercream. Garnish with fresh strawberry slices.


