Strawberry cake recipe
There’s something magical about a strawberry cake that actually tastes like strawberries. Not just a pink cake, but one where every bite delivers that sweet, sun-ripened berry flavor in a cloud of tender crumb and creamy frosting. After years in professional kitchens and countless recipe tests, I’ve perfected a method that locks in that fresh berry essence without compromising the cake’s structure.
This is the celebratory cake you’ll want to make for birthdays, spring gatherings, or simply to turn an ordinary Tuesday into something special. Let’s bake a cake that’s as beautiful as it is delicious.
- Real Strawberry Flavor: We use a reduced strawberry puree, concentrating the natural sweetness and vibrant color into every layer.
- Incredibly Moist Crumb: The combination of sour cream, milk, and fruit puree creates a cake that stays tender for days.
- Professional Technique, Home Cook Friendly: I’ll guide you through the “reverse creaming” method for a finer texture, explaining each step simply.
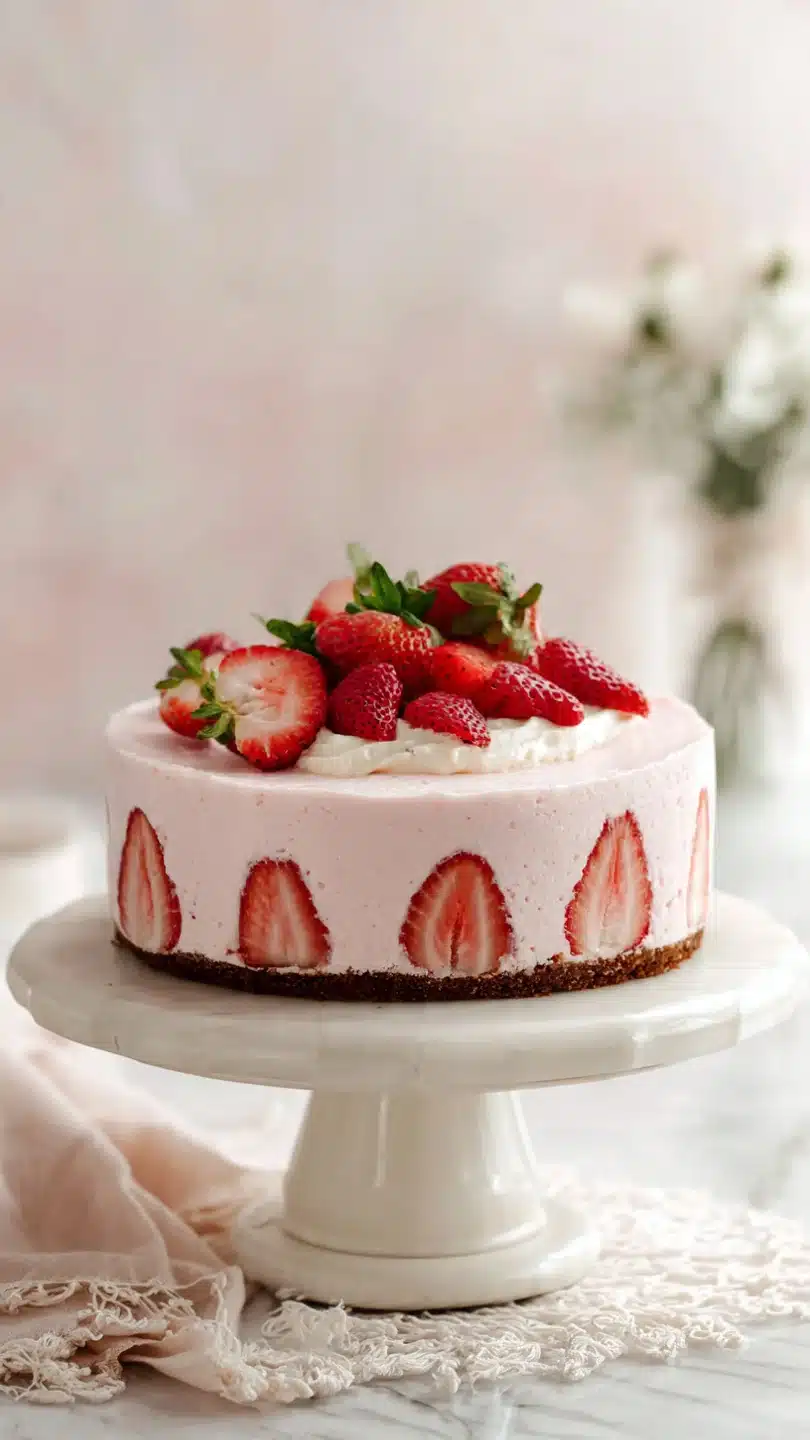
- Stunning Presentation: With its natural pink hue and creamy frosting, this cake looks impressive with minimal decorating effort.
- Make-Ahead Friendly: You can bake the layers and make the frosting a day ahead, making assembly a breeze.
- Perfectly Balanced Sweetness: The tangy cream cheese frosting cuts through the berry sweetness, creating a harmonious flavor profile.
Ingredients You’ll Need
Gathering high-quality ingredients is the first step to baking success. For the deepest strawberry flavor, seek out ripe, fragrant berries. If they smell like summer, you’re on the right track.
Using room temperature dairy and eggs is non-negotiable here—it ensures proper emulsification for a smooth, voluminous batter. Trust me, taking those ingredients out an hour before you start makes all the difference. Let’s break down what you’ll need.
For the Cake Layers:
- All-purpose flour: Spooned and leveled into your measuring cup to avoid a dense cake.
- Baking powder & baking soda: Our dual leavening agents for the perfect rise.
- Salt: Enhances all the other flavors.
- Unsalted butter: Room temperature for easy creaming. I prefer European-style butter for its richer flavor.
- Granulated sugar: For sweetness and structure.
- Eggs: Room temperature. Cold eggs can cause the batter to break.
- Pure vanilla extract: Use the real stuff for the best aroma.
- Sour cream: Full-fat sour cream adds incredible moisture and a slight tang.
- Whole milk: Room temperature. The fat content contributes to a tender crumb.
- Fresh strawberries: You’ll hull and puree them, then cook the puree down slightly to intensify the flavor and remove excess water.
For the Strawberry Cream Cheese Frosting:
- Cream cheese: Use full-fat, brick-style cream cheese, not the spreadable kind in a tub.
- Unsalted butter: Room temperature.
- Powdered sugar: Sifted to avoid lumps in your silky frosting.
- Reduced strawberry puree: We’ll use a portion of the puree we made for the cake.
- Pure vanilla extract & salt: To balance the sweetness.

Note: You’ll find the complete list of ingredients, along with their exact measurements, in the printable recipe card at the bottom of this post.
Kitchen Equipment Needed
You don’t need specialized gear, but a few key tools will ensure success. Two 9-inch round cake pans are essential—light-colored metal pans bake most evenly. Lining them with parchment paper circles guarantees easy release.
A stand mixer or sturdy hand mixer is crucial for properly creaming the butter and sugar and for making the frosting. You’ll also need a blender or food processor for the strawberries, a fine-mesh sieve for straining the puree, a saucepan for reducing it, and a rubber spatula. An offset spatula makes frosting the cake beautifully much easier, and a rotating cake stand is a helpful luxury.
How to Make Strawberry Cake Recipe
Step 1: Prepare the Strawberry Puree
Start by washing, hulling, and pureeing your fresh strawberries until completely smooth. Pour this puree into a small saucepan and cook it over medium heat for about 15-20 minutes, stirring frequently. You’re looking for it to reduce by about one-third to one-half; it should thicken slightly and darken in color.
This step is my secret weapon—it concentrates the flavor and removes water that would make our cake gummy. Believe me, it’s worth the extra time. Let this reduced puree cool completely before using.
Step 2: Mix the Dry Ingredients and Cream the Butter
Preheat your oven to 350°F (175°C) and prepare your cake pans with parchment and a light grease. In the bowl of your stand mixer, whisk together the flour, baking powder, baking soda, and salt. Add the room-temperature butter to the dry ingredients.
Using the paddle attachment, mix on low speed until the mixture resembles coarse, damp sand with no large butter pieces remaining. This “reverse creaming” method coats the flour proteins in fat, resulting in a more tender, fine-crumbed cake that’s less likely to dome.
Step 3: Combine Wet Ingredients and Finish the Batter
In a separate bowl or large measuring cup, whisk together the eggs, vanilla, sour cream, milk, and 3/4 cup of the cooled strawberry puree (reserve the rest for the frosting) until smooth. With the mixer on low, slowly pour the wet mixture into the butter-flour mixture. Mix just until the batter is combined and smooth, stopping to scrape the bowl once.
Tip from me: Overmixing at this stage develops gluten and leads to a tough cake. Divide the beautiful pink batter evenly between your prepared pans.
Step 4: Bake and Cool Completely
Bake the layers for 28-32 minutes. You’ll know they’re done when the tops spring back lightly when touched and a toothpick inserted into the center comes out clean or with a few moist crumbs. Rotate the pans halfway through baking for even color.
Let the cakes cool in their pans on a wire rack for 15 minutes, then carefully turn them out onto the racks to cool completely. This patience is critical—frosting a warm cake is a recipe for a melted, sliding mess.
Step 5: Make the Frosting and Assemble
While the cakes cool, make the frosting. Beat the room-temperature cream cheese and butter together until completely smooth and creamy. Gradually add the sifted powdered sugar, beating on low initially to avoid a sugar cloud.
Add the reserved strawberry puree (about 1/4 cup), vanilla, and a pinch of salt. Beat on medium-high for 2-3 minutes until fluffy. To assemble, place one cake layer on your serving plate.
Spread a generous amount of frosting over it. Top with the second layer. Apply a thin “crumb coat” of frosting over the entire cake, chill for 15 minutes, then apply the final, beautiful layer of frosting.
Step back and admire your creation before garnishing with fresh strawberry halves.
- Room Temperature is Key: This is the most common mistake I see. Cold ingredients don’t incorporate evenly, leading to a curdled batter and a dense cake. Plan ahead.
- Don’t Skip Reducing the Puree: Using raw, watery puree will steam the cake from the inside, creating a wet, dense texture. The reduction step is essential for flavor and structure.
- How to Test for Doneness: Beyond the toothpick test, look for the edges of the cake just starting to pull away from the sides of the pan. The center should no longer look wet or glossy.
- For Flat Cake Layers: Ensure your oven temperature is accurate with an oven thermometer. The reverse creaming method also helps minimize doming. You can also use cake strips around the pans.
- Frosting Consistency: If your frosting seems too soft after adding the puree, chill it for 20 minutes before using. If it’s too stiff, beat in a teaspoon of milk at a time.
Recipe Variations
- Strawberry Vanilla Bean: Scrape the seeds of one vanilla bean into the batter along with the extract for an extra-special aromatic touch.
- Lemon Strawberry: Add the zest of one lemon to the cake batter and use lemon juice instead of milk in the frosting for a bright, tangy twist.
- Strawberry Shortcake Style: Skip the frosting between layers. Instead, fill the cake with sweetened whipped cream and sliced fresh strawberries.
- Dairy-Free/Vegan: Use plant-based butter, milk, and sour cream. For the eggs, a commercial egg replacer or flax eggs can work, though the texture will be denser.
- Gluten-Free: Substitute the all-purpose flour with a 1:1 gluten-free baking blend. The batter may be slightly thicker.
- Strawberry Jam Swirl: Before baking, dollop tablespoons of high-quality strawberry jam on top of the batter in each pan and swirl gently with a knife for a marbled effect.
What to Serve With This Recipe
This strawberry cake is a celebration in itself, but it pairs wonderfully with a cup of freshly brewed coffee or a glass of cold milk. For a dessert spread, consider lighter options like a fruit salad or lemon sorbet to balance the richness. It’s the perfect centerpiece for a spring brunch, paired with quiche and mimosas, or as the grand finale to a summer barbecue.
For a truly decadent experience, serve each slice with a scoop of vanilla bean ice cream or a dollop of freshly whipped cream.
Storage & Make-Ahead Instructions
- Refrigeration: Due to the cream cheese frosting, this cake must be stored in the refrigerator. Cover it with a cake dome or invert a large bowl over it. It will stay fresh for up to 4 days.
- Freezing: You can freeze the unfrosted cake layers tightly wrapped in plastic wrap and then foil for up to 2 months. Thaw overnight in the refrigerator. The frosting does not freeze well.
- Make-Ahead Strategy: Bake the cake layers and let them cool completely. Wrap them tightly in plastic wrap and store at room temperature for one day, or freeze as above. The frosting can be made 1-2 days ahead and stored in an airtight container in the refrigerator. Let it come to room temperature and re-whip briefly before using.
- Serving Tip: For the best texture and flavor, let the refrigerated cake sit at room temperature for 30-60 minutes before serving.
Frequently Asked Questions
Q: Can I use frozen strawberries?
Yes, you can. Thaw them completely and drain any excess liquid before pureeing. The flavor may be slightly less intense than peak-season fresh berries, but it will still be delicious.
Q: My puree is very seedy. Should I strain it?
For the smoothest cake texture and frosting, I highly recommend straining the reduced puree through a fine-mesh sieve to remove the seeds. It takes a minute but makes a noticeable difference.
Q: Why did my cake turn out dense/gummy?
This is almost always due to using cold ingredients or not reducing the strawberry puree enough, introducing too much moisture. Also, ensure you measured your flour correctly (spooned and leveled) and didn’t overmix the final batter.
Q: Can I make this as a sheet cake or cupcakes?
Absolutely. For a 9×13 sheet cake, bake for 35-40 minutes. For cupcakes, fill liners 2/3 full and bake for 18-22 minutes.
The recipe will yield about 24 cupcakes.
Q: My frosting is too runny. How can I fix it?
Chill the frosting bowl for 20-30 minutes, then re-whip. If it’s still too soft, you can carefully add a bit more sifted powdered sugar, a quarter cup at a time.
Q: Can I use strawberry extract instead of puree?
I don’t recommend it. Extract will give an artificial flavor and none of the natural moisture, color, or nuanced taste that real fruit provides. The puree is fundamental to this recipe.
Q: How do I get my frosting so pink without food coloring?
The color comes solely from the reduced strawberry puree. The more you reduce it, the deeper and redder it becomes, leading to a naturally pink frosting. For a vibrant pink, a tiny drop of pink or red gel food coloring can boost it.
Final Thoughts
This strawberry cake represents everything I love about baking: transforming simple, wholesome ingredients into something extraordinary that brings people together. The process of reducing the strawberries, carefully creaming the batter, and watching those pink layers rise in the oven is a joyful ritual. The result is a cake that’s unapologetically fruity, wonderfully moist, and sure to earn you compliments.
It’s a testament to the power of using real fruit and reliable technique.
I encourage you to give this recipe a try, especially when strawberries are at their sweetest. Take your time, follow the tips, and don’t be intimidated by the steps—each one has a purpose. I’d love to hear how it turns out for you.
Share your creation online and tag me, or leave a comment with your experience. Happy baking