
Pear pizza
Imagine the scene: a crisp, blistered crust topped with melting cheese, sweet caramelized onions, and juicy slices of ripe pear, all brought together with a final drizzle of honey. This isn’t dessert—it’s a sophisticated savory pear pizza that will change how you think about pizza night. I first fell for this combination years ago while working in a farm-to-table restaurant, where we celebrated seasonal produce in unexpected ways.
This recipe brings that gourmet experience to your kitchen with minimal fuss and maximum flavor. It’s the perfect appetizer for a dinner party or a stunningly simple main course that feels special any night of the week. Let’s create a pizza that beautifully walks the line between sweet and savory.
This pear pizza is more than just a meal; it’s a delightful culinary experience designed for success.
- Gourmet Results, Simple Process: You’ll achieve a restaurant-quality flatbread using mostly pantry staples and a few fresh ingredients, with pre-made dough keeping it accessible.
- Perfect Flavor Balance: The recipe is engineered for harmony—sweet pears and onions play against tangy gorgonzola, rich walnuts, and aromatic thyme, finished with a honey kiss.
- Surprisingly Versatile: It effortlessly transitions from a fancy party appetizer to a cozy weeknight dinner, and the toppings are easily adaptable to what you have on hand.
- Quick from Start to Finish: With active cooking time under 30 minutes, you can have this impressive dish on the table faster than ordering delivery.
- A Feast for the Senses: It delivers on every level: the crisp crust has a satisfying crunch, the melted cheese offers creaminess, and the combination of warm pears and walnuts is simply irresistible.
- Conversation-Starter: This is the dish that makes guests ask, “What’s in this?” It’s unique, memorable, and always a hit.
Ingredients You’ll Need
- Let’s gather our ingredients—this is where simple components come together to create something truly special. The magic lies in the quality and balance.
For the best results, choose a ripe but firm pear like Anjou or Bosc; they hold their shape beautifully when baked. A soft pear will turn to mush. For the cheese, a good-quality gorgonzola offers the perfect tangy punch, but don’t be afraid to use a milder blue cheese or even goat cheese if you prefer.
The caramelized onions are non-negotiable—they provide a deep, sweet base note. Take your time with them over medium-low heat; rushing with high heat will burn the sugars and leave you with bitter onions. A splash of balsamic vinegar at the end is my secret for an extra layer of complexity.
For the dough, a high-quality store-bought ball from the refrigerated section works perfectly, letting you focus on the toppings.

Note: You’ll find the complete list of ingredients, along with their exact measurements, in the printable recipe card at the bottom of this post.
Kitchen Equipment Needed
You don’t need professional gear to make professional-tasting pizza. A pizza stone is the gold standard for a crisp, evenly cooked crust, but an inverted heavy rimmed baking sheet preheated in the oven works nearly as well. You’ll also need a skillet for the onions, a sharp knife for thin, even pear slices, and a cutting board.
A pizza peel makes transferring the pizza easy, but I often just shape my dough on a piece of parchment paper and slide the whole paper onto the hot stone—it’s a foolproof method for home cooks.
How to Make Savory Pear Pizza Recipe
Step 1: Caramelize the Onions & Prep
Preheat your oven to 475°F (245°C) with a pizza stone or inverted baking sheet inside. Let the pizza dough rest at room temperature, covered, for 30 minutes. Meanwhile, heat 1 tbsp olive oil in a skillet over medium-low heat.
Add the thinly sliced onions and a pinch of salt. Cook, stirring occasionally, for 15-20 minutes until deeply golden and caramelized. For extra depth, add a teaspoon of balsamic vinegar in the last minute of cooking.
Remove from heat. This slow cooking is crucial—it develops the sugars and creates a jammy, sweet foundation that defines the pizza.
Step 2: Shape the Dough
On a lightly floured surface, stretch or roll the dough into a 12-inch round or rustic rectangle. If you don’t have a pizza peel, place the shaped dough on a piece of parchment paper. This makes transferring to the hot stone much easier.
Lightly brush the entire surface with a thin layer of olive oil. Believe me, this simple step creates a barrier that prevents the juicy toppings from making the center of the crust soggy, ensuring every bite is perfectly crisp.
Step 3: Assemble the Toppings
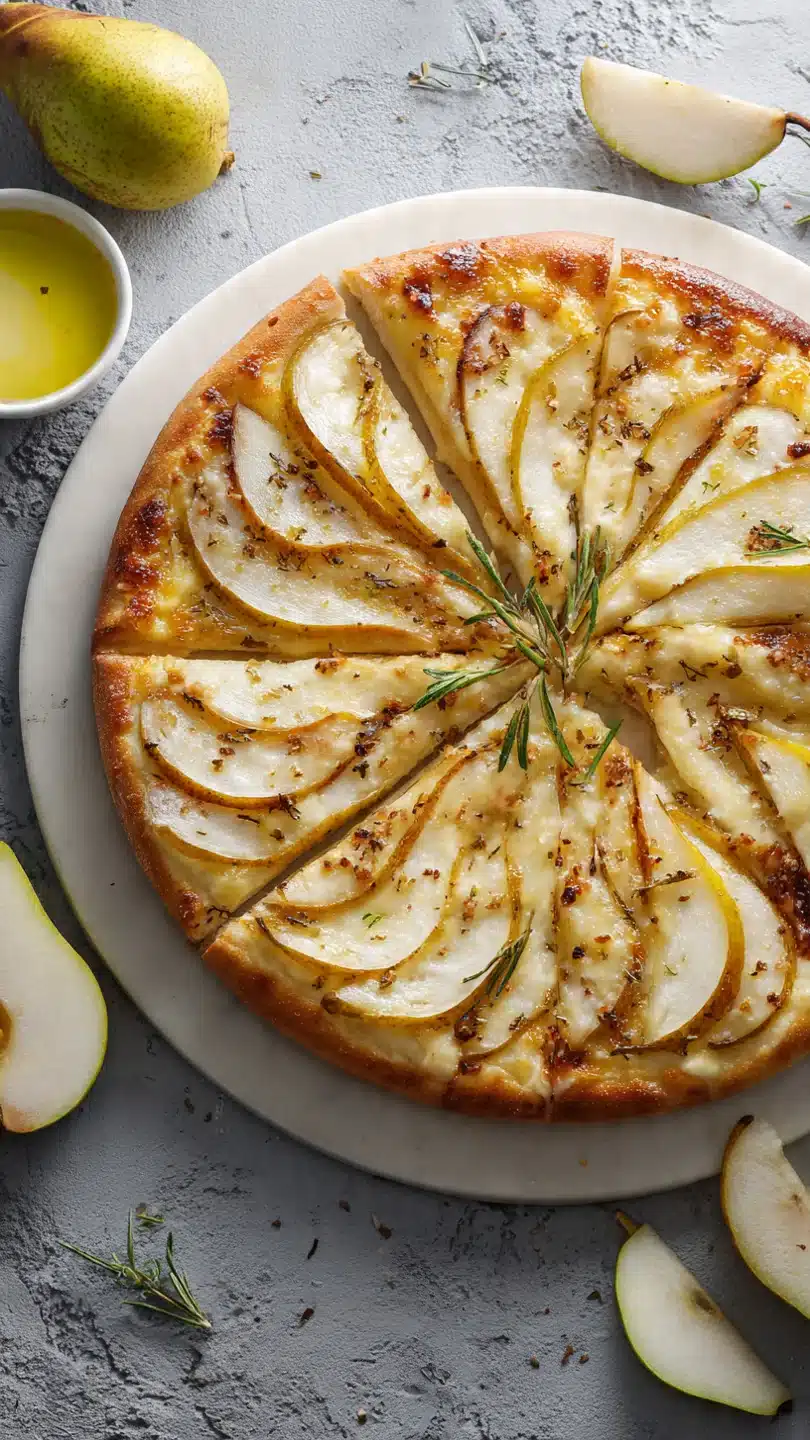
Evenly scatter the caramelized onions over the dough, leaving a small border for the crust. Top with about two-thirds of the crumbled gorgonzola. Arrange the thin pear slices in a single, slightly overlapping layer.
Sprinkle the remaining cheese and the chopped walnuts over the pears. Trust me, adding some cheese on top helps the pears and walnuts adhere and brown slightly in the oven’s intense heat. The layering order matters for texture and even cooking.
Step 4: Bake to Perfection
Carefully transfer the pizza (on the parchment, if using) to the preheated pizza stone or baking sheet. Bake for 10-12 minutes, or until the crust is puffed and golden brown, the cheese is bubbly, and the edges of the pears have just begun to curl. The high heat is key for a crisp, professional-quality crust.
Oven temperatures vary, so keep an eye on it after the 10-minute mark. You’re looking for visual cues of doneness, not just the timer.
Step 5: Finish and Serve
Remove the pizza from the oven and let it rest for 2-3 minutes. This allows the cheese to set slightly for cleaner slicing. Now comes the fun part: drizzle with honey, sprinkle with fresh thyme leaves, and top with a handful of peppery arugula if desired.
Slice and serve immediately. Step back and admire your beautiful, restaurant-worthy creation. The contrast of the warm pizza with the cool, fresh arugula and the glossy honey is the final masterstroke.
Drawing from years in professional kitchens, here are the insights that will elevate your pear pizza from good to exceptional.
- Dough Temperature is Key: Always let refrigerated dough come to room temperature. Cold dough is tight and will fight you when stretching, often snapping back and resulting in a tough crust.
- The Paper Trick: Using parchment paper to build and transfer your pizza is the single best tip for home bakers. It eliminates the fear of a stuck or misshapen pizza when sliding it onto the stone.
- Slice Pears Thinly: Use a sharp knife to slice pears to about 1/8-inch thickness. Thick slices won’t soften properly and can release too much water, steaming the crust instead of letting it crisp.
- Don’t Crowd the Toppings: It’s tempting to load it up, but a lighter hand ensures the crust cooks evenly and gets crispy. You should still see glimpses of the dough base through the toppings.
- The Resting Period: Letting the baked pizza rest for a few minutes isn’t just about avoiding a burnt mouth. It allows the molten cheese to set, so when you slice, the toppings don’t all slide off onto the board.
Recipe Variations
- The beauty of this recipe is its adaptability. Once you master the base, feel free to get creative with these tested variations.
- Cheese Swap: For a milder flavor, use crumbled goat cheese or even shredded fontina. For a vegan version, a high-quality plant-based blue cheese or a simple drizzle of vegan pesto works wonderfully.
- Nut-Free Option: Replace the walnuts with toasted pumpkin seeds (pepitas) for a similar crunch without the common allergen. Sunflower seeds are another great alternative.
- Prosciutto Addition: For a salty, savory punch, add 2-3 ounces of thinly sliced prosciutto or speck after baking. The heat of the pizza will gently warm it without making it tough.
- Herb Variations: While thyme is classic, try chopped fresh rosemary for a piney fragrance or sage leaves fried in butter until crisp and used as a garnish.
- Fig & Balsamic: In the fall, replace the pear with fresh figs and swap the honey finish for a reduced balsamic glaze for a deeper, richer sweetness.
- Spicy Kick: Add a pinch of red pepper flakes to the caramelizing onions or sprinkle them over the finished pizza for a subtle heat that cuts through the richness.
- Gluten-Free: Use your favorite gluten-free pizza dough blend. Par-bake the crust for 5-7 minutes before adding toppings to prevent a gummy texture.
What to Serve With This Recipe
This pear pizza is incredibly versatile. As an appetizer, slice it into small squares or strips for easy grazing at a party—it pairs beautifully with a crisp white wine like Sauvignon Blanc or a dry Riesling. For a complete dinner, I love serving it with a simple arugula salad dressed in a lemon vinaigrette to cut through the pizza’s richness.
A bowl of roasted tomato soup or a creamy butternut squash soup also makes for a cozy, satisfying meal. If you’re hosting a brunch, this pizza is a stunning centerpiece alongside a frittata and a fruit platter.
Storage & Make-Ahead Instructions
- This pizza is best enjoyed fresh, but you can manage components ahead of time for a quick assembly.
- Make-Ahead Components: The caramelized onions can be made up to 3 days in advance and stored in an airtight container in the refrigerator. Let them come to room temperature before using.
- Storing Leftovers: Cool leftover pizza completely, then store in an airtight container in the refrigerator for up to 2 days. The crust will soften, but the flavors will still be delicious.
- Reheating: To recrisp the crust, reheat slices in a 375°F (190°C) oven or toaster oven for 5-8 minutes. Avoid the microwave, as it will make the crust chewy and the pears mushy.
- Freezing: I don’t recommend freezing the assembled baked pizza, as the pear texture will suffer. However, you can freeze the caramelized onions for up to 2 months.
Frequently Asked Questions
Q: Can I use canned or jarred pears?
A: I don’t recommend it. Canned pears are too soft and sweet, and they contain too much moisture, which will steam and make your crust soggy. The texture and subtle flavor of a fresh, firm pear are essential to this recipe.
Q: My pizza dough keeps shrinking back when I try to stretch it. What am I doing wrong?
A: This is almost always because the gluten in the dough is too tight. The fix is simple: let your dough rest, covered, at room temperature for a full 30 minutes after taking it out of the fridge. Gluten relaxes as it warms, making the dough much more pliable and easier to shape.
Q: Can I make this without a pizza stone?
A: Absolutely. Preheat your oven as directed and place an inverted, heavy rimmed baking sheet on the middle rack to heat up. You’ll build your pizza on another piece of parchment on a flat surface, then carefully slide it onto the hot baking sheet.
The results are still excellent.
Q: Is there a way to make this recipe vegan?
A: Yes, easily. Use a vegan pizza dough (check the label), a high-quality vegan blue cheese or crumbled tofu seasoned with nutritional yeast, and maple syrup instead of honey. The caramelized onions and pears are naturally vegan.
Q: How do I know when the pizza is done baking?
A: Look for three signs: the crust should be puffed and golden brown on the edges, the cheese should be fully melted and bubbly, and the thin edges of the pear slices will just start to curl and may show a few caramelized spots. If the crust is browning too quickly, you can move the pizza to a lower rack.
Q: What’s the best pear variety to use?
A: Anjou and Bosc pears are my top choices. They are firm-fleshed and hold their shape beautifully during baking. Bartlett pears can work if they are very firm, but avoid Comice or other ultra-juicy, soft varieties.
Q: Can I prepare the whole pizza ahead of time and bake it later?
A: You can assemble the pizza on its parchment paper up to 1 hour before baking and keep it in the refrigerator. However, the pears may release a little juice. For best results, I recommend prepping components ahead and doing the final assembly just before baking.
Final Thoughts
This savory pear pizza is a testament to how a few quality ingredients, combined with thoughtful technique, can create something extraordinary. It breaks the mold of traditional pizza, offering a sophisticated yet approachable flavor profile that never fails to impress. Whether you’re looking to spice up pizza night or need a show-stopping appetizer, this recipe delivers on every promise—crispy crust, melting cheese, and the perfect sweet-savory balance.
I’ve tested this recipe multiple times to ensure it works reliably in home kitchens, and I’m confident it will become a new favorite in your repertoire. The process is part of the joy, from the slow, sweet smell of caramelizing onions to the dramatic moment you pull the golden pizza from the oven. Give it a try this week, and don’t forget to drizzle that honey!
I’d love to hear how it turns out for you—share your creations online and tag me. If you enjoyed this gourmet twist, explore my other recipes where we turn simple ingredients into memorable meals. Happy cooking
Savory Pear Pizza with Caramelized Onions & Gorgonzola
Ingredients
Equipment
Method
- Preheat your oven to 475°F (245°C) with a pizza stone or inverted baking sheet inside. Let the pizza dough rest at room temperature, covered, for 30 minutes. Meanwhile, heat 1 tbsp olive oil in a skillet over medium-low heat. Add the thinly sliced onions and a pinch of salt. Cook, stirring occasionally, for 15-20 minutes until deeply golden and caramelized. For extra depth, add a teaspoon of balsamic vinegar in the last minute of cooking. Remove from heat.
- On a lightly floured surface, stretch or roll the dough into a 12-inch round or rustic rectangle. If you don’t have a pizza peel, place the shaped dough on a piece of parchment paper. This makes transferring to the hot stone much easier. Lightly brush the entire surface with a thin layer of olive oil. This creates a barrier to prevent a soggy crust.
- Evenly scatter the caramelized onions over the dough, leaving a small border for the crust. Top with about two-thirds of the crumbled gorgonzola. Arrange the thin pear slices in a single, slightly overlapping layer. Sprinkle the remaining cheese and the chopped walnuts over the pears. Trust me, adding some cheese on top helps the pears and walnuts adhere.
- Carefully transfer the pizza (on the parchment, if using) to the preheated pizza stone or baking sheet. Bake for 10-12 minutes, or until the crust is puffed and golden brown, the cheese is bubbly, and the edges of the pears have just begun to curl. The high heat is key for a crisp, professional-quality crust.
- Remove the pizza from the oven and let it rest for 2-3 minutes. This allows the cheese to set slightly for cleaner slicing. Drizzle with honey, sprinkle with fresh thyme leaves, and top with a handful of peppery arugula if desired. Slice and serve immediately. Step back and admire your beautiful, restaurant-worthy creation.


