
Cast iron pizza
There’s something undeniably magical about pulling a sizzling, golden-brown pizza from a cast iron skillet. The aroma of toasted crust and bubbling cheese fills the kitchen, promising a slice with a texture that’s simply unachievable with a standard baking sheet: a shatteringly crisp bottom that gives way to a soft, airy interior. This isn’t just another pizza recipe; it’s a technique that leverages the incredible heat retention of cast iron to create a professional-quality pie right in your home oven.
As a chef who has made thousands of pizzas, I can tell you this method is a game-changer for achieving that coveted crispy-yet-chewy crust without any special equipment. Let’s make pizza night unforgettable.
- Foolproof Crispy Crust: The preheated cast iron skillet acts like a pizza stone on steroids, delivering an instant, intense sear for a perfectly crisp bottom every single time.
- Minimal Hands-On Time: With a simple, no-fuss dough that requires just one rise, the active work is under 20 minutes, leaving you free to prep toppings or simply relax.
- Endlessly Customizable: This is your perfect canvas. Go classic with pepperoni, create a veggie garden, or experiment with gourmet combinations—the sturdy crust can handle it all.
- No Special Skills Needed: You don’t need to master the pizza toss. The dough is simply pressed or rolled into the pan, making it accessible for cooks of all levels.
- One-Pan Wonder: From mixing the dough to baking and serving, your trusty cast iron skillet is the star, meaning less cleanup and more flavor from the seasoned pan.
Ingredients You’ll Need
Gathering these simple, quality ingredients is the first step to pizza perfection. The beauty of this recipe lies in how these basic components transform in the intense heat of the cast iron.
For the dough, we’re using a high-protein all-purpose flour for structure, instant yeast for convenience and a reliable rise, a touch of sugar to feed the yeast, and salt for flavor. The warm water should feel like a pleasant bath temperature—too hot will kill the yeast, too cold will slow it down. A good glug of olive oil enriches the dough and helps create a tender crumb.
For the assembly, a high-quality pizza sauce or even a simple crushed San Marzano tomato base makes a world of difference. For the cheese, low-moisture, whole-milk mozzarella is non-negotiable for that perfect melt and stretch without releasing excess water. As for toppings, choose what you love, but remember: less is often more to avoid a soggy center.
Now, let’s get our ingredients ready.

Note: You’ll find the complete list of ingredients, along with their exact measurements, in the printable recipe card at the bottom of this post.
Kitchen Equipment Needed
The equipment list is refreshingly short. The essential tool is a 10- or 12-inch cast iron skillet. Its heavy weight and superior heat retention are what create the signature crust.
You’ll also need a large mixing bowl, a wooden spoon or dough whisk for initial mixing, and reliable oven mitts—handling the preheated skillet safely is paramount. A kitchen scale for measuring flour is helpful for accuracy, but measuring cups work fine if you use the “spoon and level” method. That’s truly all you need to create pizza magic.
How to Make Cast Iron Pizza Recipe
Step 1: Mix and Knead the Dough
In your large bowl, whisk together the flour, yeast, sugar, and salt. This distributes the yeast evenly. Make a well and pour in the warm water and olive oil.
Stir until a shaggy ball forms, then turn it out onto a lightly floured surface. Now, knead with the heels of your hands for 5-7 minutes. Trust me, this develops the gluten network that gives the crust its chew.
You’ll know it’s ready when the dough is smooth, springs back when poked, and passes the windowpane test.
Step 2: Let the Dough Rise
Place your smooth dough ball into a lightly oiled bowl, turning it once to coat. Cover the bowl with a damp kitchen towel or plastic wrap. Let it rest in a warm, draft-free spot for about 1 hour, or until it has roughly doubled in size.
This fermentation is where flavor develops. If your kitchen is cool, it may take a bit longer—be patient, the wait is worth it.
Step 3: Preheat the Skillet and Shape
About 30 minutes into the dough’s rise, place your empty cast iron skillet on the middle rack and preheat your oven to a blazing 500°F (260°C). This is the secret step! When the dough is ready, punch it down gently to release gases.
On a floured surface, roll or stretch it into a circle about 1-2 inches wider than your skillet. Don’t worry about perfection.
Step 4: Assemble the Pizza
Carefully, using heavy-duty oven mitts, remove the scorching hot skillet from the oven. Immediately add the remaining tablespoon of olive oil, swirling to coat the bottom. Quickly but carefully, lay your dough into the skillet—it will sizzle promisingly.
Use your fingers to press it snugly into the corners and slightly up the sides. Now, spread the sauce, sprinkle the cheese, and add your toppings. Work efficiently but safely.
Step 5: Bake, Rest, and Serve
Slide the loaded skillet back into the hot oven. Bake for 14-18 minutes. You’re looking for a deeply golden-brown crust and cheese that’s molten and beautifully spotted with brown.
Believe me, the smell will be incredible. Once out of the oven, let the pizza rest in the pan for a full 5 minutes. This allows the cheese to set slightly for cleaner slices and prevents burnt mouths!
Slice, serve, and step back to admire your masterpiece.
- Temperature is Key: Ensure your oven and skillet are fully preheated. An infrared thermometer can confirm your skillet surface is around 450°F+ before adding the dough for the ultimate sear.
- The Windowpane Test: Don’t skip kneading until the dough passes this test. Gently stretch a small piece; if you can see light through it without it tearing, your gluten is perfectly developed for a chewy, airy crust.
- Topping Strategy: Pre-cook very wet vegetables like mushrooms or zucchini to drive off excess moisture. For pepperoni, placing some underneath the cheese ensures flavor infusion, while some on top gets beautifully crispy.
- The Resting Period: Letting the baked pizza cool for 5 minutes isn’t just for safety. It allows the internal steam to finish cooking the crumb and lets the cheese firm up just enough to hold its shape when sliced.
- Skillet Maintenance: After serving, while the pan is still warm (not hot), scrub it with coarse salt and a paper towel to remove stuck-on bits, then wipe with a thin layer of oil. This keeps your seasoning perfect for next time.
Recipe Variations
- Garlic Herb Crust: Mix 2 tablespoons of melted butter with 2 minced garlic cloves and a teaspoon of Italian seasoning. Brush this mixture onto the crust edge during the last 3 minutes of baking.
- Breakfast Pizza: Swap pizza sauce for a layer of ricotta mixed with a pinch of nutmeg. Top with cooked crumbled sausage, scrambled eggs, and cheddar cheese. Bake as directed.
- White Pizza (Pizza Bianca): Omit the tomato sauce. Spread a base of ricotta or béchamel sauce, then top with mozzarella, fresh garlic, and sautéed spinach or broccoli rabe.
- Spicy Honey & Pepperoni: After baking, drizzle the hot pizza with a mixture of warm honey and a pinch of red pepper flakes for a sweet-heat combination that’s utterly addictive.
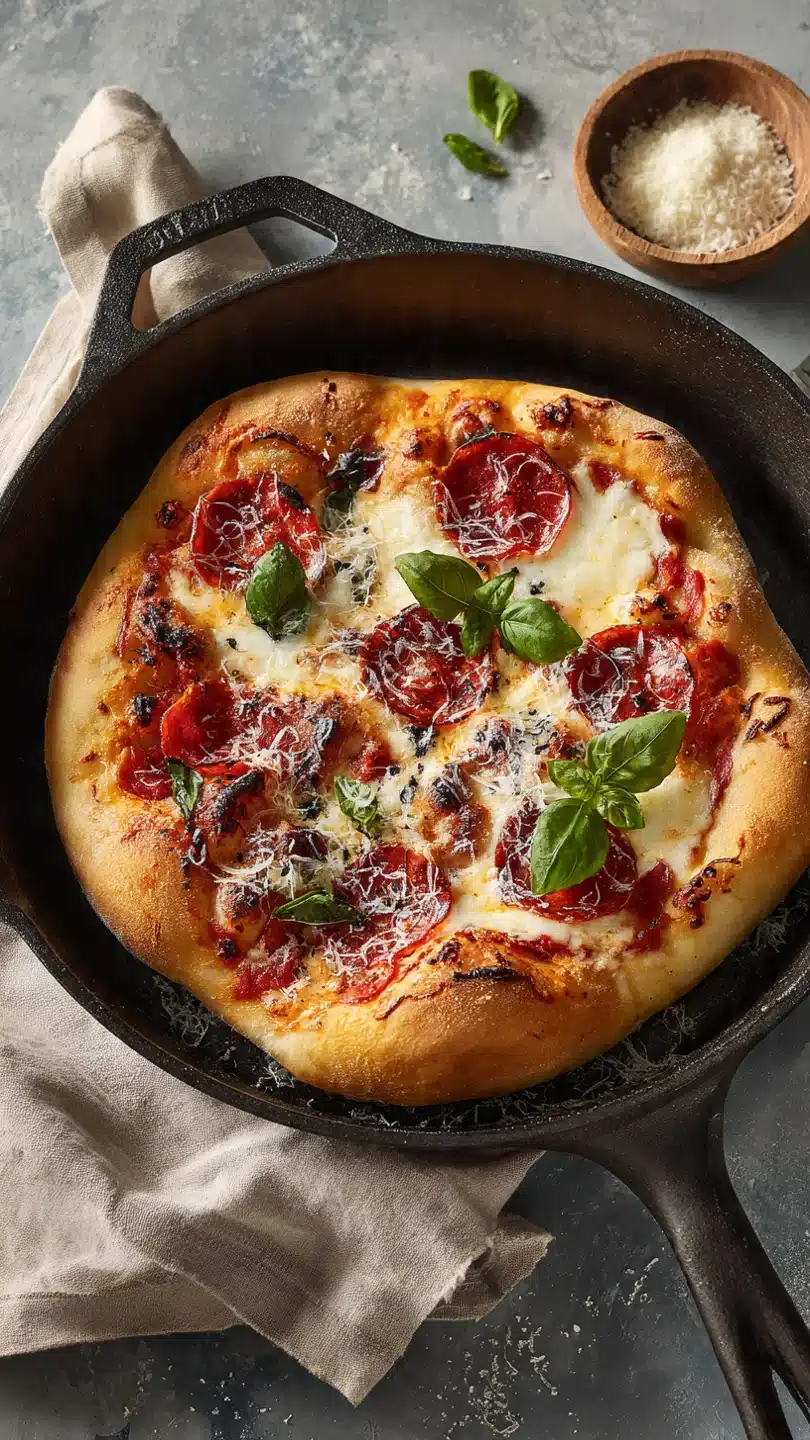
- Margherita-Style: Use a simple sauce of crushed San Marzano tomatoes, top with fresh mozzarella (bocconcini) sliced and patted dry, and finish after baking with fresh basil leaves and a drizzle of good olive oil.
- Barbecue Chicken: Substitute pizza sauce with your favorite barbecue sauce. Top with shredded cooked chicken, red onion, mozzarella, and sharp cheddar. Garnish with cilantro after baking.
- Gluten-Free Option: Use a trusted 1:1 gluten-free flour blend in the dough and add 1/2 teaspoon of xanthan gum if your blend doesn’t include it. The results will be slightly more tender but still deliciously crisp.
What to Serve With This Recipe
This hearty pizza is a complete meal on its own, but it pairs beautifully with a simple arugula salad tossed with lemon juice, olive oil, shaved Parmesan, and a crack of black pepper—the peppery greens cut through the richness. For a more substantial spread, serve it alongside garlic knots made from extra dough or a bowl of marinated olives and artichokes. Beverage-wise, a crisp lager or pilsner is a classic pairing, while a Chianti or Sangiovese red wine complements the tomato sauce beautifully.
For a family movie night, keep it casual with the pizza and some carrot and celery sticks with ranch dressing for dipping.
Storage & Make-Ahead Instructions
- Leftover Storage: Cool leftover pizza completely, then store slices in an airtight container in the refrigerator for up to 4 days. For best texture, reheat in a skillet on the stovetop over medium-low heat with a lid until the cheese melts and the bottom re-crisps.
- Freezing: You can freeze baked pizza slices. Place cooled slices on a parchment-lined baking sheet to freeze solid (about 2 hours), then transfer to a freezer bag for up to 2 months. Reheat from frozen in a 375°F oven until hot.
- Make-Ahead Dough: The dough can be made 1-2 days ahead. After the first rise, punch it down, place it in an oiled container, cover tightly, and refrigerate. About 2 hours before baking, take it out to come to room temperature before shaping.
- Avoid the Microwave: Reheating in a microwave will make the crust soggy. The stovetop skillet or oven methods are essential for restoring that desirable crispy texture.
Frequently Asked Questions
Q: Can I use active dry yeast instead of instant yeast?
A: Absolutely. Use the same amount. Dissolve it and the sugar in the warm water first and let it sit for 5-10 minutes until frothy (“proofing”), then mix with the flour and salt as directed.
Q: My dough didn’t double in size. What happened?
A: Your yeast may be old, or the water was too hot and killed it. The environment may also be too cold. Ensure your yeast is fresh and your water is between 105-110°F.
You can place the bowl in a turned-off oven with the light on for a gentle, warm proofing spot.
Q: Can I make this in a different pan if I don’t have cast iron?
A: The unique results come from the cast iron’s heat. A heavy-duty oven-safe stainless steel skillet is the next best option. Avoid non-stick or ceramic pans, as they cannot handle the high preheat temperature required.
Q: Why is my pizza center soggy?
A: This is usually due to too many wet toppings or too much sauce. Use a light hand with sauce (about 1/2 cup for a 12-inch pizza) and pre-cook vegetables like mushrooms, onions, and peppers to remove excess moisture.
Q: How do I get the pizza out of the skillet to slice it?
A: Let it cool for 5 minutes first. Then, use a thin, flexible spatula to gently loosen the edges and slide the entire pizza onto a large cutting board. The crispy crust should release easily if your skillet is well-seasoned.
Q: Can I double this recipe?
A: Yes, you can double the ingredients to make two pizzas. You will need two skillets, or you can bake them one after the other, re-preheating the skillet for the second pizza.
Q: Is it safe to put a cold skillet in a hot oven?
A: Yes, cast iron is designed for thermal shock. Always start with a room-temperature or warm skillet when preheating it in the oven. Do not place a piping hot skillet under cold water, as that can cause cracking.
Final Thoughts
Mastering cast iron pizza is one of those kitchen skills that pays endless dividends. It transforms simple ingredients into a spectacular, shareable meal that feels special any night of the week. The technique of preheating the skillet is the true chef’s secret, guaranteeing a professional-quality crust that will have everyone asking for your recipe.
I encourage you to make this your own—experiment with toppings, try the variations, and enjoy the process. There’s genuine joy in the ritual of making dough and the triumphant moment you pull that golden pie from the oven. I’d love to hear how your pizza turns out!
Share your creations and any clever topping combinations you discover. Happy cooking
Cast Iron Skillet Pizza
Ingredients
Equipment
Method
- In a large bowl, whisk together the flour, instant yeast, sugar, and salt. Make a well in the center and pour in the warm water and 1 tablespoon of olive oil. Stir with a wooden spoon until a shaggy dough forms, then turn out onto a lightly floured surface.
- Knead the dough for 5-7 minutes until it becomes smooth and elastic. It should pass the windowpane test: gently stretch a small piece; it should thin without tearing. Place in an oiled bowl, cover with a damp towel, and let rise in a warm spot for 1 hour, or until doubled in size.
- Preheat your oven to 500°F (260°C) with a 10- or 12-inch cast iron skillet inside. Punch down the risen dough and shape it into a ball. On a floured surface, roll or stretch it into a circle slightly larger than your skillet.
- Carefully remove the hot skillet from the oven. Add the remaining 1 tablespoon of olive oil, swirling to coat the bottom. Lay the dough into the skillet, pressing it up the sides slightly. Spread the pizza sauce evenly over the dough, then top with cheese and your desired toppings.
- Bake for 14-18 minutes, until the crust is deeply golden and the cheese is bubbly and spotted with brown. Using oven mitts, carefully remove the skillet. Let the pizza cool in the pan for 5 minutes before slicing and serving.


