
Strawberry birthday cake
There’s something truly special about a homemade birthday cake. It’s a centerpiece of celebration, a labor of love, and when it’s a strawberry birthday cake, it brings a burst of joyful color and fresh, sweet flavor to the table. As a professional chef, I’ve baked countless celebration cakes, and this strawberry cake recipe is the one I return to for its reliable, moist crumb and incredible taste that comes from real strawberries, not just extract or gelatin.
Forget the box mix—this from-scratch version is surprisingly straightforward and delivers a stunning, bakery-quality result that will make you the star of any birthday party. Let’s create a cake that’s as memorable as the occasion itself.
This strawberry birthday cake is designed for success and maximum enjoyment. Here’s what makes it stand out:
- Intense Real Strawberry Flavor: We use a generous amount of fresh strawberry puree in both the cake layers and the frosting, ensuring every bite is packed with natural, fruity sweetness, not just artificial pink color.
- Exceptionally Moist & Tender Crumb: The combination of sour cream, butter, and fruit puree creates a cake that stays incredibly soft and moist for days, avoiding the common pitfall of dry birthday cakes.
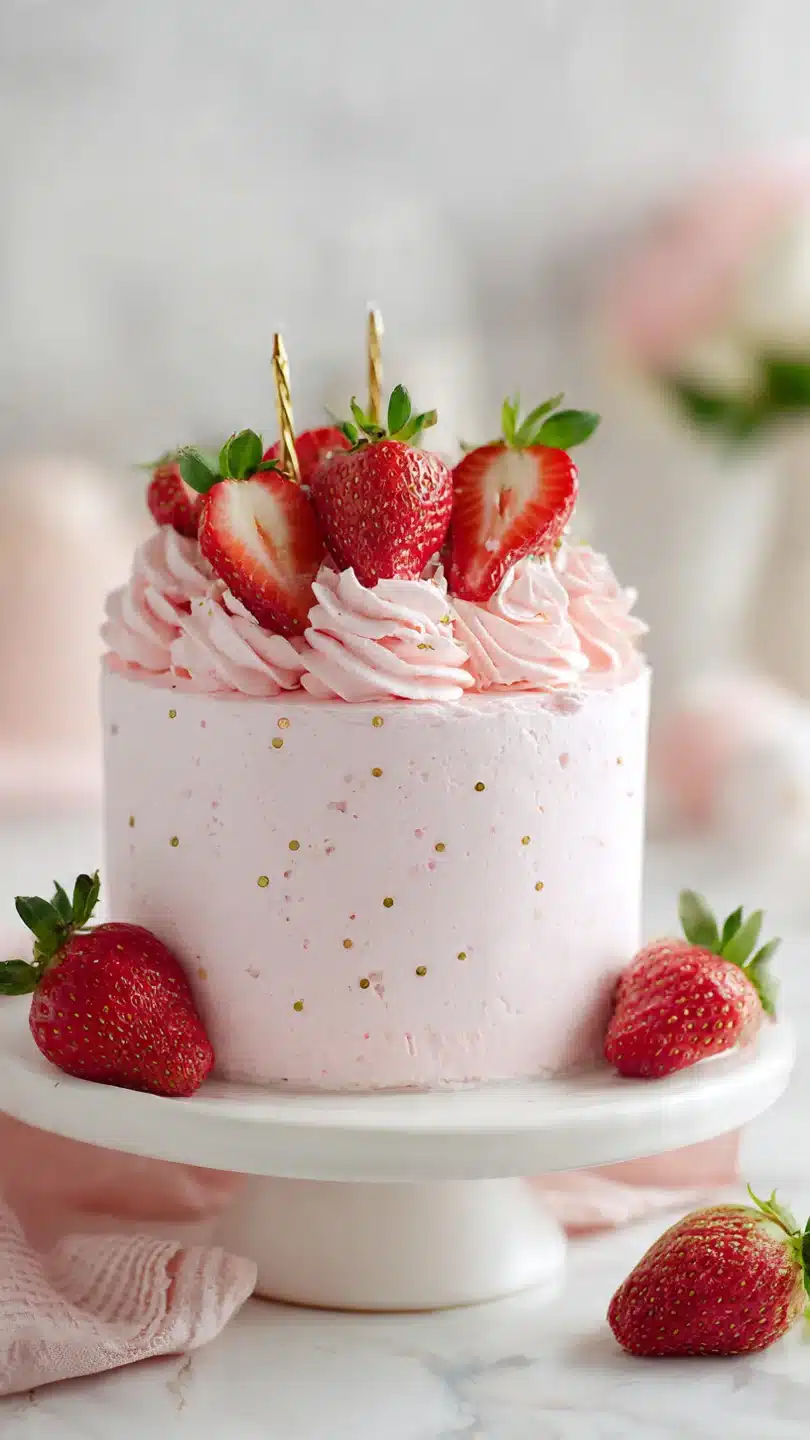
- Stunning Visual Appeal: The natural pink hue from the berries (enhanced with just a hint of optional gel color) and the creamy frosting make for a picture-perfect dessert that looks professionally made.
- Make-Ahead Friendly: You can bake the layers up to two days in advance or freeze them for a month, making party day prep calm and manageable.
- Crowd-Pleasing for All Ages: The flavor is universally loved, striking the perfect balance between sweet and slightly tangy, making it a hit with both kids and adults.
Ingredients You’ll Need
- Gathering quality ingredients is the first step to baking success. Using room-temperature dairy and eggs is non-negotiable here—it ensures proper emulsification for a smooth, high-rising batter. For the strawberries, choose ripe, fragrant ones for the best flavor; frozen and thawed berries work in a pinch, but be sure to drain any excess liquid. Let’s break down what you’ll need.
For the Strawberry Cake Layers:
- All-purpose flour: Spooned and leveled into your measuring cup to avoid a dense cake.
- Baking powder & baking soda: Our dual leaveners for the perfect rise and tender texture.
- Salt: Enhances all the other flavors.
- Unsalted butter & granulated sugar: Creamed together to create the foundation of a light, fluffy cake.
- Eggs: Provide structure and richness.
- Pure vanilla extract: Use the real stuff for the best aroma.
- Sour cream: The secret ingredient for unparalleled moisture and a slight tang.
- Fresh strawberry puree: The star of the show, made from blended fresh berries.
- Whole milk: Adds liquid for the right batter consistency.
- Pink gel food coloring: Optional, but a tiny drop gives a vibrant, consistent pink color.
For the Strawberry Cream Cheese Frosting:
- Cream cheese & unsalted butter: The base for a tangy, creamy, and pipeable frosting.
- Strawberry puree: Reserved from the cake ingredients to flavor the frosting naturally.
- Powdered sugar: Sifted to prevent lumps in your smooth frosting.
- Fresh strawberries: For a simple, elegant garnish on top.

Note: You’ll find the complete list of ingredients, along with their exact measurements, in the printable recipe card at the bottom of this post.
Kitchen Equipment Needed
You don’t need specialized tools, but a few key items will make the process smoother. A stand mixer or a sturdy hand mixer is essential for properly creaming the butter and sugar—a step you can’t rush. Two 9-inch round cake pans are standard, and lining the bottoms with parchment paper is my foolproof insurance policy for perfect release.
An offset spatula makes frosting the cake a breeze, and a wire cooling rack is crucial for allowing the cakes to cool completely before you assemble, preventing a melted frosting disaster.
How to Make Strawberry Birthday Cake Recipe
Step 1: Prep Your Pans and Strawberry Puree
Start by preheating your oven to 350°F (175°C). This ensures a consistent temperature for even baking. Grease your two 9-inch round cake pans thoroughly with butter or baking spray, then line the bottoms with circles of parchment paper.
Trust me, this extra step guarantees your beautiful cakes will release without a crumb left behind. For the puree, hull about 1 1/2 cups of fresh strawberries and blend them in a blender or food processor until completely smooth. You’ll need 1 cup for the batter and will reserve 1/4 cup for the frosting.
Step 2: Combine Dry Ingredients and Cream Butter & Sugar
In a medium bowl, whisk together your flour, baking powder, baking soda, and salt. This aerates the dry ingredients and ensures the leaveners are evenly distributed. Now, in the bowl of your stand mixer fitted with the paddle attachment, beat the room-temperature butter and granulated sugar together on medium-high speed.
Believe me, don’t skimp on this step—cream it for a full 4-5 minutes until the mixture is very pale, fluffy, and almost white. This incorporates air, which is vital for your cake’s structure and lift.
Step 3: Build the Wet Ingredient Base
With the mixer on low speed, add your room-temperature eggs one at a time, letting each fully incorporate before adding the next. This prevents the batter from breaking. Beat in the vanilla extract.
Next, add the sour cream and mix until just combined. Tip from me: Don’t worry if the mixture looks a bit curdled at this point; the addition of the dry ingredients will bring it all together beautifully.
Step 4: Alternate Dry and Wet Ingredients
Reduce your mixer speed to low. Add about one-third of your flour mixture to the butter bowl, mixing just until combined. Follow with half of the milk, then another third of flour, the full 1 cup of strawberry puree, the final third of flour, and finally the remaining milk.
Mix each addition only until the last streaks disappear. Over-mixing once the flour is added develops gluten, leading to a tough cake. Now, fold in a drop or two of pink gel food coloring if you want a more vibrant hue.
Step 5: Bake and Cool Completely
Divide the batter evenly between your prepared pans. I like to use a kitchen scale for precision, but you can also eyeball it. Smooth the tops with a spatula and bake for 28-32 minutes.
The cakes are done when a toothpick inserted into the center comes out clean and the top springs back when lightly pressed. Let them cool in the pans for 15 minutes only—this sets the structure. Then, carefully turn them out onto a wire rack, peel off the parchment, and let them cool completely.
Patience is key; frosting a warm cake is a recipe for a sugary puddle.
Step 6: Make Frosting, Assemble, and Serve
For the frosting, beat the cold cream cheese and room-temperature butter together on medium speed until perfectly smooth and creamy, about 3 minutes. Beat in the reserved strawberry puree, vanilla, and salt. With the mixer on low, gradually add the sifted powdered sugar until you reach your desired sweetness and a spreadable consistency.
Place one cooled cake layer on your serving plate, spread a generous amount of frosting over it, top with the second layer, and frost the top and sides. Step back and admire your work! Garnish with fresh strawberries just before serving for the freshest look.
A few chef-driven insights will elevate your cake from good to exceptional. Ingredient Temperature is Critical: Room-temperature butter, eggs, and sour cream emulsify seamlessly into the batter, trapping air for a light texture. Cold ingredients lead to a dense, sunken cake.
Don’t Over-Puree the Strawberries: Blend just until smooth. Over-blending can incorporate too much air and affect the puree’s density. The Toothpick Test is Your Best Friend: Start checking your cakes at the 28-minute mark.
Overbaking is the enemy of moisture. Chill for Clean Slices: For picture-perfect portions, pop the fully frosted cake into the refrigerator for 20-30 minutes before slicing with a warm, dry knife.
Recipe Variations
- This versatile recipe is a wonderful canvas for creativity. Here are some tested variations to suit different tastes and occasions.
- Lemon-Strawberry Twist: Add the zest of one lemon to the cake batter and use lemon juice instead of milk for a bright, tangy contrast to the sweet berries.
- Strawberry Shortcake Style: For a less sweet option, swap the cream cheese frosting for freshly whipped cream stabilized with a little powdered sugar. Layer with sliced fresh strawberries.
- Chocolate-Dipped Strawberry Cake: Add 1/2 cup of sifted cocoa powder to the dry ingredients, replacing an equal amount of flour. Frost with the strawberry cream cheese frosting or a chocolate ganache.
- Mini Layer Cakes or Cupcakes: Divide the batter among three 6-inch pans for a taller, elegant cake, or into cupcake liners (bake for 18-22 minutes). This recipe yields about 24 cupcakes.
- Dairy-Free Adaptation: Use high-quality vegan butter sticks, plant-based milk and sour cream, and a dairy-free cream cheese alternative. The structure and flavor translate very well.
- “Very Berry” Version: Replace half of the strawberry puree with pureed raspberries for a more complex, tart berry flavor profile.
What to Serve With This Recipe
This strawberry birthday cake is a celebratory centerpiece that needs little accompaniment. For a classic birthday party spread, serve it alongside a scoop of high-quality vanilla bean ice cream or a dollop of lightly sweetened whipped cream. If you’re planning a full dessert table, complement its fruity sweetness with a platter of assorted macarons, some dark chocolate truffles, or a simple fruit salad.
Beverage pairings are easy: champagne or prosecco for a toast, cold milk for the kids, or a pot of lightly caffeinated Earl Grey tea for the adults. It’s perfect for spring and summer gatherings, baby showers (in pink or blue!), and of course, any birthday celebration.
Storage & Make-Ahead Instructions
- Proper storage ensures your cake tastes as good on day three as it did fresh from the kitchen. Refrigerator Storage: Due to the cream cheese frosting, store the assembled cake in an airtight container or cake carrier in the refrigerator for up to 5 days. Freezing for Longevity: You can freeze the unfrosted, cooled cake layers tightly wrapped in plastic wrap and then foil for up to 2 months. Thaw overnight in the refrigerator before frosting. The frosting itself can also be made ahead and refrigerated for up to 3 days; let it come to room temperature and re-whip before using. Make-Ahead Strategy: For stress-free party prep, bake and cool the layers up to 2 days in advance. Wrap them tightly in plastic wrap and store at room temperature. Make the frosting 1 day ahead. Assemble and frost the cake the day you plan to serve it for the freshest presentation.
Frequently Asked Questions
Q: Can I use frozen strawberries?
A: Absolutely. Thaw frozen strawberries completely, drain any excess liquid in a fine-mesh strainer, and then puree them. The excess liquid can throw off your batter’s moisture balance, so draining is key.
Q: Why is my cake dense and gummy?
A: This usually points to over-mixing the batter after the flour was added, or using cold ingredients that didn’t emulsify properly. Always mix on low speed once the dry ingredients are in the bowl and ensure everything is at room temperature.
Q: Can I make this into a sheet cake?
A: Yes. Pour the batter into a greased and parchment-lined 9×13-inch pan. The baking time will increase to about 35-40 minutes.
Use the toothpick test for doneness.
Q: My frosting is too soft/runny. How can I fix it?
A: If your frosting is too soft, the butter may have been too warm or the cream cheese too soft. Pop the whole bowl of frosting into the refrigerator for 20-30 minutes to firm up, then re-whip. You can also add a bit more sifted powdered sugar, a quarter cup at a time.
Q: How do I get a really pink cake without food coloring?
A: The natural color from strawberries can be subtle. For a vibrant pink without artificial dyes, try adding 1-2 tablespoons of freeze-dried strawberry powder (made by grinding freeze-dried berries into a fine dust) to your dry ingredients.
Q: Is there a way to make this cake less sweet?
A: You can reduce the sugar in the cake by 1/4 cup without major structural issues. For the frosting, use the lower end of the powdered sugar range (4 cups) and consider folding in an extra 1/4 cup of strawberry puree to balance the sweetness with more fruit flavor.
Q: How far in advance can I frost the cake?
A: You can fully assemble and frost the cake 1 day ahead. Store it, covered, in the refrigerator. Let it sit at room temperature for about 60-90 minutes before serving to take the chill off and allow the frosting to soften to its ideal texture.
Final Thoughts
This strawberry birthday cake is more than just a dessert; it’s a testament to the joy of baking from scratch. The process of transforming simple, fresh ingredients into a stunning, flavorful centerpiece is incredibly rewarding. With its moist crumb, tangy-sweet frosting, and beautiful appearance, this cake is guaranteed to earn you compliments and create a memorable moment for any birthday celebrant.
I’ve poured years of professional testing into this recipe to make it as foolproof and delicious as possible. So, preheat your oven, gather your strawberries, and bake with confidence. I’d love to hear how your celebration turns out—share your masterpiece online and tag me!
Happy baking, and happiest of birthdays
Ultimate Strawberry Birthday Cake
Ingredients
Equipment
Method
- Preheat oven to 350°F (175°C). Grease and line the bottoms of two 9-inch round cake pans with parchment paper. To make the strawberry puree, hull and blend 1 1/2 cups of fresh strawberries until completely smooth. You’ll need 1 cup for the cake batter and will reserve 1/4 cup for the frosting.
- In a medium bowl, whisk together the flour, baking powder, baking soda, and salt. In the bowl of a stand mixer fitted with the paddle attachment, beat the room temperature butter and granulated sugar on medium-high speed for 4-5 minutes until very light and fluffy. Scrape down the bowl.
- With the mixer on low, add the eggs one at a time, fully incorporating each before adding the next. Beat in the vanilla extract. Add the sour cream and mix until combined. The mixture may look slightly curdled, which is normal.
- Add the dry ingredients in three additions, alternating with the milk and the 1 cup of strawberry puree, beginning and ending with the dry ingredients. Mix on low speed just until the last streaks of flour disappear. Fold in optional food coloring if using. Divide the batter evenly between the prepared pans.
- Bake for 28-32 minutes, or until a toothpick inserted into the center comes out clean and the cakes spring back when lightly pressed. Let the cakes cool in the pans for 15 minutes, then turn them out onto a wire rack to cool completely before frosting.
- For the frosting, beat the cold cream cheese and room temperature butter together on medium speed until completely smooth and creamy, about 3 minutes. Beat in the reserved 1/4 cup strawberry puree, vanilla, and salt. With the mixer on low, gradually add the sifted powdered sugar until the desired sweetness and consistency is reached. Frost and fill the cooled cake layers, then garnish with fresh strawberries.


