
Strawberry pound cake recipes
There’s something undeniably special about a classic pound cake. Its dense, velvety crumb and rich, buttery flavor are a testament to simple ingredients done right. But when you fold in a generous amount of sweet, juicy strawberries, you elevate that timeless treat into a celebration of the season.
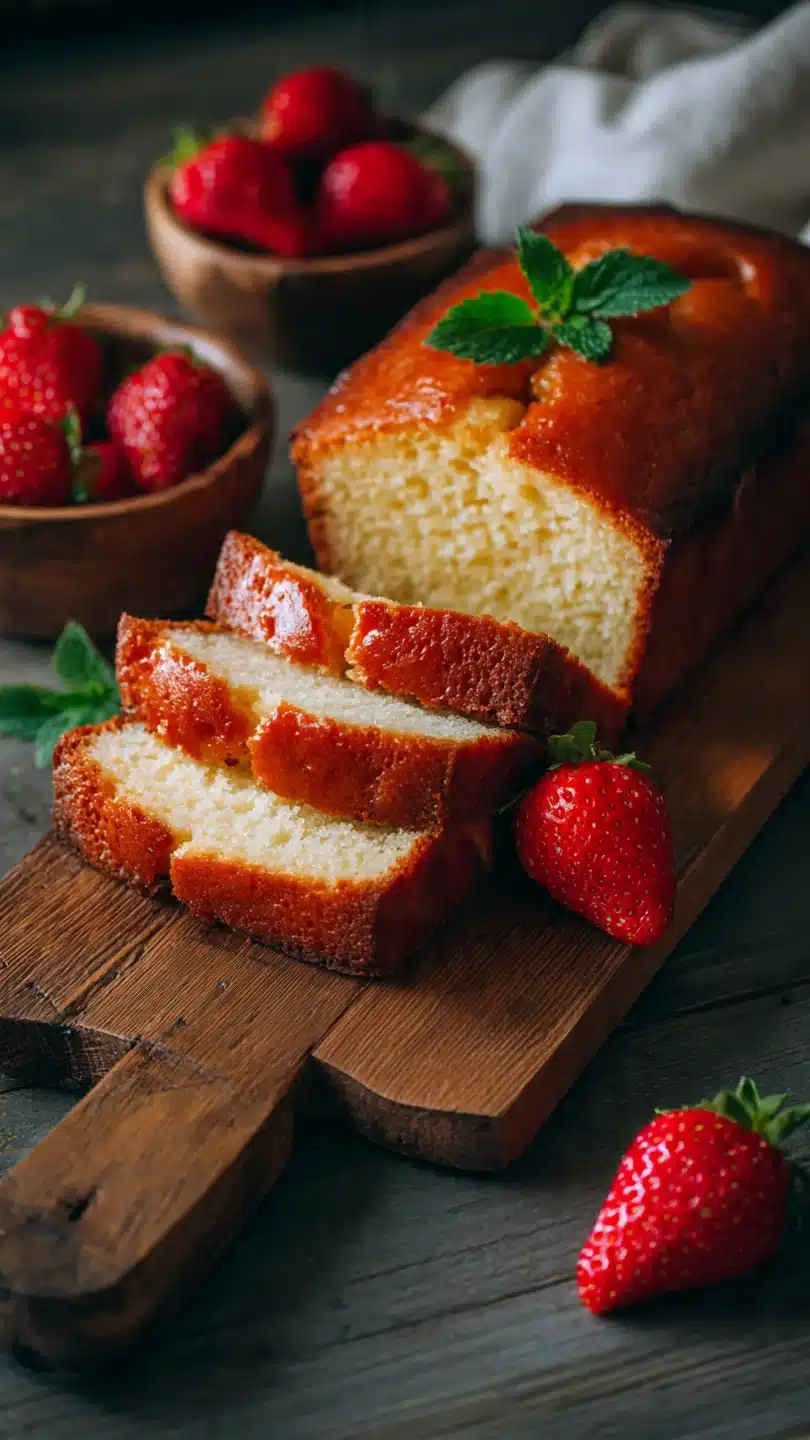
This strawberry pound cake recipe delivers the perfect marriage of a tender, moist cake base and bursts of fresh berry flavor in every single bite. It’s the kind of dessert that looks impressive on a cake stand but is straightforward enough for a weekend baking project. Let’s create a cake that’s sure to become a new favorite.
This recipe is the result of multiple tests in my kitchen, designed to solve common issues like soggy berries or a dry crumb. Here’s what makes it a keeper:
- Perfect Berry Distribution: By coating the diced strawberries in a little flour, they stay suspended throughout the batter instead of sinking to the bottom.
- Unbeatable Moisture: The combination of sour cream and a careful mixing method guarantees a cake that stays supremely moist for days.
- Simple, Accessible Ingredients: You likely have most of these pantry staples on hand already, with fresh strawberries as the star.
- Versatile for Any Occasion: It’s elegant enough for a dinner party, sturdy enough for a picnic, and comforting enough for an afternoon snack with tea.
- Make-Ahead Friendly: This cake’s flavor actually improves after a day, making it a fantastic do-ahead dessert for busy hosts.
Ingredients You’ll Need
- Gathering quality ingredients is the first step to baking success. For this cake, precision and temperature matter. Using room-temperature dairy and eggs is non-negotiable—it ensures proper emulsification for a smooth, homogeneous batter that bakes up evenly. I recommend real unsalted butter and full-fat sour cream for the richest flavor and texture. The fresh strawberries should be ripe and fragrant, but not mushy. If they’re very juicy, you can pat them dry gently after dicing. Let’s break down what you’ll need.
- Fresh Strawberries: The star of the show. Hull and dice them into small, pea-sized pieces for even distribution.
- All-Purpose Flour: The structural backbone. Be sure to measure by spooning flour into the cup and leveling it off for accuracy.
- Baking Powder & Baking Soda: Our leavening duo. They provide the gentle lift needed for this dense cake.
- Salt: A flavor enhancer that balances the sweetness and brightens the berry flavor.
- Unsalted Butter: For superior flavor control. It must be softened to the consistency of cool peanut butter.
- Granulated Sugar: Sweetens and, when creamed properly with butter, helps create a light crumb.
- Large Eggs: They provide structure, richness, and moisture. Room temperature eggs incorporate much more easily.
- Pure Vanilla Extract: Use the real stuff for the best aromatic background note.
- Sour Cream: My secret weapon for incredible moisture and a slight tang that complements the berries.
- Whole Milk: Adds additional liquid for the perfect batter consistency.

Note: You’ll find the complete list of ingredients, along with their exact measurements, in the printable recipe card at the bottom of this post.
Kitchen Equipment Needed
You don’t need any specialty tools, but a few key items will make the process smoother. A stand mixer is fantastic for the crucial creaming step, but a sturdy hand mixer will work perfectly. The pan choice is important: a classic Bundt pan gives a beautiful presentation, while a standard loaf pan is a great alternative.
Just be sure to grease and flour whatever pan you use meticulously—those strawberry pieces love to stick. You’ll also need mixing bowls, a whisk, a spatula for folding, and a wire rack for cooling. A long wooden skewer is more reliable than a toothpick for testing doneness in such a deep cake.
How to Make Strawberry Pound Cake Recipe
Step 1: Prep Your Pan and Ingredients
Before you start mixing, get organized. Preheat your oven to 325°F—this slightly lower temperature is key. It allows the center of this dense cake to cook through without over-browning the edges or burning the strawberries near the pan.
Generously grease and flour your Bundt or loaf pan, getting into every nook. Then, whisk your dry ingredients—flour, baking powder, baking soda, and salt—in a bowl. Finally, toss the diced strawberries with that reserved two tablespoons of flour.
This creates a light barrier that soaks up excess juice and helps them stay put in the batter. Trust me, this simple trick makes all the difference.
Step 2: Cream Butter and Sugar to Perfection
This is the most important step for texture. In your mixer bowl, combine the softened butter and sugar. Beat them on medium-high speed for a full 4 to 5 minutes.
You’re looking for the mixture to become extremely pale, fluffy, and almost white. This isn’t just mixing; you’re beating tiny air bubbles into the fat. These air bubbles will expand in the oven, giving your pound cake its fine, tender crumb rather than a heavy, dense one.
Scrape down the bowl halfway through to ensure everything is incorporated evenly.
Step 3: Incorporate Eggs and Vanilla
With the mixer now on low speed, add your room-temperature eggs one at a time. Beat well for about 30 seconds after each addition before adding the next, and scrape the bowl as needed. This slow, steady incorporation prevents the batter from breaking or curdling.
Once all the eggs are in, mix in the vanilla extract. At this stage, the batter may look a bit grainy or separated—that’s completely normal and will resolve once you add the dry ingredients. Tip from me: Room-temperature eggs blend in seamlessly; cold eggs can cause the batter to curdle and result in a less uniform texture.
Step 4: Combine Wet and Dry Ingredients
Now, we alternate adding the dry mixture and the sour cream/milk mixture to the butter base. Start with about one-third of the flour mixture, mix on low just until combined, then add half of the sour cream and milk. Repeat, ending with the final portion of flour.
Mix only until the last streaks of flour disappear. Overmixing now would develop the gluten in the flour, leading to a tough, chewy cake. Finally, use a spatula to gently fold in the flour-coated strawberries.
A light hand here keeps the berries intact.
Step 5: Bake Low and Slow
Transfer the thick, studded batter to your prepared pan and smooth the top. Give the pan a few firm taps on the counter to settle the batter and release any large air pockets. Place it in the center of your preheated oven.
Now, practice patience. A pound cake bakes slowly. It will need 60 to 70 minutes in a Bundt pan, or slightly longer in a loaf pan.
The cake is done when it’s golden brown, has pulled away slightly from the sides of the pan, and a long skewer inserted into the deepest part comes out clean or with a few dry crumbs.
Step 6: Cool Completely Before Serving
Resist the urge to turn the cake out immediately! Let it cool in the pan on a wire rack for 20 minutes. This allows the structure to firm up so it holds its beautiful shape.
Then, invert the pan onto the rack and lift it away. Allow the cake to cool completely, which will take about 2 hours. Believe me, slicing into a warm pound cake is tempting, but it will be crumbly and the flavors won’t have fully settled.
The wait rewards you with perfect, clean slices and the full, rich taste of butter and berry.
Drawing from years in pastry kitchens, here are the insights that will guarantee your success every time.
- Ingredient Temperature is Critical: True room-temperature ingredients (70°F) blend smoothly and create an emulsion that traps air. Cold ingredients will seize up and result in a dense cake. Take your butter, eggs, sour cream, and milk out at least 1-2 hours before baking.
- The Creaming Rule: Don’t shortcut the creaming time. Five full minutes of beating the butter and sugar is the foundation for a light texture. The mixture should be noticeably paler and fluffy.
- Avoid Overmixing After Adding Flour: Once the flour is introduced, mix only until the last dry streak disappears. Overworking the gluten is the most common cause of a tough, rubbery pound cake.
- Test for Doneness Correctly: Use a long wooden skewer, not a toothpick. A toothpick isn’t long enough to reach the true center of a deep Bundt cake. Look for a clean skewer or one with a few dry crumbs attached.
- Cooling is Part of the Process: The 20-minute cool in the pan is essential for the cake’s structure. Cooling completely before slicing allows the crumb to set and the flavors to meld beautifully.
Recipe Variations
- This classic recipe is wonderfully adaptable. Once you’ve mastered the base, try these delicious twists.
- Lemon-Strawberry: Add the zest of two lemons to the butter-sugar mixture during creaming. The bright citrus cuts through the richness and pairs magically with the berries.
- Almond Strawberry: Replace the vanilla extract with 1 teaspoon of pure almond extract. You can also fold in 1/2 cup of sliced almonds with the strawberries for added crunch.
- Glazed Version: For a fancier finish, whisk together 1 cup of powdered sugar with 2-3 tablespoons of strawberry puree or milk and a splash of vanilla until smooth. Drizzle over the cooled cake.
- Mixed Berry: Substitute half of the strawberries with an equal amount of raspberries or blueberries. Be sure to coat all berries in flour.
- Cream Cheese Swirl: Before baking, dollop 4 ounces of softened, sweetened cream cheese over the batter in the pan and use a knife to swirl it gently for a marbled effect.
What to Serve With This Recipe
This strawberry pound cake is a delightfully versatile dessert. For a simple, elegant presentation, dust it with a snowfall of powdered sugar just before serving. A dollop of freshly whipped cream or a scoop of vanilla bean ice cream turns a slice into a decadent treat.
For a brunch or afternoon tea, serve it plain with a pot of Earl Grey or a light herbal tea. It also makes a fantastic component of a berry-themed dessert spread alongside a fresh fruit salad or individual strawberry shortcakes. It’s the perfect bake for spring celebrations, Mother’s Day, Fourth of July picnics, or simply as a sweet end to a family dinner.
Storage & Make-Ahead Instructions
- Proper storage ensures your cake stays moist and delicious.
- Room Temperature Storage: Once completely cool, wrap the cake tightly in plastic wrap or store in an airtight container. It will stay fresh and moist at room temperature for up to 2 days.
- Refrigerator Storage: For longer storage, refrigerate the wrapped cake for up to 5 days. Let slices come to room temperature for about 30 minutes before serving for the best texture and flavor.
- Freezing for Later: This cake freezes exceptionally well. Wrap the completely cooled cake (or individual slices) tightly in plastic wrap, then in a layer of aluminum foil or a freezer bag. Freeze for up to 3 months. Thaw overnight in the refrigerator or at room temperature for several hours.
- Make-Ahead Strategy: This is an ideal make-ahead dessert. Bake it the day before you need it. The flavors deepen and the texture becomes even more moist overnight. Simply store it wrapped at room temperature.
Frequently Asked Questions
Q: Can I use frozen strawberries instead of fresh?
A: I don’t recommend it for this specific recipe. Frozen strawberries release too much water when thawed, which can make the batter too wet and lead to a gummy texture around the berry pieces. For best results, stick with fresh, ripe strawberries.
Q: Why did my strawberries sink to the bottom of the cake?
A: This usually happens if they weren’t coated in flour, if they were cut too large, or if the batter was too thin. Ensure you dice them small, toss them thoroughly in the reserved flour, and that your batter is thick (which it will be if your ingredients were at the correct temperature).
Q: My cake is browning too fast on top but isn’t cooked inside. What should I do?
A: This can happen if your oven runs hot. Tent the cake loosely with aluminum foil for the remainder of the baking time. Next time, try lowering your oven temperature by 25°F and extending the bake time slightly.
An oven thermometer is a baker’s best friend for accuracy.
Q: Can I make this recipe into cupcakes or muffins?
A: Absolutely! Divide the batter into lined muffin cups, filling each about 2/3 full. Bake at 350°F for 20-25 minutes, or until a tester comes out clean.
The yield will be about 18-24 cupcakes.
Q: What’s the best way to get a clean slice of pound cake?
A: Use a sharp, serrated knife and a gentle sawing motion. For the cleanest cuts, you can briefly run the knife under hot water and wipe it dry between slices.
Q: My cake is very dense. What went wrong?
A: A dense cake is typically caused by one of three things: ingredients that were not at room temperature, under-creaming the butter and sugar, or overmixing the batter once the flour was added. Ensure you follow the temperature and mixing instructions closely.
Q: Can I reduce the sugar in this recipe?
A: You can reduce it by up to 1/4 cup without major issues, but sugar contributes to moisture and tenderness beyond just sweetness. Reducing it more may result in a drier, less tender crumb.
Final Thoughts
This strawberry pound cake embodies what I love most about baking: transforming a handful of simple, wholesome ingredients into something truly special and shareable. It’s a recipe built on technique rather than complexity, rewarding a little patience with a incredibly moist, buttery cake packed with sweet berry flavor. Whether you’re baking it for a special occasion or just because, I hope it brings as much joy to your kitchen as it has to mine over the years.
I’d love to hear how it turns out for you—share your results and any creative variations you try. Happy baking
Classic Strawberry Pound Cake
Ingredients
Equipment
Method
- Preheat your oven to 325°F (165°C). Thoroughly grease and flour a 10-inch bundt pan or a 9×5-inch loaf pan, tapping out any excess flour. In a medium bowl, whisk together the 3 cups of flour, baking powder, baking soda, and salt. Set aside. In a small bowl, toss the finely diced strawberries with the 2 tablespoons of flour until evenly coated. This crucial step prevents the berries from sinking to the bottom during baking.
- In the bowl of a stand mixer fitted with the paddle attachment, cream the room-temperature butter and granulated sugar together on medium-high speed for 4-5 minutes. Trust me, this is not the time to rush. The mixture should become very pale, fluffy, and almost doubled in volume. This step incorporates air, which is essential for the cake’s signature fine, tender crumb.
- With the mixer on low speed, add the eggs one at a time, beating well after each addition and scraping down the sides of the bowl as needed. Mix in the vanilla extract. The batter may look slightly curdled after adding the eggs—this is normal and will come together when you add the dry ingredients.
- Alternate adding the dry flour mixture and the wet ingredients (sour cream and milk) to the butter mixture. Start and end with the dry ingredients, mixing on low speed just until combined after each addition. Tip from me: Overmixing at this stage develops gluten and leads to a tough cake. Gently fold in the flour-coated strawberries with a spatula until just distributed.
- Spoon the thick batter into your prepared pan, smoothing the top with a spatula. Tap the pan firmly on the counter a few times to release any large air bubbles. Bake for 60-70 minutes (or 75-85 minutes for a loaf pan), or until a long wooden skewer inserted into the center comes out clean with just a few moist crumbs.
- Let the cake cool in the pan on a wire rack for 20 minutes. This allows the structure to set so it doesn’t break when you turn it out. Then, carefully invert the pan onto the rack and lift it away. Allow the cake to cool completely before slicing. Believe me, the wait is worth it for clean slices and fully developed flavor.


