
Pizza sliders
There’s something magical about the moment a tray of hot, cheesy, golden-brown pizza sliders comes out of the oven. The aroma of garlic butter and baking bread fills the kitchen, and you know you’re about to make everyone very happy. As a chef, I’ve served countless fancy canapés, but for pure, reliable, crowd-pleasing power, nothing beats a well-made slider.
This recipe is my perfected version—a hybrid of soft Hawaiian rolls, rich pizza toppings, and a crackly, savory crust that comes together in minutes. It’s the ultimate solution for game day, potlucks, or when the kids declare it’s a “fun dinner” night.
- Maximum Flavor, Minimal Effort: This recipe turns simple pantry staples into a show-stopping dish with just 15 minutes of hands-on prep. The layering technique does all the work.
- Guaranteed Crowd-Pleaser: The combination of sweet rolls, savory pepperoni, and melty cheese appeals to all ages. I’ve never brought these to a gathering without someone asking for the recipe.
- Perfectly Portable: These sliders hold their shape beautifully, making them ideal for potlucks, picnics, or tailgating. They taste great warm or at room temperature.
- Endlessly Customizable: Think of this as a template. Don’t like pepperoni? Use cooked sausage, veggies, or ham. I’ll share all my favorite tested variations below.
- Make-Ahead Friendly: You can assemble the entire tray hours ahead, cover it, and refrigerate it until you’re ready to bake. It’s a host’s secret weapon.
Ingredients You’ll Need
Let’s gather our ingredients—this is where simple components come together to create something greater than the sum of its parts. The key is quality where it counts.
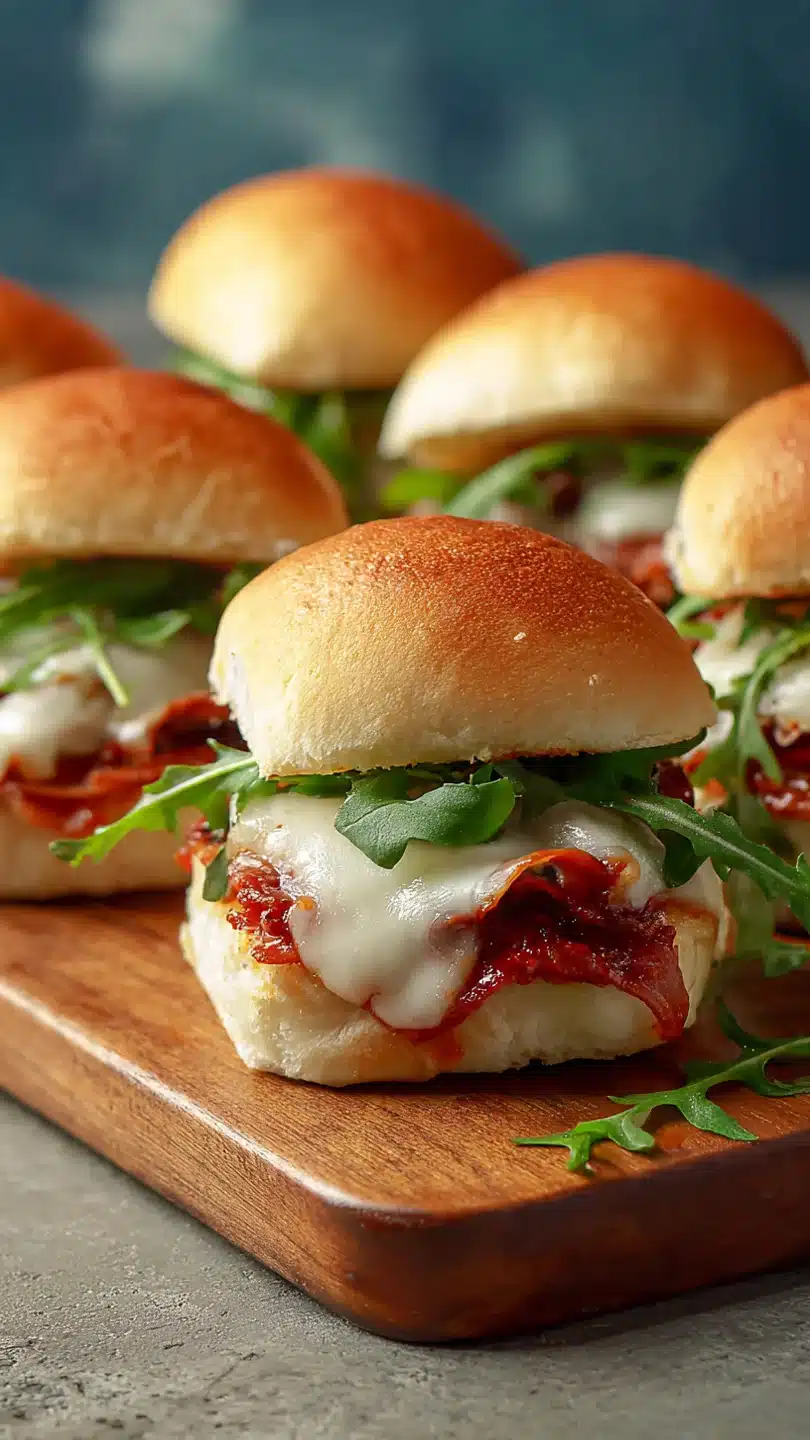
For the sliders themselves, you’ll need a package of Hawaiian sweet rolls. Trust me, their slight sweetness is the perfect counterpoint to the salty pizza flavors. Please buy them in the connected slab; it makes assembly infinitely easier.
For the cheese, an 8-ounce block of mozzarella that you grate yourself is my professional recommendation. Pre-shredded cheese contains cellulose to prevent clumping, which can make your melt less smooth. You’ll also need pepperoni and about a cup of pizza sauce.
Choose a sauce you enjoy eating on its own.
The secret weapon is the garlic-parmesan butter wash. You’ll mix melted butter with garlic powder, Italian seasoning, and grated Parmesan. This creates a glossy, flavorful, slightly crisp top that elevates these from simple sandwiches to a baked masterpiece.
A pinch of red pepper flakes is optional but adds a nice background warmth.

Note: You’ll find the complete list of ingredients, along with their exact measurements, in the printable recipe card at the bottom of this post.
Kitchen Equipment Needed
You don’t need any specialty gear. A 9×13 inch baking dish is perfect, though a rimmed baking sheet lined with parchment paper works too. A sharp serrated knife is essential for cleanly slicing the rolls in half and cutting the finished product.
A pastry brush helps evenly distribute the garlic butter, and a box grater is best if you’re grating your own cheese. That’s really it!
How to Make Pizza Sliders Recipe
Step 1: Prepare the Base
Preheat your oven to 350°F (175°C). Take your slab of Hawaiian rolls and, using your serrated knife, slice the entire rectangle in half horizontally. You should have one large top bun and one large bottom bun.
Believe me, doing this while they’re connected is the only way to go. Place the bottom half directly into your baking dish. This is your foundation.
Step 2: Layer the Fillings
Now for the fun part: building the flavors. Spread about 3/4 cup of the pizza sauce evenly over the bottom rolls. Sprinkle on half of your grated mozzarella—this first layer acts as a barrier to keep the bottom bun from getting soggy.
Next, layer on all your pepperoni slices, followed by the remaining cheese. Dot the top with the last 1/4 cup of sauce. Tip from me: keeping some sauce on top helps the top bun adhere and adds moisture.
Gently place the top half of the rolls back on.
Step 3: Apply the Flavor Bomb
In a small bowl, whisk together the melted butter, garlic powder, Italian seasoning, and grated Parmesan until it forms a cohesive mixture. Using your pastry brush, generously and patiently brush this all over the top of the rolls. Take your time and let it seep down into all the nooks and seams.
This buttery layer is what creates that irresistible, fragrant, golden crust. Sprinkle with red pepper flakes now if using.
Step 4: Bake to Perfection
Here’s a critical technique: cover the entire baking dish tightly with aluminum foil. This creates a steamy environment that heats the sliders through without over-browning the top. Bake covered for 15 minutes.
Then, remove the foil and bake for another 5-7 minutes. You’re looking for the cheese to be visibly bubbly around the edges and the top to be a perfect, even golden brown.
Step 5: Rest, Slice, and Serve
As tempting as it is to dive right in, you must let the sliders rest for 5 minutes after pulling them from the oven. Trust me, this allows the molten cheese to set just enough so that when you cut them, they hold their shape beautifully. Use your serrated knife to slice along the pre-scored lines into 12 individual sliders.
Serve them warm and watch them disappear.
- Grate Your Own Cheese: I know it’s an extra step, but it makes a significant difference in the melt quality. Pre-shredded cheese contains anti-caking agents that can leave a grainy texture.
- The Butter Wash is Key: Don’t just drizzle the butter mixture; brush it on thoroughly. Getting it into the seams ensures every bite of the top crust is flavorful.
- Resting is Non-Negotiable: Cutting into steaming hot sliders will cause a cheese avalanche and squished rolls. Five minutes of patience yields perfect, photogenic sliders.
- Check Your Oven: All ovens have hot spots. If one corner is browning faster than the rest, rotate the pan halfway through the uncovered baking time.
Recipe Variations
- Meat Lover’s: Add a layer of cooked, crumbled Italian sausage and chopped cooked bacon along with the pepperoni.
- Veggie Supreme: Omit the pepperoni and layer on sautéed sliced mushrooms, bell peppers, onions, and black olives. Blot your veggies well to remove excess moisture.
- BBQ Chicken: Swap the pizza sauce for your favorite BBQ sauce. Use shredded cooked chicken and a mix of mozzarella and cheddar cheese. Top with thinly sliced red onion before baking.
- Breakfast Sliders: Use cooked scrambled eggs, diced ham, and cheddar cheese. Substitute the garlic butter with a mixture of melted butter, a touch of maple syrup, and everything bagel seasoning.
- White Pizza: Skip the red sauce. Spread the bottom roll with a mixture of ricotta cheese, minced garlic, and spinach. Top with mozzarella and a sprinkle of nutmeg.
- Gluten-Free Option: Use your favorite gluten-free slider buns or rolls. You may need to adjust baking time slightly as GF bread can dry out faster.
What to Serve With This Recipe
These sliders are incredibly versatile. For a game day spread, pair them with crispy oven-baked potato wedges, a fresh vegetable platter with ranch dip, and a big pot of hearty chili. For a casual family dinner, a simple Italian chopped salad or a lemony arugula salad cuts through the richness perfectly.
Beverage-wise, they pair wonderfully with a cold lager, root beer for the kids, or a robust red wine like a Chianti.
Storage & Make-Ahead Instructions
- Storage: Store leftover sliders in an airtight container in the refrigerator for up to 3 days.
- Reheating: Reheat individual sliders in the microwave for 20-30 seconds, or for a crisper result, reheat them on a baking sheet in a 350°F oven for 8-10 minutes.
- Freezing: You can freeze baked and cooled sliders. Wrap them tightly in plastic wrap and then foil, or place in a freezer bag. They’ll keep for up to 2 months. Thaw in the refrigerator overnight and reheat in the oven.
- Make-Ahead: You can assemble the entire tray (including brushing on the butter topping) up to 24 hours in advance. Cover tightly with plastic wrap and refrigerate. When ready to bake, let the tray sit at room temperature for 20-30 minutes while the oven preheats, then bake as directed, adding 2-3 extra minutes if needed.
Frequently Asked Questions
Q: Can I use different rolls?
Absolutely. While Hawaiian rolls are my favorite for their texture and sweetness, you can use any soft dinner rolls or slider buns (like King’s Hawaiian or Sister Schubert’s). Just keep them connected in a slab.
Q: My sliders are soggy on the bottom. What happened?
This is usually due to too much sauce or wet toppings. Make sure you’re using the sauce amounts listed and that any added veggies (like mushrooms) are well-sautéed and blotted dry. The layer of cheese directly on the bottom bun also acts as a barrier.
Q: Can I double this recipe for a big party?
Yes, easily. Simply use two packages of rolls and two baking dishes. You may need to rotate the dishes in the oven for even baking.
I don’t recommend stacking them in one deeper dish, as the center may not heat through properly.
Q: How do I know when they’re done baking?
The visual cues are your best guide. The cheese should be bubbling at the edges, and the top should be uniformly golden brown. An instant-read thermometer inserted into the center of the slider filling should read at least 165°F.
Q: Can I make these vegetarian?
Of course! Simply omit the pepperoni. The Veggie Supreme variation listed above is a fantastic and hearty vegetarian option.
Q: Why cover with foil first?
Covering the sliders traps steam, which ensures the filling gets piping hot and the rolls stay soft. Baking uncovered at the end crisps and browns the top without drying out the interior.
Final Thoughts
After 15 years in professional kitchens, I’ve learned that the best recipes are often the simplest ones executed with care. These pizza sliders are a perfect example. They require no fancy skills, just good ingredients and a few smart techniques (like grating your own cheese and letting them rest).
They deliver that incredible combination of gooey, savory, sweet, and crispy that makes everyone come back for seconds.
Whether you’re feeding a hungry sports crowd, looking for a surefire potluck contribution, or just want to make a weeknight feel special, this recipe has you covered. I encourage you to make it your own—try the variations, find your favorite combo, and enjoy the process. Once you see how quickly these disappear, you’ll understand why this recipe is a permanent staple in my own repertoire.
Give them a try this weekend, and don’t forget to come back and let me know how they turned out!
Easy Pizza Sliders
Ingredients
Equipment
Method
- Preheat your oven to 350°F (175°C). Without separating the individual rolls, slice the entire slab of Hawaiian rolls in half horizontally, creating a top and bottom ‘bun.’ Place the bottom half in a 9×13 inch baking dish or on a parchment-lined baking sheet.
- Spread 3/4 cup of the pizza sauce evenly over the bottom layer of rolls. Layer on half of the grated mozzarella cheese, followed by all of the pepperoni slices. Top with the remaining mozzarella cheese and the remaining 1/4 cup of pizza sauce. Place the top half of the rolls back on.
- In a small bowl, whisk together the melted butter, garlic powder, Italian seasoning, and grated Parmesan. Brush this mixture generously and evenly over the top of the rolls, making sure it seeps into the seams. Sprinkle with optional red pepper flakes.
- Cover the baking dish tightly with aluminum foil and bake for 15 minutes. Then, remove the foil and bake for an additional 5-7 minutes, or until the cheese is bubbly and the tops of the rolls are a beautiful golden brown.
- Remove from the oven and let the sliders rest for 5 minutes. This allows the cheese to set slightly so they don’t fall apart when you cut them. Use a sharp serrated knife to slice along the pre-scored lines into 12 individual sliders. Serve warm.


