
Pizza rolls
There’s something universally irresistible about the combination of warm dough, melted cheese, and savory pepperoni, all in a perfectly portable, dippable package. While the frozen aisle version has its place, making pizza rolls from scratch is a game-changer. The dough is softer and more flavorful, the cheese is gooier, and you have complete control over every ingredient.
As a chef who has made thousands of appetizers, I can tell you these are the ones that disappear first from any party platter. They’re fun to make, incredibly satisfying to pull apart, and deliver that nostalgic comfort food feeling with a fresh, homemade upgrade.
- Superior Taste & Texture: Forget the cardboard-like crust of frozen rolls. This homemade dough bakes up soft, fluffy, and golden brown, with a far more satisfying chew.
- Endlessly Customizable: This is your canvas. Swap in different cheeses, meats, veggies, or sauces to create your perfect flavor combo. I’ll share my favorite variations below.
- Perfect for Freezing: Make a double batch! These freeze beautifully before or after baking, giving you a ready-to-go snack that’s infinitely better than anything from a box.
- Kid-Friendly Fun: Getting little hands involved in rolling and filling the dough is a wonderful way to make cooking a family activity. They love to eat what they help create.
- Crowd-Pleasing Appetizer: Whether it’s game day, a birthday party, or a casual get-together, a platter of these warm, cheesy rolls is always a hit. They’re easy to eat and universally loved.
Ingredients You’ll Need
Let’s gather our ingredients—this is where simple pantry staples transform into something magical. The beauty of this recipe lies in its accessibility. The dough requires just flour, yeast, water, and a few other basics, while the filling is a classic, no-fuss combination.
For the best results, use low-moisture, part-skim mozzarella. It melts beautifully without making the dough greasy. Mini pepperoni are ideal because they distribute evenly, but chopping regular slices works just fine.
If your pizza sauce is very thick, you can thin it with a teaspoon of water to make it easier to mix into the cheese. Believe me, that little trick ensures every roll gets sauciness without making the dough wet.

Note: You’ll find the complete list of ingredients, along with their exact measurements, in the printable recipe card at the bottom of this post.
Kitchen Equipment Needed
You don’t need any specialty gear. A large mixing bowl (or stand mixer) for the dough, a rolling pin, and a large baking sheet are the essentials. A pizza cutter makes quick work of dividing the dough, but a sharp knife does the job.
I always line my sheet with parchment paper for easy cleanup and to prevent sticking. A pastry brush is handy for applying the butter wash, which gives the rolls their gorgeous golden sheen.
How to Make Pizza Rolls Recipe
Step 1: Activate the Yeast and Make the Dough
In your large bowl, combine the warm water (around 110°F—too hot will kill the yeast), yeast, and sugar. Give it a quick stir and let it sit for 5-7 minutes. You’re looking for a foamy, creamy layer on top; this is proof your yeast is alive and ready to work.
Tip from me: if your kitchen is cool, place the bowl in a turned-off oven with the light on for a cozy proofing spot. Once foamy, add the flour, salt, and olive oil.
Step 2: Knead and Let the Dough Rise
Mix everything until a shaggy dough forms, then turn it out onto a lightly floured surface. Now, knead for a good 5-7 minutes. You want the dough to become smooth, elastic, and no longer sticky.
It should spring back slowly when you gently poke it. This kneading develops the gluten, which gives the rolls their structure. Place the smooth dough ball in a lightly oiled bowl, cover it, and let it rise until doubled.
This usually takes about an hour.
Step 3: Prepare the Cheesy Filling
While the dough works its magic, mix your filling. In a medium bowl, combine both cheeses, the mini pepperoni, pizza sauce, and Italian seasoning. Mix it thoroughly until the sauce coats everything.
This method of integrating the sauce, rather than dolloping it separately, is a pro move—it prevents soggy dough pockets and ensures every bite is flavorful. Trust me, it makes all the difference.
Step 4: Shape and Fill the Rolls
Once your dough has doubled, punch it down to release the air. On a floured surface, roll it out into a large rectangle, roughly 16×12 inches. Use your pizza cutter to slice it into 24 squares.
Place a heaping tablespoon of filling in the center of each square. Brush the edges with a little water—this acts as glue. Fold one corner over to the opposite corner to form a triangle, then press the edges firmly with your fingers.
Step 5: Seal, Bake, and Serve
Here’s the crucial step: after pressing the edges with your fingers, take a fork and crimp them firmly. This double seal is your best defense against cheesy eruptions in the oven. Arrange the sealed rolls on your parchment-lined sheet.
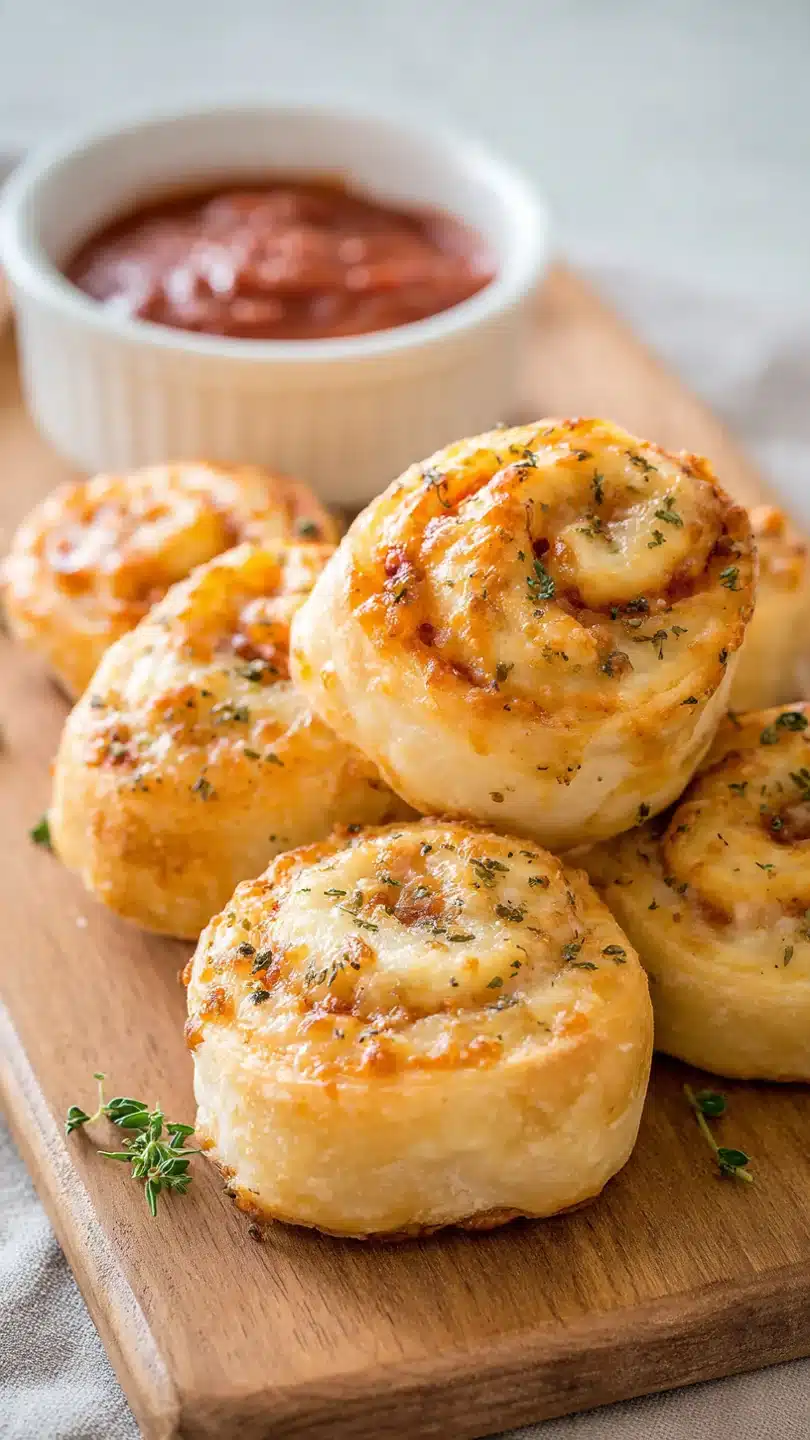
Brush the tops with melted butter (I like to add a pinch of garlic powder to it) and sprinkle with Parmesan. Bake at 400°F for 16-18 minutes until they’re beautifully puffed and golden brown. Let them cool for 5 minutes before diving in.
Serve with warm marinara sauce for dipping and step back to enjoy the compliments!
- Dough Temperature is Key: Your water should be warm to the touch, like bathwater, not hot. If you kill the yeast, your dough won’t rise. If you’re unsure, use a thermometer—110°F (43°C) is perfect.
- Don’t Skip the Crimp: Sealing with a fork after pinching isn’t just for looks. It creates a physical barrier that the melting cheese has a harder time breaking through, preventing messy leaks.
- Even Rolling for Even Baking: Try to roll your dough to a consistent thickness. If some parts are too thin, they might tear; if too thick, they won’t cook through evenly.
- The Cool-Down: Letting the rolls rest for 5 minutes after baking isn’t just about safety. It allows the molten cheese filling to set slightly, so it doesn’t all run out on the first bite.
Recipe Variations
- Supreme Style: Add 1/4 cup each of finely diced green bell pepper, sliced black olives, and chopped mushrooms to the filling mixture.
- Three-Cheese Spinach: Replace the pepperoni with 1/2 cup of thawed and thoroughly squeezed frozen chopped spinach and add 1/4 cup of ricotta cheese to the filling.
- BBQ Chicken: Swap the pizza sauce for 1/3 cup of barbecue sauce and use 1 cup of shredded cooked chicken and 1/2 cup of shredded smoked gouda or cheddar.
- Breakfast Pizza Rolls: Fill with scrambled eggs, cooked crumbled sausage, and cheddar cheese. A fantastic make-ahead breakfast option!
- Spicy Hawaiian: Use chopped Canadian bacon or ham, add 1/4 cup of finely chopped pineapple (well-drained), and mix a pinch of red pepper flakes into the filling.
- Pesto & Mozzarella: For a vegetarian option, use 1/3 cup of basil pesto instead of pizza sauce and fill with mozzarella and sun-dried tomatoes.
- Gluten-Free Adaptation: Use a reliable gluten-free all-purpose flour blend (like Cup4Cup or Bob’s Red Mill 1-to-1) in place of regular flour. The dough may be a bit more delicate to handle.
What to Serve With This Recipe
Pizza rolls are the ultimate finger food for a casual spread. For game day, pair them with other easy eats like buffalo chicken dip, a crisp vegetable platter, and loaded potato skins. For a kid’s party, serve them alongside fruit skewers and mini corn dogs.
They also make a fun, informal dinner alongside a big, crunchy Caesar salad or a bowl of tomato soup for dipping. Beverage-wise, they pair well with everything from craft beer and soda for a crowd to a light, acidic red wine like a Chianti for a more grown-up gathering.
Storage & Make-Ahead Instructions
- Refrigeration: Store cooled pizza rolls in an airtight container in the refrigerator for up to 4 days.
- Freezing (Unbaked): This is my favorite method. Assemble the rolls, place them on a parchment-lined sheet, and freeze until solid (1-2 hours). Then transfer to a freezer bag. Bake from frozen, adding 3-5 minutes to the baking time.
- Freezing (Baked): Let baked rolls cool completely, then freeze on a sheet before bagging. Reheat in a 350°F oven for 10-12 minutes until hot.
- Reheating: The oven or toaster oven is best (350°F for 8-10 minutes) to restore crispness. The microwave will make them soft and chewy, but it works in a pinch.
Frequently Asked Questions
Q: Can I use store-bought pizza dough to save time?
A: Absolutely. One pound of store-bought dough will work. Let it come to room temperature before rolling.
The flavor and texture of the homemade dough are superior, but this is a great shortcut.
Q: My cheese keeps leaking out during baking. What am I doing wrong?
A: This usually means the edges aren’t sealed well enough. Ensure you’re brushing the edges with water, pressing firmly, and crimping with a fork. Also, avoid overfilling—a heaping tablespoon is plenty.
Q: Can I make these vegetarian?
A: Yes, simply omit the pepperoni. You can add other fillings like diced bell peppers, mushrooms, olives, or even meatless pepperoni crumbles.
Q: How do I know when they are done baking?
A: They should be a deep, golden brown all over, not pale. The dough will look puffed and set. If you’re unsure, you can carefully peek inside one; the cheese should be fully melted.
Q: Can I air fry these pizza rolls?
A: Yes! Brush with butter, then air fry at 370°F for 6-8 minutes, shaking the basket halfway through. You may need to work in batches to avoid overcrowding.
Q: What’s the best way to reheat leftovers?
A: To maintain a crispy exterior, reheat in an oven or toaster oven at 350°F for about 8-10 minutes. The microwave will steam them, making the dough soft.
Q: Can I prep these the night before?
A: You can prepare the filling and store it covered in the fridge overnight. I recommend making the dough the day of for the best rise, but you can let the shaped, unbaked rolls rest in the fridge overnight on the baking sheet, covered. Bake directly from the fridge, adding a minute or two.
Final Thoughts
Homemade pizza rolls are more than just a snack; they’re a project that delivers immense satisfaction and even better flavor. This recipe gives you the foundation—a reliable dough and a classic filling—and then hands you the keys to endless creativity. Whether you stick with the beloved pepperoni classic or venture into your own custom creations, the process is straightforward and the results are guaranteed to please.
So next time that craving hits, skip the freezer aisle. Gather your simple ingredients, put on some music, and enjoy the process of creating a truly superior version of a favorite treat. I’d love to hear how yours turn out—what variations did you try?
Share your results and tag me! Now, go enjoy those warm, cheesy, perfectly golden bites.
Homemade Pizza Rolls
Ingredients
Equipment
Method
- In a large bowl or the bowl of a stand mixer, combine the warm water, yeast, and sugar. Let it sit for 5-7 minutes until foamy. This ‘proofing’ step is crucial—if the yeast doesn’t foam, it’s inactive and won’t make your dough rise. Add the flour, salt, and olive oil. Mix with a dough hook or wooden spoon until a shaggy dough forms.
- Knead the dough on a lightly floured surface for 5-7 minutes (or with a stand mixer for 4-5 minutes) until it’s smooth, elastic, and springs back when poked. Place it in a lightly oiled bowl, turning to coat. Cover with a damp towel or plastic wrap and let rise in a warm spot for 1 hour, or until doubled in size.
- While the dough rises, prepare the filling. In a medium bowl, combine the mozzarella, cheddar, mini pepperoni, pizza sauce, and Italian seasoning. Mix until well combined. Trust me, using mini pepperoni ensures every bite gets a piece, and mixing the sauce into the filling prevents soggy dough.
- Preheat your oven to 400°F (200°C) and line a large baking sheet with parchment paper. Punch down the risen dough and turn it out onto a lightly floured surface. Roll it into a large rectangle, about 16×12 inches. Use a pizza cutter or sharp knife to cut the dough into 24 roughly 4-inch squares.
- Place a heaping tablespoon of filling in the center of each dough square. Brush the edges lightly with water. Fold one corner over the filling to the opposite corner, creating a triangle. Press the edges firmly with your fingers, then crimp them with a fork to seal completely. This double seal is your insurance against cheese leaks!
- Arrange the sealed pizza rolls on the prepared baking sheet, leaving an inch between them. Brush the tops generously with melted butter (mixed with garlic powder if using) and sprinkle with Parmesan. Bake for 16-18 minutes, rotating the pan halfway through, until puffed and deep golden brown. Let cool for 5 minutes before serving with warm pizza sauce for dipping.


