
Pizza oven recipes
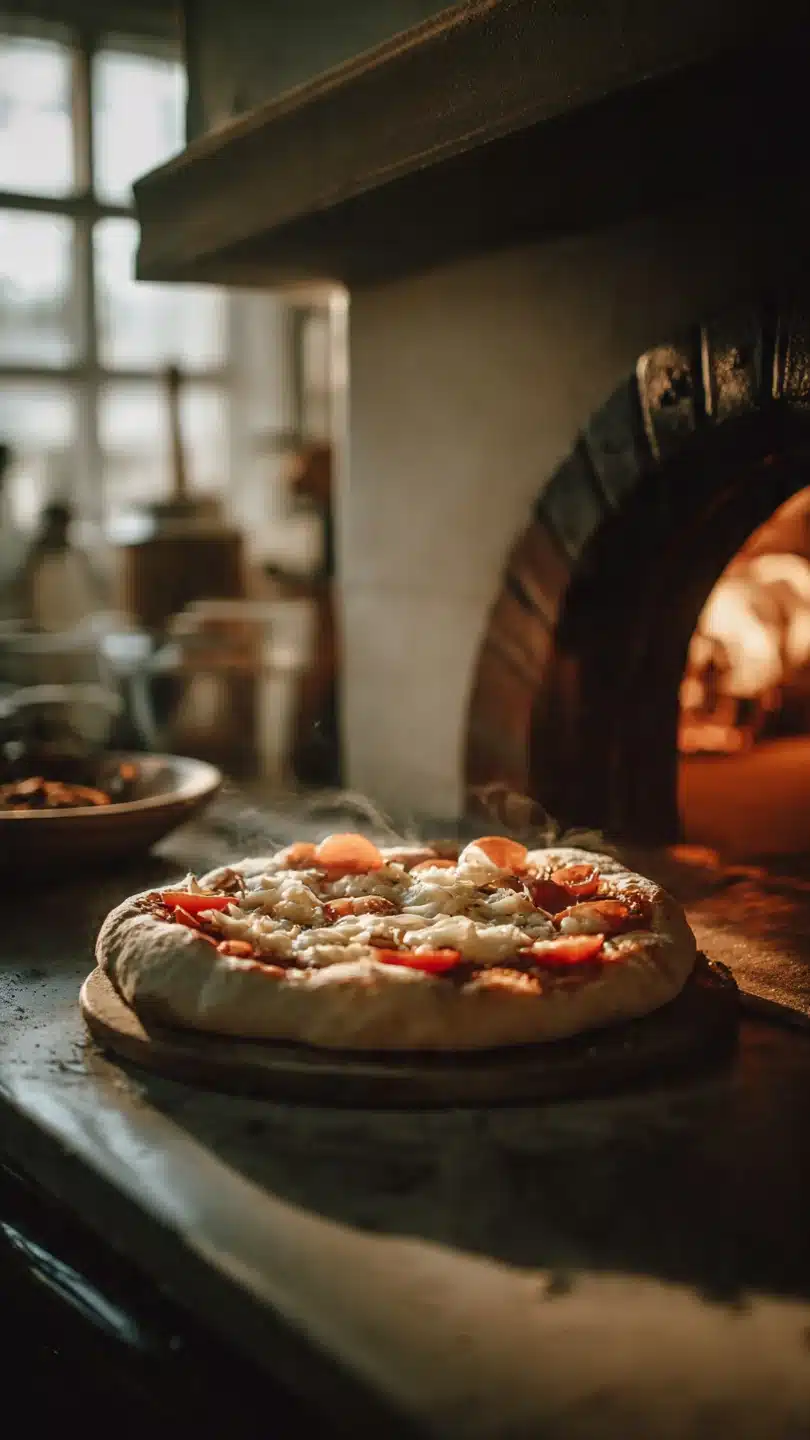
There’s a moment of pure culinary magic that happens only in a pizza oven. It’s the sight of dough hitting a 800°F stone, instantly bubbling and rising, developing those iconic leopard-spot char marks in under 90 seconds. It’s the smell of wood smoke mingling with baking bread and melting cheese.
As a chef who has fired thousands of pizzas, I can tell you that mastering your pizza oven unlocks a world beyond delivery pizza—it’s about achieving a specific texture, a complex flavor, and a level of freshness that simply can’t be replicated in a home oven. This guide is your roadmap. We’ll start with the non-negotiable foundation: a perfect Neapolitan dough.
Then, we’ll explore the techniques and creative recipes that will transform your outdoor oven into your favorite cooking tool.
- Authentic Texture: Achieve that elusive combination of a tender, airy interior (the crumb) and a crisp, lightly charred exterior that’s the hallmark of true Neapolitan pizza.
- Flavor Development: The slow, room-temperature fermentation isn’t just for texture; it builds a wonderfully complex, slightly tangy flavor in the crust that store-bought dough can’t match.
- Surprisingly Simple Ingredients: The dough requires just flour, water, salt, and yeast. The magic is in the technique and patience, not a long grocery list.
- Fast Cook Time: Once your oven is hot and your dough is ready, each pizza cooks in 60-90 seconds, making it perfect for interactive, fun dinners with friends and family.
- Endlessly Customizable: Master this base recipe, and a universe of toppings—from classic to wildly creative—becomes your playground.
- The Ultimate Food Experience: The process of shaping, launching, and retrieving a perfect pizza from a blazing oven is incredibly satisfying and impressive.
Ingredients You’ll Need
Let’s gather our ingredients. The beauty of this recipe lies in the quality and precision of these simple components. For the dough, using the right flour is 80% of the battle.
Italian “00” flour, specifically a high-protein type like Caputo Pizzeria, is milled super fine. This creates a soft, elastic dough that can withstand high heat without becoming tough. The water temperature matters—too cold and the yeast sleeps, too hot and you kill it.
Lukewarm is the sweet spot. For the topping, seek out DOP San Marzano tomatoes; their lower water content and sweet-acid balance are ideal. And please, pat your mozzarella dry!
This one step prevents a soupy center.
- 00 Flour: 500g. This is not all-purpose flour. Its fine texture is key for a tender, digestible crust.
- Water: 325ml, lukewarm. Precision in hydration (65%) is critical for the dough’s structure.
- Fine Sea Salt: 10g. Enhances flavor and strengthens gluten.
- Fresh Yeast: 2g (or 1g active dry). A small amount encourages a slow, flavorful rise.
- San Marzano Tomatoes: 400g, canned. Crush them by hand for the perfect rustic texture.
- Fresh Mozzarella: 200g. Fior di latte is classic, but buffalo mozzarella adds incredible richness.
- Fresh Basil: A handful. Add it before baking for infused flavor, or after for a fresh pop.
- Extra Virgin Olive Oil: For drizzling. A good, fruity oil adds a final layer of flavor.
- Flaky Sea Salt: For finishing. A sprinkle on the hot crust makes all the difference.

Note: You’ll find the complete list of ingredients, along with their exact measurements, in the printable recipe card at the bottom of this post.
Kitchen Equipment Needed
Beyond the pizza oven itself, a few key tools will make your life much easier. First, you need a pizza peel for launching. A wooden or composite peel is best for this, as the dough is less likely to stick.
A second, smaller metal turning peel is incredibly helpful for rotating the pizza in the intense heat. An infrared thermometer is not a luxury; it’s essential for knowing your stone’s exact temperature. A digital kitchen scale is non-negotiable for baking—volumetric cups are too imprecise for this recipe.
Finally, have a bench scraper for handling the dough and a large mixing bowl.
How to Make Classic Neapolitan Pizza Recipe
Step 1: Mixing and the Windowpane Test
Combine the water and yeast, then mix in the flour and salt until a shaggy dough forms. Turn it out onto your counter. Now, knead.
This isn’t gentle. You need to develop the gluten network fully, which takes a good 10-12 minutes of vigorous folding and pushing. The dough will transform from sticky and ragged to incredibly smooth and elastic.
The professional test is the “windowpane”: stretch a small piece between your fingers. If you can stretch it thin enough to see light through without it tearing, you’re done. Trust me, this effort pays off in every bite.
Step 2: The Long, Slow Rise
Place your smooth dough ball in a lightly oiled bowl, cover it tightly, and walk away. For 8 to 12 hours. This long, cool fermentation is the soul of the recipe.
The yeast works slowly, creating gases that form the air pockets (the alveoli) and developing flavorful acids. The dough should double in size and be beautifully bubbly. Don’t rush this.
If your kitchen is warm, the time will be shorter; if cool, it may take longer. The dough is ready when it’s puffy and holds an indentation when gently poked.
Step 3: Shaping the Final Dough Balls
Gently deflate the dough and divide it into four equal pieces using your scale. Now, shape each into a tight ball. Using a cupping motion on an un-floured part of your counter, tuck the edges of the dough underneath itself, creating surface tension on top.
This tension is what helps the crust puff up dramatically in the oven. Place the balls on a floured tray, cover them with a damp cloth, and let them rest for another 1-2 hours. They will relax and become easy to stretch.
Step 4: Fire Management and Topping Prep
While the dough rests, fire up your oven. You’re aiming for a roaring flame and a stone temperature between 750°F and 800°F (400-430°C) in the center. Use your infrared thermometer.
Prepare your toppings: crush the tomatoes by hand and season lightly. Tear the mozzarella and lay the pieces on paper towels to absorb excess moisture—this is my top tip to avoid a wet pizza. Have your basil, oil, and salt ready to go in an organized mise en place.
Step 5: The Stretch, Top, and Launch
Lightly flour your surface and your hands. Press one dough ball from the center out, leaving a thick border. Lift it and use the backs of your knuckles to gently stretch it, letting gravity do the work.
Never roll it with a pin—you’ll crush all those precious air bubbles. Transfer the stretched base to a floured peel. Shake it to ensure it slides.
Add a thin layer of tomato, some cheese, and a few basil leaves. Now, with a confident, swift motion, jerk the peel forward and pull it back, launching the pizza onto the stone. Believe me, the first launch is thrilling.
Step 6: The 90-Second Bake and Final Touch
The moment it hits the stone, it will start to bubble. After about 20 seconds, use your turning peel to rotate it 180 degrees for even cooking. You may need to rotate it once or twice more.
It’s done in 60-90 seconds when the crust is puffed and charred in spots, and the cheese is melted and bubbling. Slide it out, drizzle with your best olive oil, and sprinkle with flaky salt. Step back and admire your work, then slice and devour immediately.
- Flour is Everything: Not all “00” flours are equal. Look for a protein content around 12-13%. Caputo “Pizzeria” or “Chef’s Flour” are my gold standards. Using bread flour as a substitute will give a chewier, denser crust.
- The Dry Cheese Rule: Wet cheese is the enemy of a crisp base. Always pat fresh mozzarella dry. For even better results, try low-moisture whole-milk mozzarella, which browns beautifully.
- Launch Confidence: If your pizza sticks to the peel on the way in, it’s a disaster. Always give the peel a final shake just before launching. Semolina flour on the peel provides less friction than regular flour.
- Oven Temperature Zones: Your oven has hot and cooler spots. Use the super-hot center for cooking, and rotate the pizza into different zones if one side is cooking faster. The dome radiates heat down—use it to finish the top if needed.
- Less is More: Overloading a pizza in a super-hot oven guarantees a soggy middle. Apply toppings with a restrained hand. The crust should be the star.
Recipe Variations
- White Pizza (Pizza Bianca): Skip the tomato. After baking, top with dollops of fresh ricotta, a handful of arugula, prosciutto, and a lemon wedge on the side.
- Spicy Soppressata and Honey: Add slices of spicy soppressata or Calabrian chili salami before baking. The moment it comes out of the oven, drizzle with hot honey for an incredible sweet-heat contrast.
- Caramelized Onion and Gorgonzola: Slowly cook sliced onions until jammy and golden. Spread on the stretched dough, dot with crumbled Gorgonzola, and bake. Finish with fresh thyme.
- Breakfast Pizza: Bake a plain crust until just set. Remove, top with scrambled eggs, cooked bacon or sausage, and cheddar cheese. Return to a cooler part of the oven just to melt the cheese.
- Grilled Vegetable & Pesto: Roast zucchini, eggplant, and bell peppers in the oven’s cooler zone. Spread basil pesto on the base, top with the veggies and fresh mozzarella.
- Dessert Pizza: Stretch the dough, brush with melted butter, and sprinkle with cinnamon-sugar. Bake until crisp. Top with sweetened ricotta, fresh berries, and a dusting of powdered sugar.
What to Serve With This Recipe
Pizza is a complete meal, but a few thoughtful accompaniments elevate the experience. Start with a simple, bright Italian chopped salad with romaine, chickpeas, olives, and pepperoncini to contrast the rich pizza. For drinks, a crisp, cold Peroni beer or a Chianti Classico are classic pairings.
If you’re making multiple pizzas for a crowd, consider serving them one at a time, straight from the oven, to ensure everyone gets that perfect, fresh-from-the-fire bite. End the meal with a simple affogato—a scoop of vanilla gelato “drowned” with a shot of hot espresso, which you can easily make while the oven embers die down.
Storage & Make-Ahead Instructions
- Dough Storage: The shaped dough balls can be refrigerated immediately after dividing for 1-3 days. This cold retardation deepens the flavor dramatically. Let them sit at room temperature for 2-3 hours before stretching.
- Freezing Dough: Place individual dough balls on a parchment-lined sheet to freeze solid, then transfer to a freezer bag for up to 3 months. Thaw overnight in the refrigerator, then bring to room temperature.
- Cooked Pizza: Leftover pizza is best reheated in the pizza oven for 30-45 seconds until crisp. A close second is a preheated skillet on the stovetop over medium heat—this revives the crust better than a microwave.
- Topping Prep: All toppings (crushed tomatoes, chopped vegetables, cooked meats) can be prepared a day ahead and stored separately in the refrigerator.
Frequently Asked Questions
Q: My home oven only goes to 500°F. Can I still make this?
A: You can, but the result will be different. Use a baking steel or stone preheated for at least an hour on the highest rack. Bake the pizza on the steel, then finish it under the broiler for 60-90 seconds to char the top.
The cook time will be 5-7 minutes.
Q: Why did my pizza dough tear when I tried to stretch it?
A: This usually means the gluten hasn’t developed enough (knead longer next time) OR, more commonly, the dough hasn’t rested enough after balling. Let it sit covered until it’s very relaxed and puffy, which can take up to 2 hours.
Q: Can I use active dry yeast instead of fresh?
A: Absolutely. Use half the weight (1g of active dry for 2g of fresh). Always activate it in the lukewarm water for 5 minutes before adding the flour to ensure it’s alive.
Q: How do I prevent my pizza from sticking to the peel on launch?
A: Use semolina or coarse cornmeal on the peel—it acts like ball bearings. Work quickly after topping, and always do a final shake before launching to confirm it’s moving freely. If it sticks, gently lift the edge and blow air underneath to create a pocket.
Q: My crust isn’t getting those leopard spots. Why?
A: Your oven isn’t hot enough. You need intense, direct radiant heat from the dome. Ensure your fire is lively and the stone is at least 750°F.
Also, a bit of sugar (1 tsp) in the dough can promote browning, though it’s not traditional.
Q: Is it okay to use all-purpose flour?
A: It will work in a pinch, but the crust will be denser and tougher, not light and airy. The protein content and milling of “00” flour are specifically designed for this style.
Q: How do I know when the pizza is done?
A: Look for a puffed, dry crust with several dark char spots (not burnt). The bottom should be firm with some darker blotches. The cheese should be fully melted and bubbling.
It happens fast, so stay focused!
Final Thoughts
Mastering your pizza oven is a journey, and this classic Neapolitan recipe is your essential first step. It teaches you respect for fermentation, temperature, and simplicity. Don’t be discouraged if your first launch isn’t perfect—mine certainly weren’t.
Each pizza is a learning experience. The real joy comes in sharing the process: the anticipation of the rise, the thrill of the launch, and the communal act of tearing into a freshly baked pie. Once you have this foundation, your creativity can run wild with the variations I’ve shared.
So fire up your oven, weigh your flour, and embrace the beautiful, smoky, delicious world of pizza oven cooking. I’d love to hear how your pizzas turn out—tag me on social media or leave a comment with your results! Now, go get that stone blazing hot.
Classic Neapolitan Pizza Dough & Margherita Pizza
Ingredients
Equipment
Method
- Make the dough: In a large bowl, combine the water and yeast, stirring to dissolve. Add about half the flour and mix with a wooden spoon until a shaggy mass forms. Add the salt and the remaining flour. Mix until combined, then turn out onto a clean surface. Knead vigorously for 10-12 minutes until the dough is incredibly smooth, elastic, and passes the windowpane test (you can stretch a small piece thin enough to see light through without tearing).
- First rise: Place the dough ball in a lightly oiled bowl, cover tightly with plastic wrap, and let rise at room temperature (70-75°F/21-24°C) for 8-12 hours, or until doubled in size. This long, cool fermentation is non-negotiable for developing complex flavor and an open crumb structure.
- Shape the dough balls: Gently deflate the dough and divide it into 4 equal pieces (about 210g each). Shape each piece into a tight, smooth ball by tucking the edges underneath. Place the balls on a lightly floured tray, spaced apart. Cover with a damp cloth and let rest for 1-2 hours at room temperature. They should look puffy and relaxed.
- Prepare toppings and oven: While dough rests, crush the San Marzano tomatoes by hand in a bowl. Season lightly with a pinch of salt. Tear the mozzarella and pat it dry with paper towels—this is crucial to prevent a soggy center. Fire your pizza oven, aiming for a stone temperature of 750-800°F (400-430°C) in the center. You want a lively, rolling flame licking the dome.
- Shape and top: On a lightly floured surface, gently press one dough ball from the center outwards, leaving a 1-inch border. Lift the dough and use the backs of your hands to stretch it into a 10-12 inch circle, letting gravity do the work. Transfer to a floured peel. Spread a thin layer of crushed tomatoes, leaving the border clean. Scatter with mozzarella pieces and a few basil leaves.
- Bake and serve: Give the peel a quick shake to ensure the pizza slides freely. With a confident motion, launch it onto the hot stone. Rotate the pizza with a turning peel every 20-30 seconds. It should bake in 60-90 seconds, developing a puffed, charred cornicione (crust edge) and a blistered base. Remove, drizzle with olive oil and a pinch of flaky salt. Slice and serve immediately.


