
Aesthetic pizza
There’s something uniquely satisfying about creating a meal that delights all the senses. A pizza that emerges from your oven not just smelling incredible, but looking like a work of edible art. This isn’t about complicated techniques or unattainable chef skills; it’s about applying a few simple principles of color, composition, and quality ingredients to transform your everyday homemade pizza into a stunning centerpiece.
As a chef who has plated thousands of dishes, I can tell you that eating with your eyes first is a real phenomenon, and this aesthetic pizza recipe is designed to deliver on that promise of beauty and flavor.
- Visually Stunning: This pizza is designed to be a showstopper, with vibrant vegetables arranged in an intentional, beautiful pattern that’s perfect for sharing.
- Surprisingly Simple: While the result looks professional, the techniques are all accessible to home cooks. The dough is straightforward, and the artistry comes from thoughtful assembly.
- Superior Flavor & Texture: Using a homemade dough and high-quality, fresh toppings guarantees a taste and mouthfeel far beyond any delivery pizza.
- Endlessly Customizable: The rainbow veggie theme is just a starting point. This method teaches you how to arrange any combination of toppings beautifully.
- The Fun Factor: Assembling this pizza is a creative and relaxing process. It’s a fantastic activity to do with family or friends.
- Diet-Friendly Base: The recipe is naturally vegetarian and can easily be adapted to be vegan or gluten-free with a few simple swaps.
Ingredients You’ll Need
Let’s gather our ingredients—this is where the magic starts. Using fresh, high-quality components is non-negotiable for an aesthetic pizza. The visual appeal comes from the natural vibrancy of ripe vegetables and the sheen of good olive oil.
For the dough, bread flour is my strong recommendation for its higher protein content, which gives you that ideal chewy-yet-crisp crust with those lovely air pockets. If you can find it, “00” pizza flour is a fantastic alternative. For the cheese, fresh mozzarella (the kind packed in water) melts beautifully and creates those gorgeous, creamy pockets without an oily film.
When it comes to the vegetables, think color and texture contrast. I’ve chosen a rainbow palette here, but the principle is what matters: use a variety of hues and slice them uniformly for a clean, intentional look. A mandoline can be helpful for super-thin, even slices of onion and pepper, but a sharp knife and a steady hand work perfectly.
Finally, don’t underestimate your finishing elements. A great extra virgin olive oil for drizzling and a sprinkle of flaky sea salt just before serving elevate the flavor and add a professional, glossy finish.

Note: You’ll find the complete list of ingredients, along with their exact measurements, in the printable recipe card at the bottom of this post.
Kitchen Equipment Needed
You don’t need a wood-fired oven to make exceptional pizza. A pizza stone is the single best investment for a home pizza enthusiast, as it absorbs and radiates intense heat to crisp the crust from below. If you don’t have one, a heavy, inverted baking sheet preheated in the oven works well too.
You’ll also need a large mixing bowl for the dough, parchment paper for easy transfer (this is a game-changer—no more stuck pizzas or messy cornmeal), and a sharp knife for prepping toppings. A bench scraper is optional but incredibly useful for dividing dough and cleaning your work surface.
How to Make Aesthetic Pizza Recipe
Step 1: Activate the Yeast
In a small bowl, combine the warm water and sugar. The water temperature is critical—aim for 105-110°F, which feels warm but not hot on your wrist. Sprinkle the yeast over the top and give it a gentle stir.
Let it sit undisturbed for 5-7 minutes. You’re looking for a creamy, foamy layer to form on top. This “proofing” tells you the yeast is alive and active, which is the foundation for a light, airy dough.
If it doesn’t foam, your yeast may be old or the water was too hot; start over.
Step 2: Mix and Knead the Dough
While the yeast proofs, measure your bread flour into a large bowl. Make a well in the center and pour in the foamy yeast mixture and the olive oil. Using a wooden spoon or your hands, mix until a shaggy, floury dough forms.
Turn it out onto a lightly floured surface. Now, knead. Trust me, this 8-10 minute process is where you develop the gluten network.
Use the heel of your hand to push the dough away from you, then fold it back over itself. The dough is ready when it’s smooth, slightly tacky but not sticky, and springs back slowly when you poke it.
Step 3: The First Rise
Place your beautiful, smooth dough ball into a lightly oiled bowl, turning it once to coat it in oil. This prevents a skin from forming. Cover the bowl tightly with plastic wrap or a damp kitchen towel.
Let it rise in a warm, draft-free spot for 1 to 1.5 hours, or until doubled in size. My favorite trick is to place it in an oven with just the light on—it creates the perfect cozy environment. This slow rise develops flavor and texture.
Step 4: Prep Your Toppings Mise en Place
This step is the secret to an aesthetic pizza. While the dough rises, wash and prep all your vegetables. Slice the bell peppers and red onion into thin, uniform strips.
Halve the cherry tomatoes. Tear the fresh mozzarella into small, rustic pieces. Arrange each prepared topping in its own small bowl or section of your cutting board.
This professional practice, called mise en place, transforms chaotic assembly into a calm, artistic process. You can see all your colors and textures at once and plan your design.
Step 5: Shape the Dough and Preheat
About 45 minutes before baking, place your pizza stone or an inverted heavy baking sheet on a middle oven rack and preheat to 500°F (260°C). This long, hot preheat is essential. Punch down the risen dough to release the air.
Divide it in half—you can freeze one portion for another meal. On a lightly floured surface, gently press and stretch one portion into a disc. Use your knuckles to carefully stretch it from the center outwards to a 12-inch round.
Avoid a rolling pin, which crushes those precious air bubbles.
Step 6: Artful Assembly
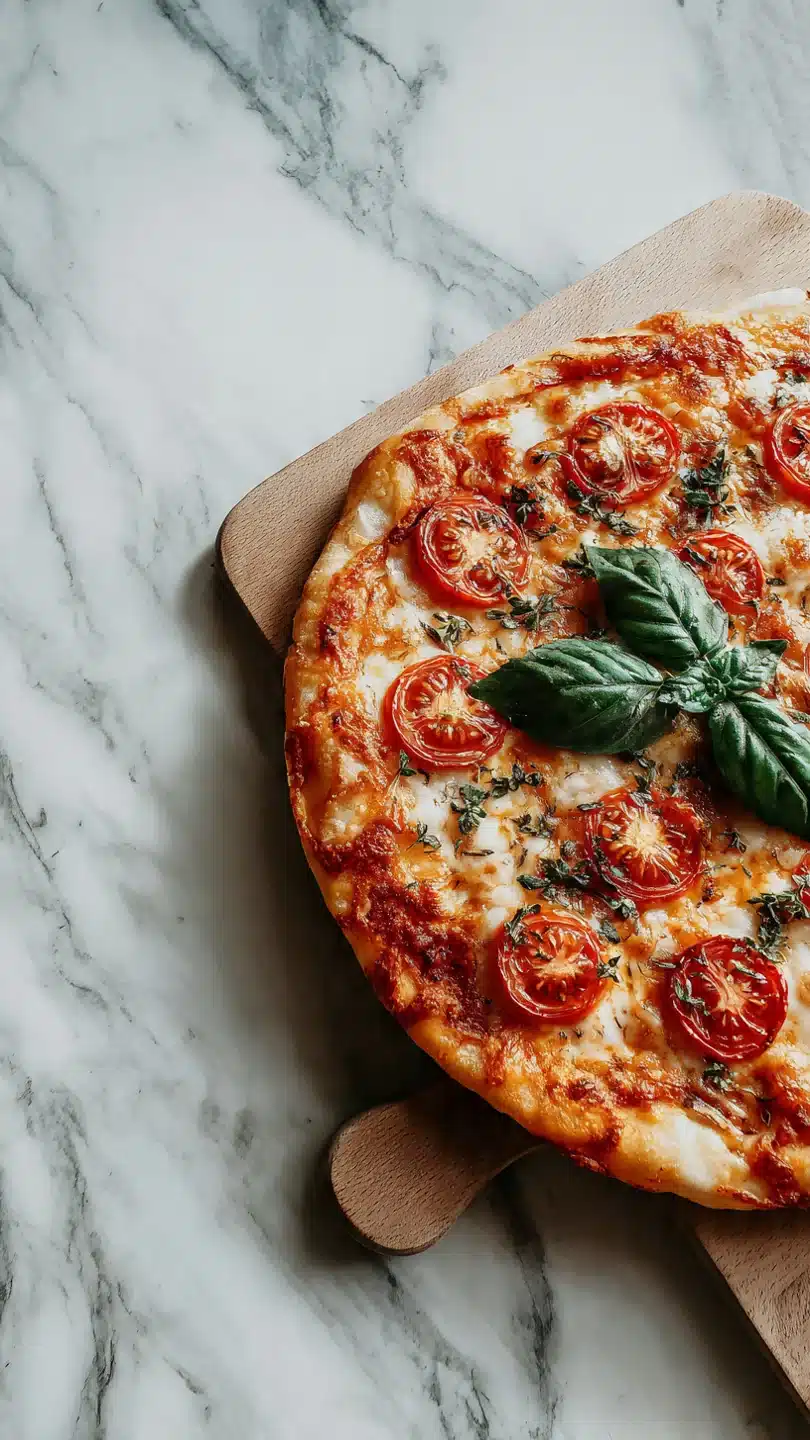
Transfer your stretched dough to a sheet of parchment paper. Spread a thin, even layer of tomato sauce, leaving a generous 1-inch border for the crust. Scatter the torn mozzarella evenly.
Now for the truly fun part. Start arranging your vegetable toppings with intention. Create concentric circles of red and yellow bell pepper.
Place halved cherry tomatoes cut-side up in the gaps. Scatter thin red onion ribbons and baby spinach leaves. Add black olives for a dark accent.
Remember, less is more—you want a balanced composition where you can still see the beautiful crust and melted cheese underneath.
Step 7: Bake to Perfection
Carefully slide the pizza (on its parchment paper) onto the screaming-hot pizza stone or baking sheet. Bake for 12-15 minutes. Believe me, the high heat is what gives you a blistered, leopard-spotted crust and perfectly melted cheese without steaming the toppings.
Rotate the pizza halfway through for even cooking. It’s done when the crust is a deep golden brown and the cheese is bubbling with some beautiful browned spots.
Step 8: The Finishing Touches
The moment the pizza comes out of the oven is your final chance to elevate it. Immediately scatter over the fresh basil and oregano leaves—the residual heat will wilt them just slightly and release their aroma. Drizzle with your best extra virgin olive oil in a zig-zag pattern.
Finally, finish with a delicate pinch of flaky sea salt and a crack of black pepper. Let it rest for 2-3 minutes before slicing. This brief rest allows the cheese to set, ensuring your gorgeous design stays intact when you cut into it.
- Dough Temperature is Key: If your kitchen is cool, the dough may take longer to rise. Be patient and let it double in size visually, not just by the clock. Rushing this step leads to a dense crust.
- The Sauce Barrier: A thin layer of sauce under the cheese acts as a moisture barrier between the dough and the wetter vegetable toppings, helping prevent a soggy center.
- Pre-Bake for Extra Crisp: For those who love an ultra-crispy crust, try this pro move: bake the dough with just the sauce for 3 minutes. Remove it, add cheese and toppings, then return it to the oven. This sets the crust.
- Embrace Imperfection: The most beautiful food often has a rustic, handmade quality. Don’t stress over a perfectly round shape or symmetrical patterns. Slight variations add charm.
- Invest in a Pizza Peel: If you make pizza often, a wooden or metal peel makes transferring the pizza to the stone effortless. Dust it with semolina flour for a classic finish.
Recipe Variations
- Caprese Style: After baking, top with alternating slices of fresh mozzarella, tomato, and basil leaves. Drizzle with a balsamic reduction for a classic, elegant look.
- Prosciutto & Arugula: Bake the pizza with just sauce and cheese. Once out of the oven, drape thin slices of prosciutto and a big handful of fresh arugula on top. The heat wilts the greens perfectly.
- Four-Cheese White Pizza: Skip the tomato sauce. Mix ricotta with a little garlic, salt, and pepper as the base. Top with mozzarella, fontina, gorgonzola crumbles, and a sprinkle of Parmesan after baking.
- Breakfast Pizza: Use the dough as a base for scrambled eggs, crispy bacon or sausage, cheddar cheese, and chives. A beautiful brunch centerpiece.
- Vegan Rainbow: Use a vegan mozzarella shreds or a cashew-based cream. Top with all the colorful veggies, vegan pesto dollops, and nutritional yeast for a cheesy flavor.
- Fig & Caramelized Onion: Spread a layer of goat cheese or ricotta on the dough. Top with thinly sliced caramelized red onions, fresh fig halves, and a drizzle of honey after baking for a sweet-savory masterpiece.
- Spicy ‘Nduja & Honey: Spread a few teaspoons of spicy ‘nduja (a spreadable Calabrian salami) over the sauce. Top with cheese and bake. Finish with a drizzle of hot honey and fresh oregano.
What to Serve With This Recipe
This pizza is a complete meal on its own, but it shines as part of a larger spread. For a casual dinner party, start with a simple arugula salad dressed with lemon juice, olive oil, and shaved Parmesan—the peppery greens cut through the richness of the pizza. For a more substantial meal, a bowl of marinated olives, some sliced cured meats, and a selection of cheeses make perfect accompaniments.
Beverage-wise, a light-bodied red wine like a Chianti or a Barbera pairs beautifully, or try a crisp, hoppy IPA. For a non-alcoholic option, sparkling water with a twist of lemon or a homemade basil lemonade complements the fresh flavors.
Storage & Make-Ahead Instructions
- Storage: Leftover pizza is best enjoyed within 2 days. Store slices in an airtight container in the refrigerator. The crust will soften, but reheating can help restore some crispness.
- Reheating: For the best texture, reheat slices in a preheated 375°F oven on a baking sheet for 5-8 minutes, or until hot and the cheese is melty again. You can also use a skillet over medium heat for a few minutes to crisp the bottom.
- Freezing: You can freeze the baked and cooled pizza slices. Wrap them individually in plastic wrap and then place in a freezer bag. Reheat from frozen in the oven.
- Make-Ahead Dough: The pizza dough can be made 1-2 days ahead. After the first rise, punch it down, place it in an oiled container, cover tightly, and refrigerate. Let it come to room temperature for about an hour before shaping.
- Prepped Toppings: Vegetables can be washed, sliced, and stored in separate airtight containers in the refrigerator for up to a day before assembling.
Frequently Asked Questions
Q: Can I use all-purpose flour instead of bread flour?
A: Yes, you can, but the crust will be slightly less chewy and may not develop as many air pockets. Bread flour has a higher protein content (12-13%) which creates stronger gluten, leading to that classic pizza texture.
Q: My dough didn’t rise. What went wrong?
A: The most common culprits are old/inactive yeast or water that was too hot (which kills the yeast) or too cold (which doesn’t activate it). Always proof your yeast first and use a thermometer to check the water is between 105-110°F.
Q: How do I get my crust crispy on the bottom without a pizza stone?
A: Preheat a heavy, rimless baking sheet or an inverted rimmed sheet in the oven for at least 30 minutes. Build your pizza on parchment paper and slide it onto the hot surface. The metal transfers heat quickly, mimicking a stone.
Q: Can I make this gluten-free?
A: Absolutely. Use a reliable gluten-free pizza flour blend (like Caputo Fioreglut or Bob’s Red Mill 1-to-1) and follow the package instructions for hydration, as GF doughs behave differently. You may need to roll it out between two sheets of parchment.
Q: Why let the pizza rest before slicing?
A: This 2-3 minute rest allows the molten cheese to set slightly. If you cut it immediately, the cheese and toppings will slide right off, ruining your beautiful arrangement. It also allows the crust to finish setting.
Q: My toppings are burning before the crust is done.
A: Your oven may be running hot, or your toppings may be too thin/dry. Try placing the pizza on a lower rack, reducing the temperature by 25 degrees, or adding delicate toppings like fresh herbs only after baking.
Q: Can I prepare the whole pizza ahead of time and bake later?
A: You can assemble the pizza on parchment paper up to 1 hour before baking and keep it refrigerated. However, the dough may start to get soggy from the sauce. For best results, I recommend prepping components separately and assembling just before baking.
Final Thoughts
Creating an aesthetic pizza is one of the most rewarding kitchen projects. It combines the tactile joy of making dough with the creative satisfaction of food styling, all culminating in a delicious, shareable meal. This recipe is a framework—a guide to the principles of balance, color, and restraint that make food visually appealing.
Once you master the basic dough and assembly technique, the canvas is yours to paint with whatever seasonal ingredients inspire you. The real magic happens when you pull that beautiful, bubbling creation from your own oven and see the smiles it brings. I encourage you to give it a try, play with the variations, and make it your own.
Don’t forget to snap a picture before you dig in! If you make this recipe, I’d love to hear how it turned out. Share your creations and tag me, and be sure to explore the site for more recipes designed to bring beauty and flavor to your home kitchen.
Happy cooking
Aesthetic Rainbow Veggie Pizza
Ingredients
Equipment
Method
- In a small bowl, combine the warm water (105-110°F is ideal—too hot will kill the yeast) and sugar. Sprinkle the yeast over the top and let it sit for 5-7 minutes until it becomes foamy. This ‘proofing’ step is non-negotiable for active dough. While it proofs, measure out your bread flour into a large mixing bowl.
- Make a well in the center of the flour and pour in the yeast mixture and 2 tablespoons of olive oil. Using a wooden spoon or your hands, mix until a shaggy dough forms. Turn it out onto a lightly floured surface and knead for 8-10 minutes. Trust me, proper kneading develops the gluten for that perfect chewy-yet-crisp crust. The dough is ready when it’s smooth, elastic, and springs back when poked.
- Place the kneaded dough in a lightly oiled bowl, turning to coat. Cover with a damp kitchen towel or plastic wrap and let it rise in a warm, draft-free spot for 1-1.5 hours, or until doubled in size. Tip from me: the oven with just the light on creates a perfect proofing environment.
- While the dough rises, prep all your toppings. This is the key to an aesthetic pizza. Slice your bell peppers and red onion thinly and uniformly. Halve the cherry tomatoes. Tear the mozzarella. Arrange each topping in its own small bowl. This ‘mise en place’ makes the assembly process smooth and intentional, which is crucial for the final design.
- Preheat your oven and pizza stone (if using) to 500°F (260°C) for at least 45 minutes. Punch down the risen dough and divide it in half (you can freeze one half for later). On a lightly floured surface, gently stretch one portion into a 12-inch round. Don’t use a rolling pin—use your knuckles to stretch it from the center outward to preserve those lovely air bubbles.
- Carefully transfer the stretched dough to a piece of parchment paper. Spread a thin, even layer of tomato sauce, leaving a 1-inch border for the crust. Scatter the torn mozzarella evenly. Now for the fun part: artfully arrange the vegetable toppings. Start with the bell peppers, creating concentric circles of color. Fill in with cherry tomatoes, red onion, spinach, and olives. Less is more—you want to see the beautiful crust peeking through.
- Slide the pizza (on the parchment) onto the preheated stone or baking sheet. Bake for 12-15 minutes, rotating halfway through, until the crust is deeply golden and the cheese is bubbly with some browned spots. Believe me, a hot oven is the secret to professional-quality pizza at home.
- Immediately after removing from the oven, garnish with fresh basil and oregano leaves. Drizzle with the remaining tablespoon of good olive oil and finish with a pinch of flaky sea salt and cracked black pepper. Let it rest for 2-3 minutes before slicing—this allows the cheese to set slightly so your beautiful design stays intact.


