
Gluten free pizza
There’s a moment of pure joy when you pull a homemade pizza from the oven—the bubbling cheese, the aromatic herbs, the promise of a perfect slice. For years, that moment felt out of reach for anyone needing a gluten free diet, often replaced by disappointing, crumbly, or cardboard-like crusts. After countless tests in my professional and home kitchens, I’ve cracked the code.
This isn’t just a substitute; it’s a celebration of pizza in its own right, with a crust that’s crispy on the outside, tender and chewy on the inside, and sturdy enough to hold all your favorite toppings. Let’s make a pizza night that everyone can enjoy.
- Authentic Pizza Experience: This recipe delivers the crispy-chewy texture and satisfying fold you crave, moving far beyond typical gluten free bread textures.
- Customizable Base: The crust is a perfect neutral canvas, ready for classic margherita, loaded veggie, or even barbecue chicken toppings.
- No Speciality Mix Needed: We build our own optimized flour blend from common gluten free staples, giving you control and often saving money.
- Tested & Reliable: Developed through three rounds of rigorous testing, this method accounts for the unique behavior of gluten free dough so you succeed on the first try.
- Better Than Takeout: Fresh, hot, and made with ingredients you choose, this homemade version surpasses most restaurant gluten free options in both flavor and texture.
- Family-Friendly: A fun, interactive meal that allows everyone to customize their own section, making it a hit for all ages.
Ingredients You’ll Need
Let’s gather our ingredients—this custom blend is the secret to a structurally sound yet deliciously edible crust. The combination of a good gluten free all-purpose flour, almond flour for fat and protein, and tapioca starch for chew mimics the complex network that gluten usually provides.
- Gluten Free All-Purpose Flour: I highly recommend Bob’s Red Mill 1-to-1 Baking Flour or King Arthur Measure for Measure. These blends contain binders like xanthan gum already, but we add a bit more for extra structure. Avoid blends that are mostly rice flour, as they can be gritty.
- Fine Blanched Almond Flour: This adds necessary fat, protein, and a subtle nutty flavor that improves browning. Almond meal is coarser and will give a gritty texture, so blanched almond flour is key.
- Tapioca Starch: Also labeled as tapioca flour, this is our magic ingredient for elasticity and that desirable chewy pull.
- Xanthan Gum: This is the essential binder that replaces gluten’s elastic properties. Do not skip it. If your all-purpose blend already contains it, still add the full amount listed for guaranteed structure.
- Active Dry Yeast: Even though gluten free doughs don’t rise dramatically, yeast adds crucial flavor and a slight airiness to the crumb.
- Egg & Vinegar: The egg adds richness and structure, while the vinegar tenderizes the dough and reacts with the baking powder for a better rise.

Note: You’ll find the complete list of ingredients, along with their exact measurements, in the printable recipe card at the bottom of this post.
Kitchen Equipment Needed
You don’t need a professional pizza oven, but a few key tools will make the process smoother. A stand mixer is ideal for beating the thick dough for the full three minutes, which is crucial for developing structure. If you have an electric hand mixer, it can work too, though it may struggle.
A pizza stone is the best tool for achieving a crisp, evenly cooked bottom crust; preheating it mimics a pizza oven’s floor. If you don’t have one, an inverted heavy rimmed baking sheet preheated in the oven is a great alternative. You’ll also need parchment paper for easy handling and transfer, and a kitchen scale for the most accurate flour measurements, which is particularly important in gluten free baking.
How to Make Gluten Free Pizza Recipe
Step 1: Activate the Yeast
Combine the warm water (think bathwater, not hot), yeast, and sugar in a small bowl. Give it a quick stir and let it sit undisturbed for 5-7 minutes. You’re looking for a foamy, creamy layer on top—this is proof your yeast is alive and active.
Believe me, this simple step is your insurance policy against a dense, flat crust. If you see no activity, your yeast may be old and it’s best to start fresh.
Step 2: Mix the Dough to Perfection
In your stand mixer bowl, thoroughly whisk together all the dry ingredients: the flours, starches, xanthan gum, and salt. This ensures even distribution, which is critical. With the mixer on low, pour in the foamy yeast mixture, olive oil, egg, and vinegar.
Once incorporated, crank the speed to medium and set a timer for 3 full minutes. The dough will be very sticky and look more like a thick brownie batter. This extended mixing time is non-negotiable—it hydrates the flours and allows the xanthan gum to create the necessary structure.
Step 3: Let the Dough Rest and Rise
Scrape the sticky dough onto a large sheet of parchment paper. Lightly oil your hands—this is essential—and gently shape the dough into a smooth ball. Place it in a lightly oiled bowl, cover with a damp kitchen towel, and let it rest in a warm spot for 30 minutes.
Tip from me: The inside of your oven with the light on is a perfect warm, draft-free spot. The dough will become slightly puffy, which develops flavor and makes it easier to shape.
Step 4: Shape and Par-Bake the Crust
Preheat your oven to a hot 475°F with your pizza stone or inverted baking sheet inside. Place the risen dough, still on its parchment, on your counter. Again, with oiled hands, press and stretch the dough outward into a 12-inch circle.
Aim for an even thickness, about 1/4-inch, with a slightly thicker rim for the crust. Now comes the key technique: par-baking. Carefully slide the parchment with the shaped crust onto the preheated stone.
Bake for 8 minutes. This sets the structure, preventing a soggy middle once toppings are added.
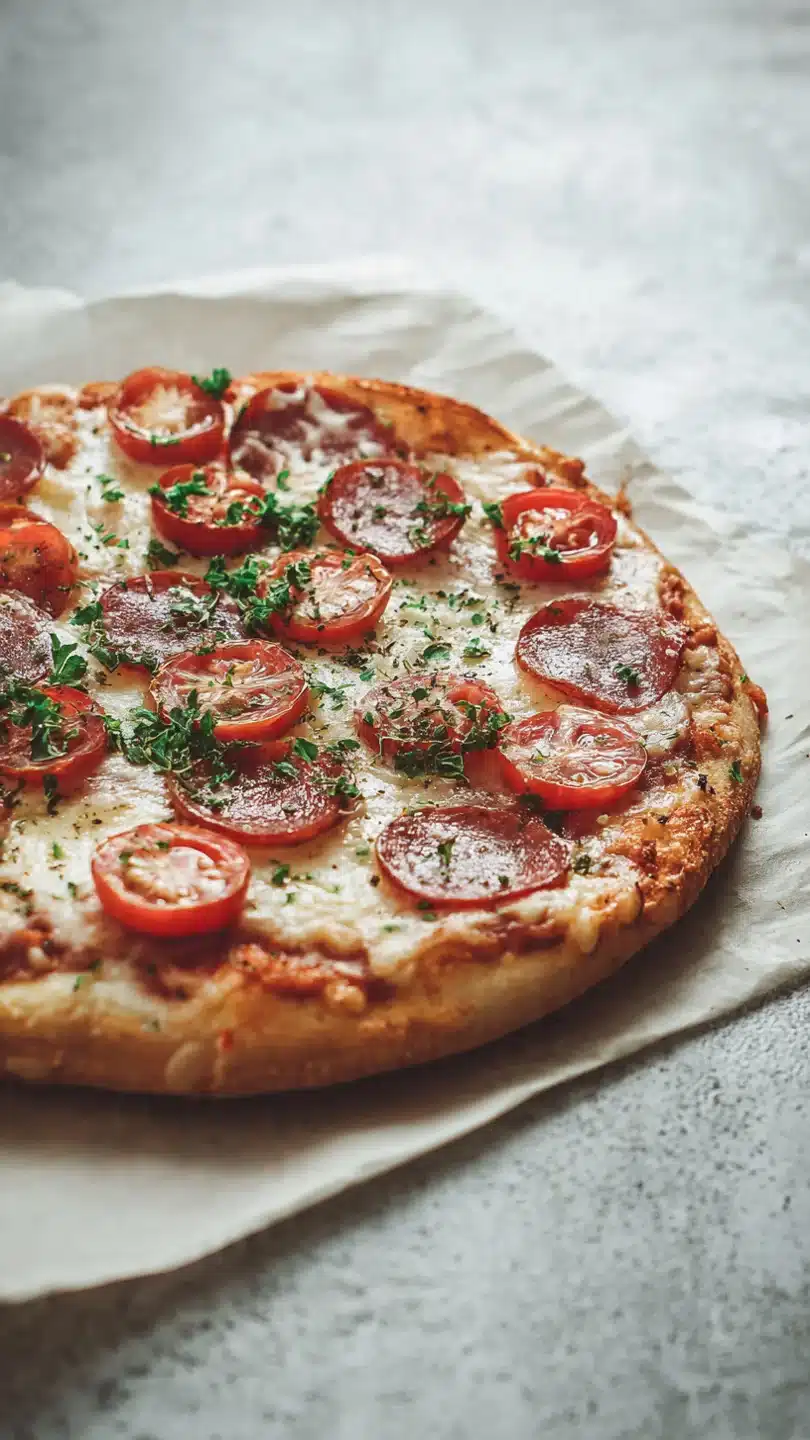
Step 5: Top, Finish Baking, and Serve
Pull the par-baked crust from the oven—it should look dry and set. Now for the fun part! Spread on a moderate amount of sauce, then cheese and your chosen toppings.
Overloading is the most common mistake; too much weight or moisture will compromise your perfect crust. Return the pizza to the oven for 6-8 more minutes, until the cheese is gloriously bubbly and the crust edges are a deep golden brown. Let it cool on a wire rack for 5 minutes to allow the cheese to set slightly, then slice and enjoy your masterpiece.
- Flour Measuring is Critical: For consistent results, use a kitchen scale. If using cups, fluff your flour with a spoon, spoon it into the cup, and level it off with a knife. Never scoop directly from the bag.
- Dough Temperature Matters: All ingredients, especially the egg and water, should be at room temperature to encourage proper yeast activity and dough hydration.
- The Parchment Paper Lifesaver: Gluten free dough is notoriously sticky. Shaping and transferring the crust on parchment paper prevents a frustrating mess and ensures it slides easily onto the hot stone.
- Don’t Rush the Par-Bake: This step drives off moisture and creates a barrier. Skipping it almost guarantees a soft, undercooked center beneath the toppings.
- High Heat is Your Friend: A very hot oven (475°F or higher) is necessary to achieve proper oven spring, browning, and a crisp crust. Don’t be tempted to lower it.
Recipe Variations
- Dairy Free Pizza: Use your favorite vegan mozzarella shreds and ensure your parmesan is dairy-free. For the dough, you can replace the egg with a “flax egg” (1 tbsp ground flaxseed mixed with 2.5 tbsp water, let sit 5 mins), though the crust may be slightly more fragile.
- Herb-Infused Crust: Add 1 teaspoon of dried Italian seasoning or 2 tablespoons of finely chopped fresh rosemary or thyme to the dry flour mixture before mixing.
- Whole Grain Version: Substitute 1/2 cup of the gluten free all-purpose flour with sorghum flour or a gluten free oat flour for a heartier, nuttier flavor and added fiber.
- Sheet Pan Pizza: After the first rise, press the dough directly into a greased 9×13 inch baking sheet. Par-bake for 10 minutes, then top and bake for another 10-12 minutes for an easy, thick-crust pizza.
- Buffalo Chicken: Top the par-baked crust with a mix of shredded cooked chicken tossed in buffalo sauce, then drizzle with ranch or blue cheese dressing after baking.
- Pesto & Veggie: Skip the red sauce. Spread a layer of basil pesto, then top with mozzarella, sliced cherry tomatoes, and artichoke hearts.
What to Serve With This Recipe
This pizza is a complete meal on its own, but it shines as part of a casual spread. For a true Italian-inspired feast, start with a simple arugula salad dressed with lemon juice, olive oil, and shaved parmesan—the peppery greens cut through the richness of the pizza beautifully. If you’re serving a crowd, a platter of antipasti like marinated olives, roasted peppers, and cured meats allows for grazing.
For beverages, a light, crisp Italian lager (gluten free options available) or a sparkling water with lemon are perfect pairings. For a family movie night, keep it simple with some carrot and celery sticks with ranch dressing on the side.
Storage & Make-Ahead Instructions
- Storage: Cool leftover pizza completely, then store slices in an airtight container in the refrigerator for up to 3 days.
- Reheating: The best method to restore crispness is to reheat in a dry skillet over medium-low heat for 3-4 minutes per side, covered for the last minute to melt the cheese. The microwave will make the crust soggy.
- Freezing: You can freeze the par-baked crusts! After the par-bake and cool, wrap them tightly in plastic wrap and foil. Freeze for up to 2 months. To use, add toppings directly to the frozen crust and bake at 475°F for 10-12 minutes.
- Make-Ahead Dough: The mixed dough can be covered and refrigerated for up to 24 hours after the first rise. Let it sit at room temperature for 20 minutes before shaping.
Frequently Asked Questions
Q: Can I make this dough without a mixer?
A: Yes, but it requires elbow grease. Mix with a sturdy wooden spoon until combined, then beat vigorously for 3 full minutes by hand to incorporate air and develop the xanthan gum’s structure. It’s a workout, but it works.
Q: My crust is gummy in the middle. What happened?
A: This is usually due to under-baking or skipping the par-bake step. Ensure your oven is fully preheated and use an oven thermometer to check accuracy. The par-bake is essential for setting the structure before wet toppings are added.
Q: What’s the best gluten free flour blend for this recipe?
A: Blends that contain a mix of rice flour, potato starch, and tapioca starch work best, like the Bob’s Red Mill or King Arthur brands mentioned. Avoid blends that are predominantly bean flours, as they can impart a strong flavor.
Q: Can I make this recipe vegan?
A: You can experiment. Replace the egg with a flax egg and use vegan cheese. The crust may be slightly more delicate and have a different rise, but it will still be tasty.
Ensure your sugar is vegan-certified if that’s a concern.
Q: Why do I need to add more xanthan gum if my flour blend already has it?
A: Most blends contain just enough for cakes or cookies. Pizza dough needs extra structural strength to be rolled thin and support toppings. The added amount ensures a reliable, non-crumbly crust.
Q: How do I get a crispier crust?
A: Three things: 1) Ensure your pizza stone or steel is preheated for a full 45 minutes. 2) Roll the dough slightly thinner. 3) After par-baking, you can brush the crust edges with a little olive oil before adding toppings.
Q: Can I use this dough for other things?
A: Absolutely! This versatile dough can be used to make calzones, breadsticks, or even focaccia. Adjust baking times accordingly.
Final Thoughts
Mastering a great gluten free pizza crust is one of the most rewarding kitchen accomplishments. It transforms weeknight dinners and special gatherings, proving that dietary needs don’t mean sacrificing flavor or tradition. This recipe, born from extensive testing, gives you the tools and techniques for consistent success.
Remember the key pillars: the right flour blend, proper mixing time, the essential par-bake, and a blazing hot oven. I encourage you to make it your own—try the variations, find your favorite topping combination, and most importantly, share it with people you love. Once you taste that first crispy, cheesy, homemade slice, you’ll know the effort was worth it.
Please let me know how your pizza turns out in the comments below, and don’t forget to tag me on social media with your creations
Perfect Gluten Free Pizza
Ingredients
Equipment
Method
- Proof the yeast by combining the warm water, yeast, and sugar in a small bowl. Let it sit for 5-7 minutes until foamy. This step is non-negotiable for a good rise, as it activates the yeast and proves it’s alive. If it doesn’t foam, start over with new yeast.
- In the bowl of a stand mixer fitted with the paddle attachment, whisk together the gluten free flour, almond flour, tapioca starch, xanthan gum, and salt. With the mixer on low, slowly pour in the yeast mixture, olive oil, egg, and vinegar. Increase speed to medium and beat for 3 full minutes. The dough will be thick, sticky, and more like a very thick cake batter than traditional bread dough. Trust me, this is correct.
- Scrape the dough onto a large piece of parchment paper. With oiled hands, gently shape it into a smooth ball. Place the dough ball in a lightly oiled bowl, cover with a damp kitchen towel, and let it rise in a warm, draft-free spot for 30 minutes. It won’t double, but it will become slightly puffy.
- Preheat your oven to 475°F (245°C) with a pizza stone or an inverted heavy baking sheet placed on the middle rack. Place the risen dough back on the parchment. Using oiled hands, press and stretch the dough into a 12-inch circle, about 1/4-inch thick. Build up a slight rim around the edge for the crust. Tip from me: If the dough sticks, a little more oil on your hands is the answer, not more flour.
- Par-bake the crust for 8 minutes. Carefully slide the parchment with the crust onto the preheated stone or baking sheet. Bake until the top looks dry and the edges are just beginning to set. This step creates a stable base that won’t get soggy under toppings.
- Remove the par-baked crust from the oven. Spread with 1/2 cup of your favorite pizza sauce, then top with 1 1/2 cups of shredded low-moisture mozzarella and your desired toppings. Return the pizza to the oven and bake for an additional 6-8 minutes, or until the cheese is bubbly and the crust edges are golden brown. Let it cool on a wire rack for 5 minutes before slicing.


