
Mini pizza recipes
There’s something universally delightful about a personal-sized pizza. It’s your own perfect circle of cheesy, saucy goodness, no sharing required. As a chef who has made thousands of pizzas, from wood-fired Neapolitan pies to quick weeknight dinners, I can tell you that mastering the mini version is a game-changer for busy households and entertaining.
These aren’t just shrunk-down large pizzas; the scale change requires a slight technique adjustment to achieve that ideal balance of soft, chewy crust, flavorful sauce, and perfectly melted cheese in every bite. Whether you’re feeding a crowd, looking for a fun cooking project with kids, or just want a quick and satisfying meal, this tested recipe delivers consistent, delicious results every time.
This recipe is designed for maximum flavor with minimal fuss. Here’s why it’s a keeper:
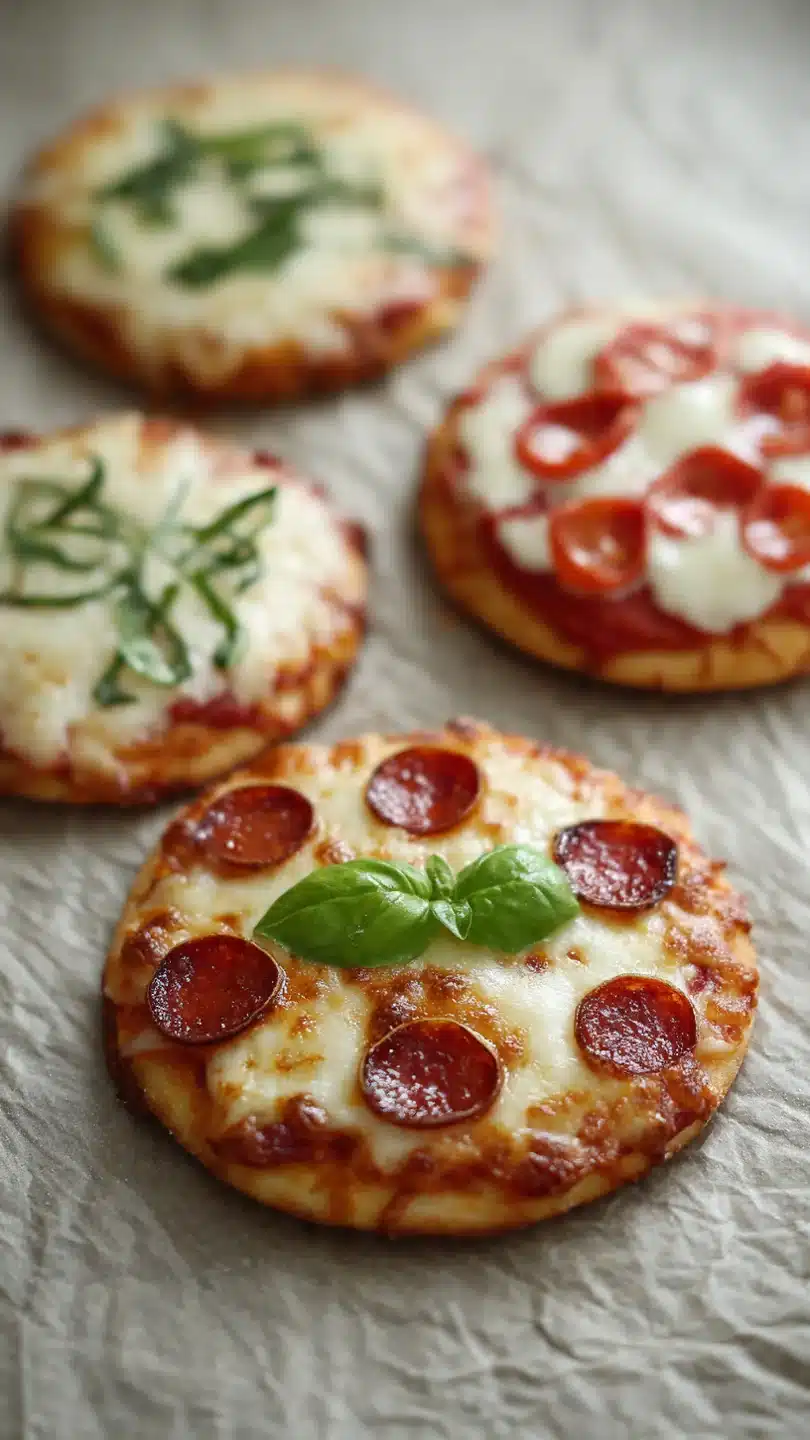
- Endlessly Customizable: This base recipe is a blank canvas. Set up a topping bar and let everyone create their own masterpiece, from classic Margherita to BBQ chicken.
- Perfect for Parties: They are the ultimate finger food—no plates or utensils needed. You can bake a large batch in minutes to keep a hungry crowd happy.
- Kid-Friendly Fun: Getting little hands involved in topping their own mini pizzas is a great way to encourage cooking and maybe even sneak in some veggies.
- Quick & Weeknight-Easy: With pre-made dough, you can go from idea to dinner in under 30 minutes. The active prep time is minimal.
- Crowd-Pleasing Flavor: The simple technique of brushing the dough with oil before saucing ensures a flavorful, non-soggy base that holds up to toppings beautifully.
- Diet-Flexible: Easily adapt for various needs by using gluten-free dough, vegan cheese, or loading up with vegetable toppings.
Ingredients You’ll Need
- Let’s gather our ingredients—this short list of pantry staples is all you need to create a platter of irresistible pizza bites. The magic is in the quality and technique.
For the best results, use a good-quality, pre-made pizza dough from the grocery store refrigerated section; it saves time and yields consistent results. For the sauce, a simple marinara or dedicated pizza sauce works perfectly—just avoid anything too watery. The cheese is key: always opt for low-moisture, whole-milk mozzarella that you shred yourself.
Pre-shredded cheese contains anti-caking agents that can prevent it from melting as smoothly and cohesively.
- Pre-made pizza dough: One pound of store-bought or homemade dough, brought to room temperature for easy stretching.
- Pizza sauce: Half a cup of your favorite brand, or a simple homemade marinara.
- Low-moisture mozzarella cheese: Two cups, freshly shredded for the best melt.
- Pepperoni: Twenty-four slices, for a classic topping (optional).
- Olive oil: One tablespoon, for brushing the dough to create a moisture barrier.
- Dried oregano: One teaspoon, for that authentic pizza parlor aroma.
- Garlic powder: One-quarter teaspoon, for a flavor boost (optional).
- Flour: For dusting your work surface to prevent sticking.

Note: You’ll find the complete list of ingredients, along with their exact measurements, in the printable recipe card at the bottom of this post.
Kitchen Equipment Needed
You don’t need any specialty gear for this recipe. A couple of standard baking sheets are your main workhorses. Lining them with parchment paper is non-negotiable in my kitchen—it prevents sticking without added grease and makes cleanup effortless.
A simple 2.5 to 3-inch round cutter (a glass works perfectly) shapes your pizzas. A pastry brush for the oil and a rolling pin (though your hands work fine) complete the list. For an extra-crispy crust, you can use a preheated pizza stone, but it’s not required for great results.
How to Make Mini Pizzas Recipe
Step 1: Prep Dough and Oven
Preheat your oven to 425°F (220°C). This high heat is crucial for getting a bit of oven spring and a nicely browned crust. Line two large baking sheets with parchment paper.
Lightly dust your work surface with flour. Place the room-temperature pizza dough on the surface and, using your hands or a rolling pin, gently press it into a large rectangle about 1/4-inch thick. Trust me, don’t overwork or aggressively knead it at this stage; you want to preserve the air bubbles for a tender texture.
Step 2: Cut and Shape the Bases
Using a 2.5 to 3-inch round cookie cutter or the rim of a glass, cut out circles from the dough. Press straight down without twisting for clean cuts. Re-roll the scraps once to cut more circles; a second re-roll can make the dough tough.
You should get about 24. Transfer the dough rounds to the prepared baking sheets, leaving about an inch between them for slight spreading. This spacing allows for proper air circulation and even browning.
Step 3: Assemble with Toppings
Here’s my pro tip: brush each dough round lightly with olive oil before adding sauce. This creates a protective layer that keeps the saucy moisture from seeping into the dough and making it soggy. Spoon about 1 teaspoon of pizza sauce onto the center of each round, spreading it almost to the edges with the back of the spoon.
Then, sprinkle a generous pinch of shredded mozzarella over the sauce. For classic pepperoni, press one slice gently into the cheese.
Step 4: Bake to Perfection
Bake for 10-12 minutes, rotating the pans halfway through. You’re looking for the crust edges to be puffed and a deep golden brown, and the cheese to be fully melted, bubbly, and with a few golden spots. Believe me, that visual cue is your best indicator of doneness.
The high heat ensures a quick bake so the crust doesn’t dry out.
Step 5: Season and Serve
Now comes the satisfying part. Remove the pans from the oven and immediately sprinkle the hot pizzas with dried oregano and a touch of garlic powder—the residual heat will wake up their flavors. Let them cool on the pan for 2-3 minutes before transferring to a serving platter.
This brief rest is essential; it allows the molten cheese to set just enough so you can pick them up without a mess. Step back and admire your handiwork, then serve warm.
A few chef-driven insights will elevate your mini pizzas from good to exceptional.
- Dough Temperature is Key: Always let refrigerated dough sit at room temperature for at least 30 minutes before shaping. Cold dough is elastic and will fight you, snapping back when stretched.
- The Oil Barrier: Never skip brushing the dough with oil before adding sauce. This simple step is the secret to a crisp-bottomed crust that holds its structure under the toppings.
- Cheese Science: Shred your own cheese from a block. Pre-shredded cheese is coated with potato starch or cellulose to prevent clumping, which also inhibits that smooth, stretchy melt we all love.
- Don’t Overload: It’s tempting to pile on toppings, but less is more here. Too much weight can prevent the center from cooking through, and excess moisture from veggies can create a soggy base.
- Baking Sheet Strategy: If you only have one oven rack, bake one sheet at a time on the center rack for the most even heat. If using two racks, rotate the sheets top-to-bottom and front-to-back halfway through baking.
Recipe Variations
- The true joy of this recipe is making it your own. Here are some tested and delicious variations to try.
- Three-Cheese Blend: Substitute half the mozzarella with a mix of freshly grated Parmesan and fontina for a more complex, nutty flavor.
- Veggie Supreme: Top with thinly sliced mushrooms, bell peppers, black olives, and red onion for a colorful vegetarian option. Tip: sauté very wet veggies like mushrooms first to remove excess moisture.
- BBQ Chicken: Swap pizza sauce for your favorite BBQ sauce. Top with shredded cooked chicken, red onion, mozzarella, and a sprinkle of cilantro after baking.
- Margherita Style: Use a simple tomato sauce, fresh mozzarella pearls (bocconcini), and a fresh basil leaf added after baking for a classic touch.
- Breakfast Pizza: Brush dough with olive oil, top with scrambled egg, cooked crumbled sausage, and cheddar cheese. A fantastic brunch idea.
- Pesto & Ricotta: Spread a teaspoon of basil pesto on the oiled base, dollop with whole-milk ricotta, and finish with a light sprinkle of mozzarella.
- Gluten-Free: Use your favorite store-bought gluten-free pizza dough. Note that it may not stretch as thinly, so adjust your rolling technique.
- Dessert Pizza: Brush dough with melted butter, sprinkle with cinnamon-sugar, and bake. Finish with a drizzle of icing or a dollop of whipped cream.
What to Serve With This Recipe
Mini pizzas are incredibly versatile. For a casual dinner, pair them with a simple green salad dressed with a tangy Italian vinaigrette to cut through the richness. For game day or a party, they’re the star of a spread that could include wings, vegetable crudités with dip, and a charcuterie board.
Beverage-wise, they pair wonderfully with a light lager, a crisp Italian red wine like Chianti, or for a family meal, sparkling water with lemon. They’re perfect for birthday parties, movie nights, or as a fun Friday night dinner tradition.
Storage & Make-Ahead Instructions
- These mini pizzas are best enjoyed fresh, but you can plan ahead with ease.
- Storage: Cool leftovers completely and store in an airtight container in the refrigerator for up to 3 days.
- Reheating: Reheat in a toaster oven or conventional oven at 350°F for 5-7 minutes until warm and crisp. The microwave will make them rubbery.
- Freezing: Freeze baked and cooled mini pizzas on a parchment-lined sheet until solid, then transfer to a freezer bag for up to 2 months. Reheat from frozen in a 375°F oven for 8-10 minutes.
- Make-Ahead: You can assemble the pizzas (up to the topping stage) on the baking sheets, cover tightly with plastic wrap, and refrigerate for up to 4 hours before baking. Add 1-2 minutes to the bake time if going straight from the fridge to the oven.
Frequently Asked Questions
Q: Can I use English muffins or pita bread instead of pizza dough?
A: Absolutely! For a super-quick version, English muffins, pita rounds, or even naan bread make great bases. Just adjust the baking time down to 8-10 minutes, as they brown faster.
Q: My dough keeps shrinking back when I try to shape it. What am I doing wrong?
A: This means the gluten is too tight. Your dough is likely too cold or has been over-kneaded. Let it rest at room temperature for another 15-20 minutes, covered with a towel.
When pressing it out, use gentle, patient pressure rather than forceful rolling.
Q: How can I prevent the mini pizzas from getting soggy in the middle?
A: The main culprits are too much sauce or overly wet toppings. Use the teaspoon measure for sauce, and always brush with oil first. For vegetables like mushrooms or zucchini, give them a quick sauté or pat them very dry with paper towels before adding.
Q: Can I make the dough from scratch?
A: Of course! A simple homemade dough only needs flour, yeast, water, salt, and olive oil. It will need about an hour to rise.
This recipe works perfectly with about one pound of any pizza dough, homemade or store-bought.
Q: What’s the best way to reheat leftovers?
A: Always use dry heat. A toaster oven or regular oven at 350°F for 5-7 minutes will restore crispness. Avoid the microwave, as it steams the crust and makes it tough.
Q: Can I freeze them before baking?
A: Yes. Assemble the pizzas, then freeze them solid on the baking sheet before transferring to a freezer bag. Bake from frozen, adding 3-5 minutes to the original bake time.
Q: My cheese isn’t browning. What should I do?
A: Try placing the baking sheet under the broiler for the final 60-90 seconds, watching closely to prevent burning. Also, ensure your cheese is spread evenly and not piled too high in the center.
Q: Are these suitable for a large crowd?
A: Perfectly. You can easily double or triple the recipe. Use multiple oven racks and rotate the sheets.
To keep them warm for serving, place cooked pizzas on a wire rack set over a baking sheet in a 200°F oven.
Final Thoughts
Mastering these mini pizzas gives you a reliable, delicious, and endlessly adaptable recipe for your permanent collection. They embody what I love most about cooking: the ability to create something crowd-pleasing and satisfying without complexity. Whether you stick with the classic pepperoni or experiment with the variations, the core techniques—the oil brush, the moderate saucing, the high-heat bake—ensure success every time.
I’ve served these to everyone from discerning foodie friends to picky toddlers, and they never fail to bring smiles.
I hope this recipe becomes a go-to in your home for easy dinners, festive gatherings, and simple cooking joy. If you try it, I’d love to hear how it turned out and what creative toppings you used. Share your creations online and tag me—there’s nothing I enjoy more than seeing your kitchen successes.
Happy cooking
Perfect Mini Pizzas
Ingredients
Equipment
Method
- Preheat your oven to 425°F (220°C). Line two large baking sheets with parchment paper. Lightly dust your work surface with flour. Place the room-temperature pizza dough on the surface and, using your hands or a rolling pin, gently press it into a large rectangle about 1/4-inch thick. Don’t overwork it, or the crust will become tough.
- Using a 2.5 to 3-inch round cookie cutter or the rim of a glass, cut out circles from the dough. Re-roll the scraps once to cut more circles. You should get about 24. Transfer the dough rounds to the prepared baking sheets, leaving about an inch between them for slight spreading.
- Brush each dough round lightly with olive oil. This creates a barrier to prevent a soggy crust. Spoon about 1 teaspoon of pizza sauce onto the center of each round, spreading it almost to the edges. Sprinkle a generous pinch of shredded mozzarella over the sauce.
- Add your desired toppings. For classic pepperoni, press one slice into the cheese. Bake for 10-12 minutes, rotating the pans halfway through, until the crust edges are puffed and golden brown and the cheese is bubbly and slightly spotted.
- Remove from the oven and immediately sprinkle with dried oregano and garlic powder. Let cool on the pan for 2-3 minutes before transferring to a serving platter. This brief rest allows the cheese to set slightly, making them easier to pick up. Serve warm and enjoy!


