
Pizza night aesthetic
There’s something magical about a homemade pizza that looks like it came from a wood-fired Neapolitan pizzeria. It’s not just about taste—it’s about the experience. The anticipation as the dough stretches, the vibrant colors of fresh toppings, the dramatic puff and char of the crust in a blisteringly hot oven, and that final, fragrant drizzle of olive oil.
A successful pizza night aesthetic transforms a simple meal into a memorable event, creating a centerpiece that’s as beautiful to look at as it is delicious to eat. This guide will walk you through the techniques, not just the ingredients, to achieve that coveted rustic, artisanal look and flavor in your own kitchen.
- Restaurant-Quality at Home: Achieve a blistered, chewy crust and melted, bubbly cheese without a professional oven.
- Visual Feast: Learn simple food styling tricks to make your pizza look incredibly inviting and photogenic.
- Technique-Focused: This recipe teaches you the why behind each step, building your pizza-making confidence.
- Endlessly Customizable: Master this classic base, then unleash your creativity with endless topping combinations.
- The Fun Factor: From stretching the dough to the final garnish, the process is engaging and satisfying for cooks of all levels.
- Impressive Results: It’s a surefire way to wow family, friends, or your social media followers with your culinary skills.
Ingredients You’ll Need
Let’s gather our ingredients—this is where quality truly shines. A great pizza night aesthetic starts with simple, vibrant components that each play a specific role in flavor and appearance.
For the best results, seek out a high-protein bread flour if making dough from scratch, or a reliable store-bought dough from your local pizzeria or bakery. The star of the sauce is San Marzano tomatoes: their sweet, low-acid flavor and vibrant red color are unmatched. For the cheese, fresh mozzarella (fior di latte) is essential for those beautiful milky pools and gentle stretch, unlike the rubbery melt of low-moisture shredded cheese.
Fresh basil adds a pop of green and aromatic freshness that dried herbs simply cannot replicate. Finally, a good extra virgin olive oil for finishing adds sheen and a fruity note.
If you can’t find San Marzano tomatoes, any high-quality canned crushed tomatoes will work—just simmer them for 10 minutes with a pinch of sugar if they taste too acidic. No pizza stone? A preheated inverted heavy baking sheet can work in a pinch.
The goal is a hot, thermal mass to cook the crust quickly.

Note: You’ll find the complete list of ingredients, along with their exact measurements, in the printable recipe card at the bottom of this post.
Kitchen Equipment Needed
The right tools make the process smoother and the results more professional. The single most important piece of equipment is a pizza stone or baking steel. It retains intense heat, mimicking a pizza oven floor to cook the crust quickly and give it that signature char and chew. A pizza peel is its trusty partner, allowing you to easily launch the pizza onto the stone and retrieve it.
If you don’t have a peel, the back of a rimless baking sheet dusted with semolina works.
You’ll also need a large mixing bowl for your sauce, a bench scraper for handling dough, and a sharp chef’s knife for prepping toppings. A wire cooling rack is my secret weapon for preventing a soggy bottom crust after baking—it allows air to circulate. Finally, have a pastry brush or small spoon ready for that final, glossy drizzle of olive oil.
How to Make Classic Rustic Margherita Pizza Recipe
Step 1: Heat the Stone and Make the Sauce
Your first move is critical: place your pizza stone or steel on a middle oven rack and preheat to the absolute highest temperature your oven can reach (500-550°F) for a full 45 minutes. This thermal mass needs time to absorb heat completely. While it heats, make your simple, no-cook sauce.
In a bowl, combine the San Marzano puree, minced garlic, salt, and a tablespoon of olive oil. Stir and let it sit. This raw sauce preserves the tomatoes’ bright, fresh flavor and vibrant color, which is key to the aesthetic.
Step 2: Stretch the Dough with Confidence
Place your room-temperature dough on a lightly floured surface. Tip from me: never use a rolling pin, as it presses out all the precious gas bubbles. Instead, use your fingertips to press down in the center, creating a thick border.
Then, gently lift the dough and use the backs of your knuckles to stretch it outward, rotating as you go. If it resists, let it rest for five minutes. Aim for a rustic 10-12 inch circle—perfection is overrated here.
Step 3: Assemble with a Light Hand
Generously dust your pizza peel or the back of a baking sheet with semolina flour. This is your non-stick launching pad. Transfer your stretched dough onto it.
Using the back of a spoon, spread a thin, even layer of sauce, leaving that beautiful border clear. Trust me, less sauce is more; it prevents sogginess. Tear the patted-dry mozzarella into small pieces and scatter them evenly.
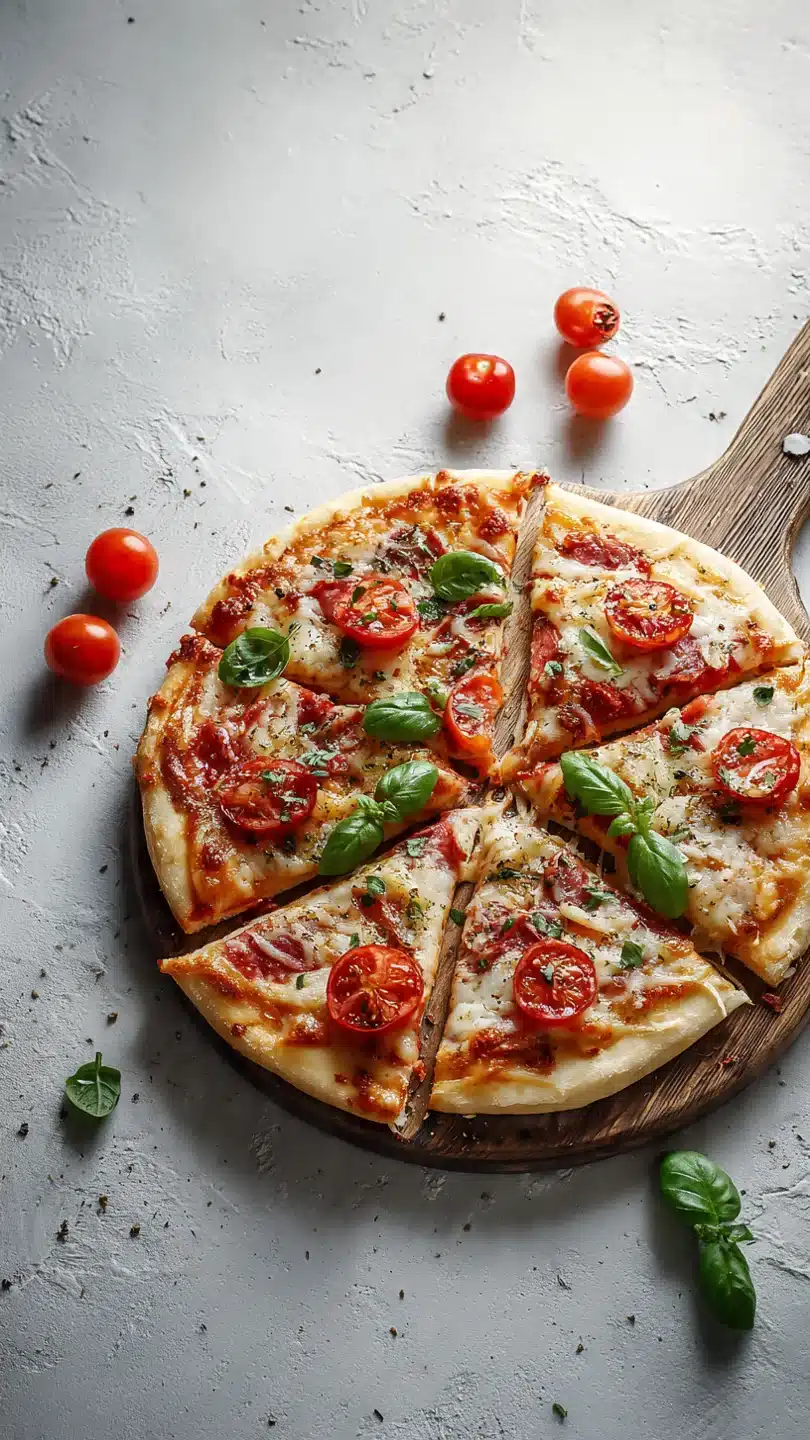
Add a few whole basil leaves and halved cherry tomatoes for color pops.
Step 4: The Launch and Bake
Open the oven door and give your peel a confident, quick shake to ensure the pizza isn’t stuck. Then, in one smooth motion, tilt the peel toward the back of the stone and quickly pull it back, letting the pizza slide off. You’ll hear an immediate, satisfying sizzle.
Bake for 8-12 minutes. Watch for the magic: the crust will puff dramatically, develop leopard-spot charring, and the cheese will melt into golden-brown pools.
Step 5: The Final Garnish and Serve
Using the peel or a large spatula, carefully remove the pizza from the oven. Immediately, while it’s still piping hot, tear over the remaining fresh basil leaves. The residual heat will wilt them just slightly, releasing incredible aroma.
Finish with a final, elegant drizzle of your best olive oil. Let it rest on a wire rack for just two minutes—this sets the cheese and keeps the crust crisp—then slice, serve, and bask in the glory of your pizza night masterpiece.
- Dough Temperature is Key: Cold dough is tight and will snap back. Always let your dough come to room temperature for 1-2 hours before stretching for maximum elasticity.
- The Dry Mozzarella Trick: Fresh mozzarella holds a lot of water. Always pat the torn pieces thoroughly with paper towels. This prevents a soupy, steamed pizza and ensures beautiful browning.
- Master the Launch: Do a “dry run” with your topped pizza on the peel before opening the oven. Give it a gentle shake. If it sticks, lift the edge and toss a bit more semolina underneath. A stuck pizza is a crisis.
- Embrace the Char: Don’t fear a few black spots on the crust. That’s leoparding—the sign of high heat and proper fermentation. It adds complex flavor and is central to the rustic aesthetic.
- Post-Bake Rest: Letting the pizza rest on a wire rack for 2 minutes is a game-changer. It allows steam to escape from the bottom crust, preventing sogginess and ensuring every slice is crisp.
Recipe Variations
- The Prosciutto & Arugula: Bake the pizza with just sauce and cheese. After baking, drape with thin slices of prosciutto and a big handful of fresh arugula. The heat wilts the greens perfectly.
- Spicy Honey & Soppressata: Top with spicy soppressata or calabrian chili slices before baking. As soon as it comes out of the oven, drizzle with hot honey for a sweet-heat sensation.
- White Pizza (Bianca): Skip the tomato sauce. Brush the stretched dough with garlic-infused olive oil, then top with ricotta dollops, mozzarella, and sautéed mushrooms. Finish with lemon zest.
- Seasonal Veggie: Use this as a canvas for farmers’ market finds. Try roasted butternut squash with sage and goat cheese in fall, or zucchini ribbons with pesto and burrata in summer.
- Breakfast Pizza: Spread a thin layer of herbed ricotta over the par-baked crust. Create wells and crack eggs into them, then bake until whites are set. Scatter with crispy pancetta.
What to Serve With This Recipe
A beautiful pizza deserves complementary sides that enhance the experience without stealing the spotlight. Start with a simple arugula salad dressed with lemon juice, olive oil, shaved Parmesan, and a crack of black pepper—its bitterness cuts through the pizza’s richness. For a heartier meal, serve with garlic knots made from extra dough or a bowl of marinated olives and artichokes.
Beverage pairings are part of the aesthetic. A chilled, light-bodied Chianti or a Sangiovese complements the tomatoes beautifully. For a non-alcoholic option, sparkling water with a twist of lemon or a homemade basil lemonade keeps things fresh.
For dessert, keep it Italian with affogato (vanilla gelato with a shot of hot espresso poured over) or simple almond biscotti for dipping.
Storage & Make-Ahead Instructions
- Best Served Immediately: Pizza is truly at its peak within minutes of leaving the oven. The crust texture changes as it cools.
- Short-Term Storage: If you have leftovers, let them cool completely, then store in an airtight container in the refrigerator for up to 3 days. Do not stack slices without parchment paper between them.
- Reheating for Quality: Reheat slices in a preheated 375°F oven on a wire rack set over a baking sheet for 8-10 minutes. This revives the crust. The microwave will make it soggy and rubbery.
- Freezing: You can freeze par-baked crusts. Bake the plain dough for 5 minutes, cool completely, wrap tightly in plastic and foil, and freeze for up to 2 months. Top and bake from frozen, adding a few extra minutes.
- Make-Ahead Sauce: The simple tomato sauce can be made 2-3 days in advance and stored in the refrigerator, allowing the flavors to deepen even more.
Frequently Asked Questions
Q: Can I use a regular baking sheet instead of a pizza stone?
A: You can, but the results will differ. Preheat the baking sheet in the oven, then carefully build your pizza directly on the hot sheet. The crust won’t get as crisp or develop as much char, but it will still be delicious.
Q: My dough keeps shrinking back when I try to stretch it. What am I doing wrong?
A: This means the gluten is too tight. The dough is either too cold or needs to relax. Cover it and let it sit at room temperature for 10-15 minutes, then try again.
Be gentle and use the weight of the dough to help it stretch.
Q: Why is my pizza coming out soggy in the middle?
A: The top three culprits are: too much sauce, wet toppings (like unpatted mozzarella), or an under-heated baking stone. Ensure your stone preheats for a full 45 minutes, use toppings sparingly and dry, and you’ll solve this.
Q: Can I make the dough from scratch?
A: Absolutely! A simple dough requires just flour, water, yeast, salt, and time. I recommend a 24-hour cold ferment in the refrigerator for the best flavor and texture.
Search for a “00 flour pizza dough” recipe to start.
Q: How do I get those beautiful leopard spots on the crust?
A: Leoparding comes from high heat and proper fermentation. Ensure your oven and stone are at maximum temperature, and if making dough, a long, slow ferment develops the sugars that caramelize and create those signature black blisters.
Q: What’s the best way to slice a pizza without ruining it?
A: Use a large, sharp chef’s knife or a pizza wheel. For a crisp crust, a rocking pizza cutter works well. For a softer, chewier crust, a sharp knife is better as it won’t drag the toppings.
Slice on a cutting board, not your serving plate.
Q: Can I make this gluten-free or vegan?
A: Yes. Use a high-quality pre-made gluten-free pizza dough blend. For vegan, use a vegan mozzarella alternative (ones that shred tend to melt better) and ensure your dough is made without dairy.
The sauce and basil are naturally vegan.
Final Thoughts
Mastering the pizza night aesthetic is about embracing the process as much as the final product. It’s the tactile joy of stretching dough, the strategic art of topping placement, and the thrilling moment you launch it into a blazing oven. This recipe gives you the foundational techniques to create a pizza that’s not only deeply satisfying to eat but also a genuine pleasure to behold.
Remember, each pizza you make will teach you something new—about your oven, your dough, your own preferences. Don’t strive for sterile perfection; aim for rustic, flavorful character. I encourage you to try this classic Margherita first, then use it as your canvas.
Tag me on social media with your creations—I love seeing how you make it your own. Now, preheat that stone, and let’s make pizza night the highlight of your week.
Classic Rustic Margherita Pizza
Ingredients
Equipment
Method
- Preheat your oven with a pizza stone or steel on the middle rack to its highest temperature (500-550°F / 260-290°C) for at least 45 minutes. This is non-negotiable for a proper crust. While it heats, make your sauce by combining the tomato puree, minced garlic, 1/4 tsp salt, and 1 tbsp olive oil in a bowl. Stir and set aside to let the flavors meld.
- On a lightly floured surface, gently stretch your room-temperature dough into a 10-12 inch circle. Trust me, don’t use a rolling pin—use your knuckles to press from the center outward, leaving a slightly thicker rim for the crust. If it springs back, let it rest for 5 minutes and try again. The goal is an even, rustic circle, not perfect.
- Dust a pizza peel or the back of a baking sheet with semolina flour or cornmeal. Carefully transfer your stretched dough onto it. This prevents sticking. Spread a thin, even layer of your tomato sauce over the dough, leaving about a 1-inch border. Less is more here; too much sauce makes a soggy pizza.
- Evenly distribute the torn, dried mozzarella over the sauce. Scatter the halved cherry tomatoes (if using) and a few whole basil leaves. Drizzle lightly with a bit more olive oil and a tiny pinch of salt. Now, with a confident shake, slide the pizza directly onto the preheated stone. Believe me, that initial sizzle is the sound of success.
- Bake for 8-12 minutes, until the crust is puffed, deeply golden, and charred in spots, and the cheese is bubbly and slightly browned. Use a peel or large spatula to remove it. Immediately garnish with the remaining fresh basil leaves and a final drizzle of olive oil. Let it rest for 2 minutes before slicing and admiring your beautiful creation.


