
Halloween pizza ideas
The crisp autumn air, the rustle of fallen leaves, and the excited buzz of costume planning can only mean one thing: Halloween is near. While candy is the undisputed star, the dinner before the trick-or-treating marathon deserves its own moment of fun. As a chef who has prepared countless holiday meals, I believe the best family recipes are those that create joy in the making, not just the eating.
Transforming a familiar favorite like pizza into a spooky centerpiece is exactly that kind of kitchen magic. These Halloween pizza ideas are designed to be approachable, forgiving, and wildly creative, yielding a deliciously golden crust topped with melted cheese and a personality all its own. Let’s turn your kitchen into a Halloween workshop and create a meal that’s as memorable as it is tasty.
- Maximum Fun, Minimal Fuss: These designs use simple ingredients and techniques. You’re not carving pumpkins, you’re arranging olives and peppers—it’s crafting you can eat.
- Totally Customizable: Start with a base recipe and let everyone design their own spooky slice. It’s a fantastic, interactive activity that gets kids involved in cooking.
- Satisfies the Whole Crowd: Beneath the fun decorations, it’s still classic, cheesy pizza—a guaranteed crowd-pleaser for picky eaters and adults alike.
- Flexible for Diets: Easily adapt with gluten-free dough, dairy-free cheese, or veggie-packed toppings to suit almost any dietary need.
- Great for Parties: Whether it’s a classroom party or an adult Halloween gathering, a pizza decorated like a mummy or spider web is an instant conversation starter.
- Practical & Delicious: This isn’t just about looks. We’ll use professional tips to ensure your crust is crisp and your cheese perfectly melted, so it tastes as good as it looks.
Ingredients You’ll Need
Let’s gather our ingredients—this is where the magic starts. The beauty of these Halloween pizza ideas lies in their simplicity. You likely have most of these items in your pantry already, and the “special” ingredients are just everyday vegetables used creatively.
For the best structural integrity and flavor, I recommend a good quality, low-moisture mozzarella (the kind you shred yourself melts more smoothly than pre-shredded, which has anti-caking agents). A simple, smooth pizza sauce or marinara works best as a canvas; chunky sauces can make decorating tricky. The dough is your foundation: a store-bought ball is perfectly fine (let it warm up on the counter for an hour!), but if you have a favorite homemade recipe, this is a great time to use it.
For decorations, black olives are your best friend for creating faces and spiders, while colorful bell peppers, pepperoni, and even strips of cheese can become webs, wounds, or monster scales.

Note: You’ll find the complete list of ingredients, along with their exact measurements, in the printable recipe card at the bottom of this post.
Kitchen Equipment Needed
You don’t need any special Halloween tools, just standard pizza-making gear. A pizza stone or steel is my top recommendation for a professional, crisp crust; preheat it in the oven for at least 30 minutes. If you don’t have one, an inverted heavy-duty baking sheet works well.
Parchment paper is non-negotiable for easily sliding your decorated creation onto the hot surface without ruining the design. Have a rolling pin handy if your dough needs help, a sharp knife for precise veggie cutting, and a pair of kitchen shears can be surprisingly useful for snipping dough or cheese into specific shapes. A pastry brush is great for giving the baked crust a glossy finish with a little olive oil.
How to Make Halloween Pizza Recipe
Step 1: Prep Your Canvas
Begin by preheating your oven to 475°F (245°C) with your pizza stone or inverted baking sheet inside. This high, direct heat is crucial for that perfect puff and char. While it heats, let your dough relax on a lightly floured surface.
Gently stretch and shape it. For a jack-o’-lantern, form a circle, then pinch and pull one end to make the pumpkin’s top stem point. For a mummy, an oval or rectangle works beautifully.
Tip from me: If the dough keeps snapping back, cover it with a towel and let it rest for 5 more minutes—the gluten just needs to relax.
Step 2: Sauce and Cheese Foundation
Transfer your shaped dough to a piece of parchment paper—this is your lifeline for easy oven transfer. Spread your sauce in a thin, even layer, leaving a small border for the crust. Believe me, a heavy hand with sauce leads to a soggy middle.
Next, sprinkle on your cheese. For most designs, full coverage is fine, but if you’re making a mummy, you’ll want to leave strategic “bandage gap” lines. Using part-skim, low-moisture mozzarella gives you great melt without excess grease pooling.
Step 3: The Spooky Decorating
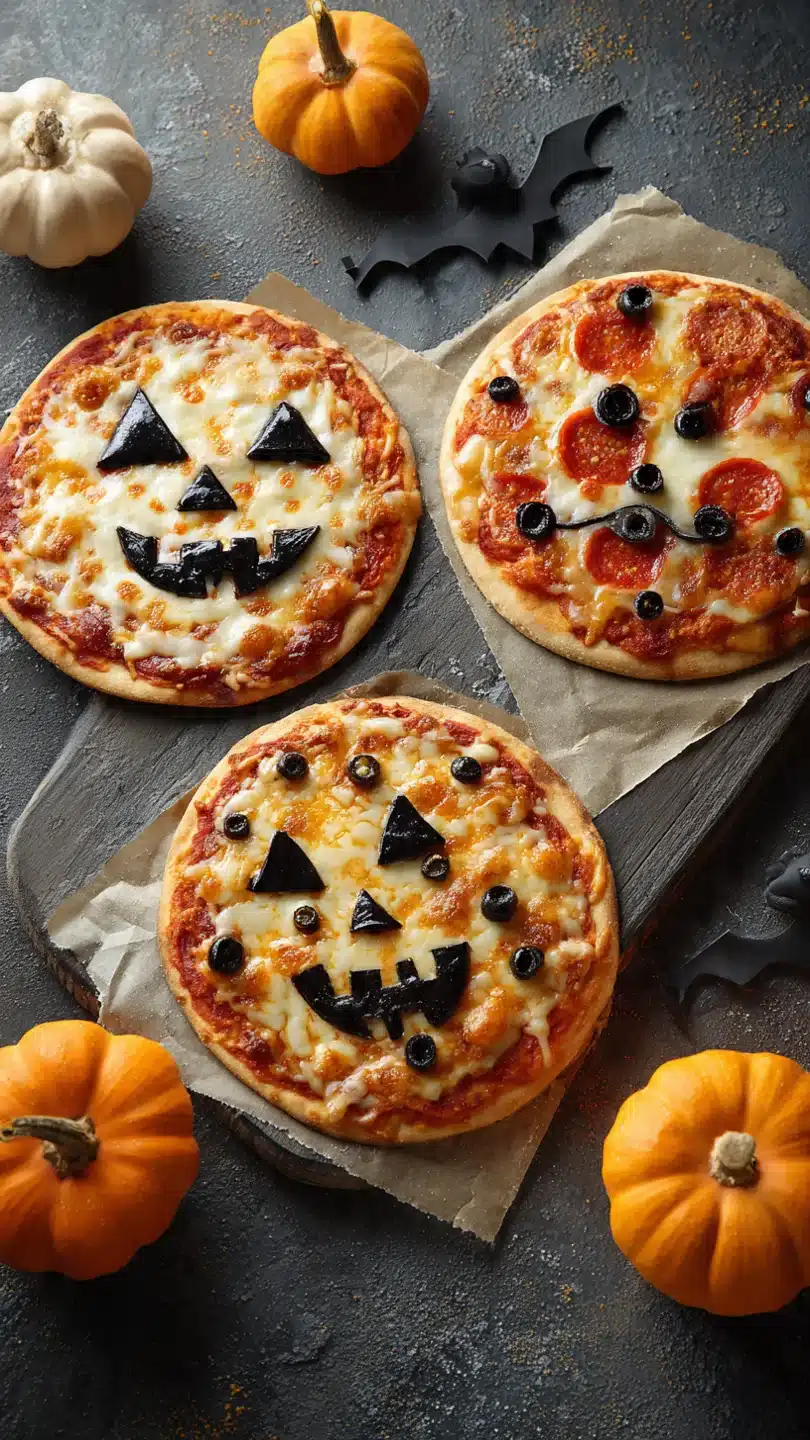
This is the truly fun, creative part. For a Jack-O’-Lantern, use sliced black olives for the eyes, nose, and jagged smile, and a strip of orange bell pepper for the stem. For a Mummy Pizza, lay strips of cheese (mozzarella string cheese works perfectly) horizontally across the pizza, leaving gaps to look like bandages, and add two olive slice eyes.
For a Spider Web, drizzle lines of ranch dressing or Alfredo sauce over a cheese-covered pizza and drag a toothpick from the center outward to create the web.
Step 4: The Bake and The Reveal
Carefully slide the parchment paper with your decorated pizza onto the preheated stone or baking sheet. The high heat will work its magic. Bake for 12-15 minutes.
You’re looking for a deeply golden-brown crust and bubbly, slightly browned cheese. The smell will be incredible. Trust me, don’t underbake—a pale crust won’t have the right texture or flavor.
Step 5: Final Touches and Serve
Once out of the oven, let the pizza rest on a cutting board for 2-3 minutes. This allows the cheese to set slightly so your design doesn’t slide off when you cut it. You can brush the crust edges with a little olive oil for extra flavor and shine.
Use a sharp pizza cutter or chef’s knife to slice, step back, and admire your edible Halloween art before serving it up to your very impressed ghosts and goblins.
- Dough Temperature is Key: Cold dough is tight and will fight you. Always let your dough sit at room temperature, covered, for at least 60-90 minutes before shaping. It will be exponentially more cooperative.
- Less is More with Toppings: For clear designs, avoid overloading. A thin layer of sauce and a moderate amount of cheese ensure your decorative elements stay on top and visible after baking.
- Pre-bake for Crispier Designs: For intricate designs with lots of veggies (like a pepper face), try a two-stage bake: par-bake the dough with just sauce for 5 minutes, add cheese and decorations, then finish baking. This prevents a soggy crust.
- Use the Right Cheese for the Job: String cheese is fantastic for mummy bandages. For spider bodies, a small mound of cheese or a meatball placed before baking works. For bloodshot eyes, a tiny dot of sriracha after baking is perfect.
Recipe Variations & Customizations
- Mummy Meat-Lovers: Before adding the cheese “bandages,” scatter cooked Italian sausage, pepperoni, and crumbled bacon over the sauced dough for a hearty mummy.
- Vegan Ghost Pizza: Use a vegan cheese shred and dough. After baking, place ghost shapes cut from vegan cream cheese or tofu slices on top. Use black sesame seeds or olives for eyes.
- Spooky Supreme: Create a “monster mash” pizza with traditional supreme toppings (peppers, onions, mushrooms, olives, pepperoni), then arrange them to form a monster face with pepperoni eyes and bell pepper mouths.
- Gluten-Free Goblin: Use your favorite gluten-free pizza dough mix or pre-made crust. Decorate with naturally gluten-free toppings like olives, peppers, ham, and pineapple for a “goblin green” and orange color scheme.
- Breakfast Witch Pizza: Use a white sauce or no sauce, top with scrambled eggs, cheese, and diced ham. Arrange sliced black olives into a witch’s hat and a bell pepper strip as the broom handle.
- Dessert Candy Corn Pizza: Use sweet pizza dough or sugar cookie dough as a base. Spread with a thin layer of vanilla frosting or mascarpone cheese. Decorate in horizontal stripes with yellow, orange, and white chocolate chips or sprinkles to mimic candy corn.
What to Serve With This Recipe
Halloween pizza is a hearty main, but you can build a full spooky spread around it. Keep sides simple and thematic. A creamy “witch’s brew” soup (like a green pea or broccoli cheddar) served in small cauldrons is perfect for dipping crusts.
A dark and stormy salad with mixed greens, black olives, purple cabbage, and a balsamic vinaigrette adds a fresh contrast. For drinks, a blood orange punch or sparkling cider with gummy worms makes it festive. If you’re hosting a party, consider making two different pizza designs and letting guests build their own “monster parts” with bowls of extra toppings like “eyeballs” (mozzarella balls), “fingers” (breadsticks), and “guts” (shredded cheese).
Storage & Make-Ahead Instructions
- Storage: Cool leftover pizza completely, then store slices in an airtight container in the refrigerator for up to 3 days. The designs will soften but will still taste great.
- Reheating: Reheat on a baking sheet in a 375°F (190°C) oven for 5-8 minutes until hot and crisp. The microwave will make the crust soggy and ruin the decoration’s texture.
- Make-Ahead: You can prep components ahead of time! Shape the dough, place it on parchment paper, and refrigerate covered for up to 24 hours. Chop all your veggie decorations and store them in separate containers. Assemble and bake just before serving for the best results.
- Freezing: I don’t recommend freezing the fully decorated baked pizza, as the vegetable toppings become watery upon thawing. You can, however, freeze the baked plain cheese pizza and add fresh decorative elements after reheating.
Frequently Asked Questions
Q: Can I use pre-made pizza crust or a French bread loaf?
Absolutely! For super-easy assembly, use a pre-baked pizza crust or split a baguette. Add sauce, cheese, and decorations, then bake just until the cheese melts (about 8-10 minutes).
It’s a fantastic shortcut.
Q: My black olives keep sliding off when I cut the pizza. How do I fix this?
This is common. Ensure you’re pressing toppings lightly into the cheese. Letting the pizza cool for 3-5 minutes after baking allows the cheese to firm up, acting like glue.
You can also place olive slices under a strategic cheese “anchor.”
Q: Can I make these pizzas with kids?
Yes, it’s ideal! Give them their own small piece of dough to shape, provide bowls of safe toppings (olives, peppers, pepperoni circles), and let them create their own monster faces. It’s a fun, hands-on cooking activity.
Q: What if I don’t have a pizza stone?
No problem. Use a heavy, rimless baking sheet (or an inverted rimmed sheet). Preheat it in the oven just like a stone.
The key is starting with a very hot surface to mimic a pizza oven’s floor.
Q: How do I get a really crisp crust?
The secret is high heat and a preheated surface. A pizza stone or steel is best. Also, avoid over-saucing and ensure your oven has fully reached 475°F+ before baking.
A thinner crust will also crisp up better.
Q: Are there no-cook decoration ideas?
Yes! For a spooky effect after baking, use fresh herbs like chives for spider legs, a dollop of sour cream for ghost shapes, or carefully placed hot sauce “blood” drips. Let the pizza cool slightly so these additions don’t melt away.
Q: Can I make the dough from scratch?
Of course! A basic pizza dough only needs flour, water, yeast, salt, and a little oil. Mix it, let it rise for an hour or two, and you’ll have a fantastic, fresh base.
It’s more time-consuming but very rewarding.
Final Thoughts
Turning dinner into a Halloween celebration doesn’t require fancy skills or rare ingredients—just a little creativity and the universal love of pizza. These Halloween pizza ideas are designed to be a starting point for your own family’s spooky traditions. The real recipe is the laughter in the kitchen as you arrange olive eyes and cheese bandages.
As a professional, I can assure you that the techniques here, from preheating your surface to managing toppings, will give you a delicious result worthy of any Halloween feast. So this October, skip the ordinary and create an edible centerpiece that’s as fun to make as it is to eat. I’d love to see your creepy creations—tag me on social media with your spooky slices!
Now, go preheat that oven and get ready for a hauntingly good meal. Happy Halloween
Classic Jack-O’-Lantern Pizza
Ingredients
Equipment
Method
- Preheat your oven to 475°F (245°C) with a pizza stone or inverted baking sheet inside. On a lightly floured surface, stretch your dough into a large circle, then gently pull and shape one side to form a classic pumpkin shape with a slight point at the top. Transfer the shaped dough to a piece of parchment paper.
- Spread the pizza sauce evenly over the dough, leaving a 1/2-inch border. Sprinkle the shredded mozzarella cheese over the sauce in an even layer. Trust me, using pre-shredded, low-moisture cheese helps prevent a soggy crust.
- Now for the fun part: create the jack-o’-lantern face. Use sliced black olives to form triangle eyes and a nose, and a wide, grinning mouth. For the stem, cut a strip from the orange bell pepper and press it into the dough at the top point.
- Carefully slide the parchment paper with the pizza onto the preheated stone or baking sheet. Bake for 12-15 minutes, or until the crust is deeply golden and the cheese is bubbly and slightly spotted.
- Remove from the oven and let it cool for 2-3 minutes before slicing. Brush the crust edges with a little olive oil for extra shine and flavor. Serve immediately and watch the spooky smiles appear!


