
Gluten free strawberry shortcake
There’s a particular magic to a well-made strawberry shortcake. It’s not just a dessert; it’s a celebration of early summer, a perfect balance of textures and temperatures. The quest for a gluten-free version that doesn’t taste like a compromise, however, can be frustrating.
Many turn out dense, gritty, or crumbly. After testing this formula multiple times in my professional kitchen, I’ve landed on a method that yields a shortcake biscuit so tender and light, with a delicate crumb and golden top, that no one will guess it’s gluten-free. It’s the perfect vehicle for juicy, macerated berries and billowy whipped cream.
Let’s make a dessert that’s genuinely worthy of those perfect strawberries.
- Authentic Texture: This recipe uses a specific technique and flour blend to create biscuits that are tender and flaky, not dense or sandy—a common pitfall in gluten-free baking.
- Simple, Quality Ingredients: You likely have most items in your pantry already. The focus is on technique, not hard-to-find specialty products.
- Make-Ahead Friendly: Every component can be prepared in stages. Macerate the berries and mix the dry ingredients hours ahead for a quick assembly before serving.
- Customizable & Diet-Friendly: The base recipe is easily adapted for dairy-free needs, and you can adjust the sweetness of the berries and cream to your taste.
- Impressive Yet Approachable: This dessert looks stunning layered in a glass trifle bowl or served simply on a plate, making it perfect for both weeknight treats and special occasions.
- The Science of Maceration: You’ll learn why a little sugar and time transform firm strawberries into a syrupy, intensely flavored topping that soaks into the biscuit perfectly.
Ingredients You’ll Need
Let’s gather our ingredients—this is where choosing quality makes all the difference. For gluten-free baking, precision matters more than in traditional recipes, as we’re building structure without gluten’s natural scaffolding.
For the Strawberries, you’ll need fresh, ripe berries. The maceration process (tossing with sugar) is non-negotiable; it breaks them down slightly and creates a luxurious juice that acts as a sauce. For the Gluten-Free Flour, you must use a reliable 1:1 baking blend that contains xanthan gum.
My go-to brands are Bob’s Red Mill 1-to-1 or King Arthur Measure for Measure. All-purpose gluten-free flour without binders will not work here. Cold Butter and Cream are critical for flakiness.
The butter should be straight from the fridge and cubed. The cream must also be cold to prevent the butter from melting before it hits the oven. Fresh Baking Powder ensures a good rise—check the date on your canister.
Finally, a splash of Vanilla in the whipped cream adds a warm, aromatic note that complements the berries beautifully.

Note: You’ll find the complete list of ingredients, along with their exact measurements, in the printable recipe card at the bottom of this post.
Kitchen Equipment Needed
You don’t need any specialty gadgets. A large mixing bowl, a pastry cutter or two forks for cutting in the butter, and a 3-inch round biscuit cutter are the main tools. A baking sheet lined with parchment paper prevents sticking and makes cleanup easy.
A wire cooling rack is helpful to stop the biscuits from steaming on the bottom. For the whipped cream, a hand mixer makes quick work, but a sturdy whisk and a chilled bowl will do the job with a little elbow grease.
How to Make Gluten-Free Strawberry Shortcake Recipe
Step 1: Macerate the Strawberries
This is your first and most important step, so let’s get it started. Hull and slice your strawberries, placing them in a medium bowl. Sprinkle over the sugar and give them a gentle stir.
Trust me, don’t skip this. As they sit, the sugar pulls the liquid from the berries through osmosis, creating a sweet, ruby-red syrup and intensifying their flavor. This process takes at least 20-30 minutes, which is the perfect amount of time to make and bake your biscuits.
Step 2: Combine Dry Ingredients & Cut in Butter
In your large bowl, whisk together the gluten-free flour, sugar, baking powder, and salt. Whisking aerates the flour and ensures the leavener is evenly distributed—a key step for an even rise. Now, add your cold, cubed butter.
Using a pastry cutter or your fingertips, work the butter into the flour until the mixture looks like coarse sand with visible pea-sized bits of butter. These butter pieces are your secret weapon; they’ll steam in the oven, creating those desirable flaky layers.
Step 3: Form the Biscuit Dough
Make a well in the center of your flour-butter mixture. Pour in the cold heavy cream all at once. Using a fork or silicone spatula, stir gently from the center outward, just until the dough comes together.
It will look shaggy and a bit sticky. Tip from me: The biggest mistake here is overmixing. We want to avoid developing any toughness.
Turn the dough out onto a surface lightly dusted with more gluten-free flour.
Step 4: Cut and Bake the Biscuits
Gently pat the dough into a 1-inch thick rectangle—no rolling pin needed. Dip your biscuit cutter in flour and press straight down to cut each biscuit. Believe me, do not twist the cutter, as this seals the edges and hinders a tall, straight rise.
Place the biscuits 2 inches apart on your prepared baking sheet. Brush the tops with a little extra cream and sprinkle with sugar for a sweet, crackly top. Bake at 425°F for 13-15 minutes until beautifully golden.
Step 5: Whip Cream and Assemble
While the biscuits cool slightly, make your whipped cream. Ensure your bowl and cream are cold for the fastest, fluffiest results. Whip the cream, powdered sugar, and vanilla just until soft peaks form.
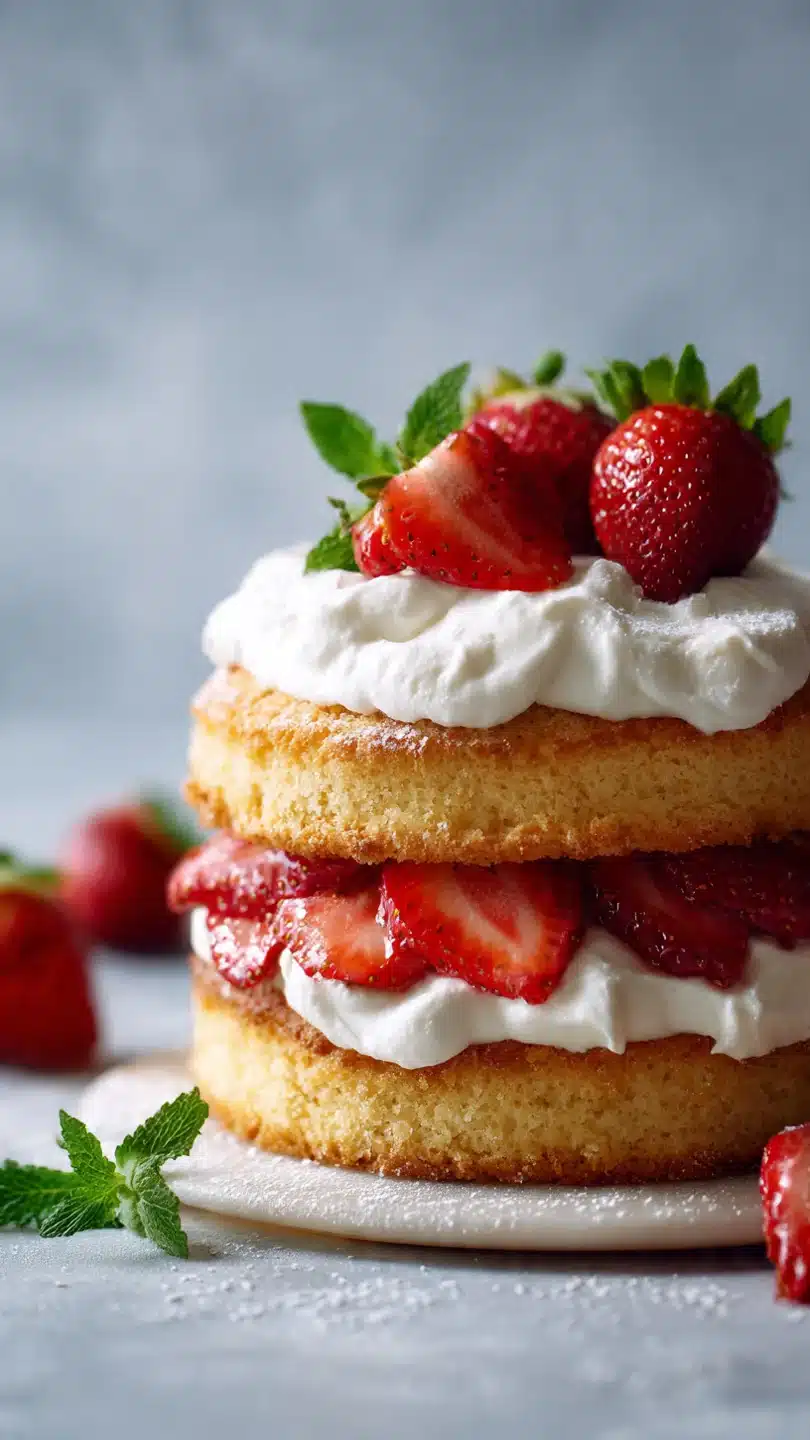
Now for the fun part: assembly. Split a warm biscuit, spoon a generous amount of strawberries and their glorious syrup over the bottom half, add a cloud of whipped cream, and place the top back on. Step back and admire your beautiful, gluten-free creation before diving in.
- Temperature is Everything: Your butter and cream must be cold. I sometimes freeze the butter cubes for 10 minutes before using. If the butter melts before baking, you’ll lose flakiness.
- Handle with Care: Gluten-free dough is more fragile than wheat-based dough. Pat it gently; never knead it. When re-rolling scraps, just press them together minimally.
- The High-Heat Bake: Baking at 425°F might seem high, but it’s crucial. It sets the structure quickly, creates a great rise, and delivers that ideal golden-brown color before the biscuits can dry out.
- Visual Cue for Doneness: The biscuits are done when they are uniformly golden on top and bottom, and they sound slightly hollow when tapped on the bottom.
- Serving Temperature: These are best served slightly warm or at room temperature. If you must make biscuits ahead, re-warm them gently in a 300°F oven for 5 minutes before assembling.
Recipe Variations
- Dairy-Free Delight: Use a high-fat, unsweetened coconut cream (chilled) in place of heavy cream in both the biscuit and the topping. Use vegan butter sticks for the biscuit fat.
- Lemon Zest Brightness: Add the zest of one lemon to the dry ingredients for the biscuits and a little zest to the whipped cream for a vibrant, citrusy twist.
- Mixed Berry Medley: Substitute half the strawberries with raspberries, blackberries, or blueberries for a deeper, more complex berry flavor.
- Cornmeal Shortcake: Replace 1/4 cup of the gluten-free flour with fine-ground cornmeal for a delightful texture and a subtle, rustic flavor.
- Individual Mini Shortcakes: Use a 2-inch cutter to make 10-12 smaller biscuits, perfect for a party or for portion control.
- Balsamic Berry Boost: Add 1 teaspoon of high-quality balsamic vinegar to the macerating strawberries. It sounds unusual, but it heightens the berries’ sweetness beautifully.
- Almond Flour Blend: For a nuttier flavor, replace 1/4 cup of the GF flour blend with super-fine almond flour. Note: This adds an allergen.
What to Serve With This Recipe
This strawberry shortcake is a star dessert that needs little accompaniment. For a summer dinner party, serve it after a light main like grilled lemon-herb chicken or a fresh salmon salad. A glass of chilled Prosecco, a sweet Moscato d’Asti, or a non-alcoholic sparkling lemonade pairs wonderfully.
For a true classic American spread, it’s the perfect finale to a barbecue or picnic. If you’re feeling indulgent, a small scoop of vanilla bean ice cream alongside the whipped cream is never a wrong choice.
Storage & Make-Ahead Instructions
- Component Storage: Store the macerated strawberries, whipped cream, and biscuits separately, all in airtight containers in the refrigerator. The berries will keep for 2 days, the whipped cream for 1 day, and the biscuits for 2 days.
- Biscuit Refresh: Biscuits will soften in the fridge. To restore texture, place them on a baking sheet in a 300°F oven for 5-8 minutes before assembling.
- Freezing Biscuits: Baked and cooled biscuits freeze exceptionally well. Wrap them tightly in plastic wrap and place in a freezer bag for up to 2 months. Thaw at room temperature and re-warm as above.
- Avoid Assembling Ahead: I do not recommend assembling the full shortcakes more than an hour before serving, as the biscuits will become soggy. Assemble them individually just before you’re ready to eat.
Frequently Asked Questions
Q: Can I use frozen strawberries?
A: I don’t recommend it for the best texture. Frozen berries release too much water when thawed, creating a soupy mixture and potentially making the biscuit soggy. Fresh is best for this recipe.
Q: My gluten-free flour blend doesn’t have xanthan gum. What should I do?
A: You must add it. Xanthan gum is the essential binder that replaces gluten. Add 1 teaspoon of xanthan gum to the dry ingredients in the biscuit recipe if your blend doesn’t include it.
Q: Why are my biscuits dry or crumbly?
A: This is usually due to over-measuring the flour or over-baking. Spoon your GF flour into the measuring cup and level it off—don’t scoop. Also, check your oven temperature with a thermometer; an oven that runs hot will bake them faster.
Q: Can I make the biscuit dough in a food processor?
A: Absolutely, and it’s a great way to keep the butter cold. Pulse the dry ingredients with the butter until crumbly, then transfer to a bowl to stir in the cream by hand to avoid over-processing.
Q: How do I know when the whipped cream is at “soft peaks”?
A: When you lift the beaters or whisk, the cream should form peaks that curl over gently at the tips. If they stand straight up, it’s stiff peaks—still usable, but less delicate.
Q: Is there a way to make this recipe less sweet?
A: Yes. You can reduce the sugar in the biscuit by 1 tablespoon and omit the sprinkling sugar on top. For the berries, start with 1 tablespoon of macerating sugar and add more to taste after they’ve sat.
Q: Can I use a different shape?
A: Of course. If you don’t have a biscuit cutter, you can pat the dough into a square and cut it into 6 squares with a sharp knife. The baking time will be similar.
Final Thoughts
This gluten-free strawberry shortcake proves that dietary restrictions don’t mean sacrificing flavor or texture. By understanding the small but important techniques—keeping ingredients cold, handling the dough gently, and using high heat—you can create a dessert that stands proudly alongside any traditional version. The joy of breaking into that tender biscuit, layered with juicy berries and cream, is a summer ritual worth preserving for everyone at the table.
I hope this recipe becomes a trusted favorite in your kitchen. If you make it, I’d love to hear how it turned out! Share your creations with me online, and don’t forget to explore more of my tested gluten-free baking recipes.
Happy baking
Gluten-Free Strawberry Shortcake
Ingredients
Equipment
Method
- Preheat your oven to 425°F (220°C) and line a baking sheet with parchment paper. In a medium bowl, combine the sliced strawberries and 2 tablespoons of granulated sugar. Stir gently, then set aside to macerate for at least 20-30 minutes. This draws out the juices and creates a delicious syrup.
- In a large bowl, whisk together the gluten-free flour, 1/4 cup granulated sugar, baking powder, and salt. Add the cold, cubed butter. Using a pastry cutter, two forks, or your fingertips, work the butter into the flour until the mixture resembles coarse crumbs with some pea-sized pieces of butter remaining. This creates flaky layers.
- Make a well in the center of the flour mixture and pour in 2/3 cup of cold heavy cream. Use a fork or a silicone spatula to gently stir just until a shaggy dough forms. Do not overmix. Turn the dough out onto a lightly floured surface (use more GF flour).
- Gently pat the dough into a 1-inch thick rectangle. Using a 3-inch round biscuit cutter dipped in flour, cut out biscuits. Press straight down without twisting. Gather scraps, pat together gently, and cut remaining biscuits. You should get 6. Place them 2 inches apart on the prepared baking sheet.
- Brush the tops of the biscuits with the remaining 2 tablespoons of heavy cream and sprinkle with the reserved 1 tablespoon of sugar. Bake for 13-15 minutes, or until the tops are golden brown and a toothpick inserted comes out clean. Transfer to a wire rack to cool slightly.
- While biscuits cool, make the whipped cream. In a chilled bowl, combine 1 cup cold heavy cream, powdered sugar, and vanilla. Whip with a hand mixer or whisk until soft peaks form. To assemble, split a warm biscuit, spoon macerated strawberries and their juices over the bottom half, top with a generous dollop of whipped cream, and crown with the biscuit top.


