
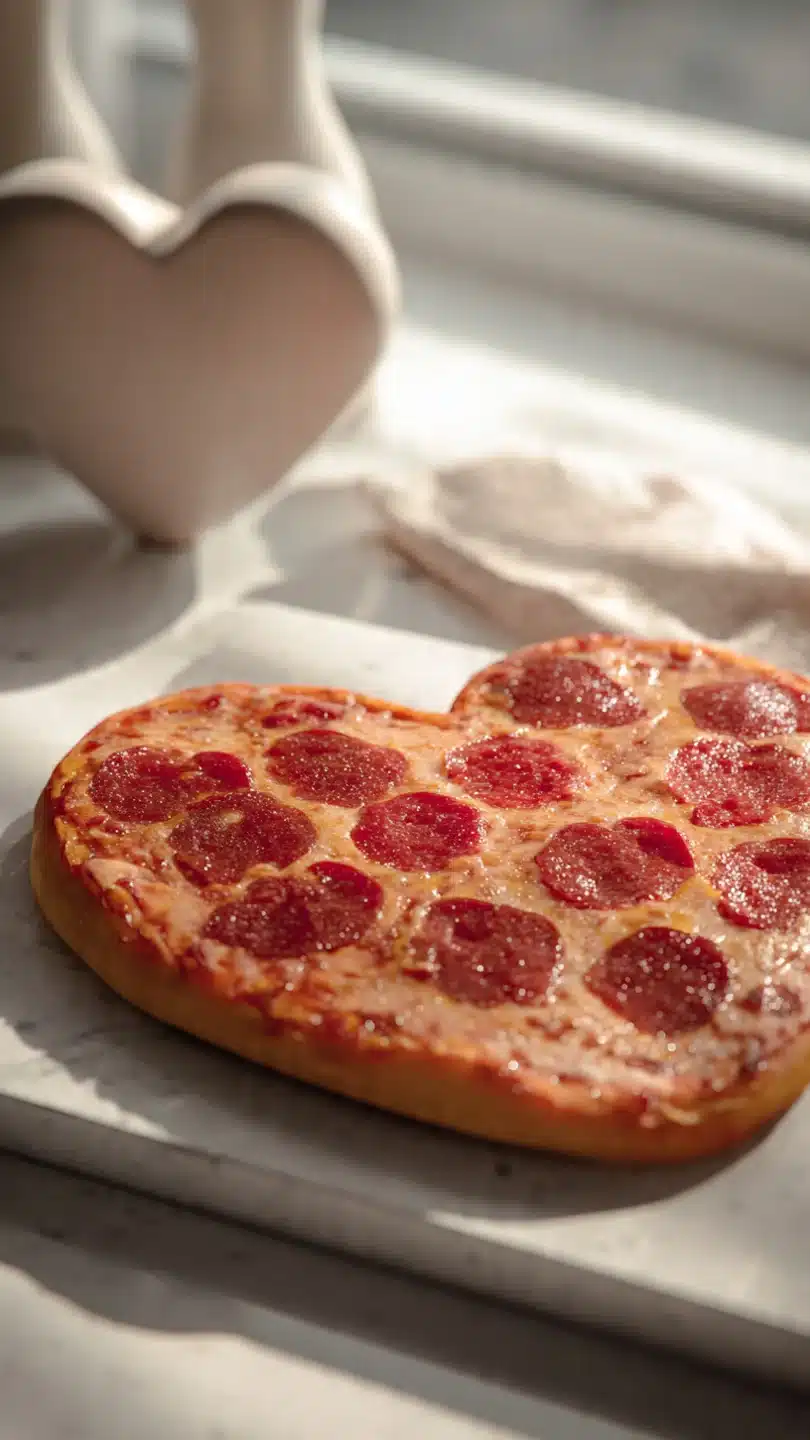
Valentine pizza
Forget crowded restaurants and prix-fixe menus. The most memorable Valentine’s dinners often happen right in your own kitchen, where you can laugh, chat, and create something delicious together. This Valentine pizza is my go-to recipe for a romantic night in.
It’s not just food; it’s an experience—a fun, interactive project that results in a stunning, heart-shaped pie with a crisp, chewy crust and bubbling, flavorful toppings. It feels special and celebratory, yet it’s built on a simple, no-fail dough that comes together in minutes. Let’s make a dinner that’s as much about the making as it is about the eating.
This Valentine pizza recipe is designed for success and enjoyment, not stress. Here’s why it’s a keeper:
- Surprisingly Simple Dough: No lengthy rise times are needed. A quick knead and a short rest yield a perfectly workable crust that bakes up crisp and chewy.
- Interactive & Fun: Shaping the dough into a heart is a delightful, hands-on activity perfect for cooking together. Imperfections add charm.
- Incredibly Customizable: The base recipe is a canvas. Use the suggested gourmet toppings or swap in your mutual favorites for a truly personal pie.
- Restaurant-Quality at Home: Baking on a preheated stone at a high temperature delivers that coveted blistered, crisp crust you love from pizzerias.
- Faster Than Delivery: From bowl to table in about 40 minutes, making it a perfect spontaneous weeknight treat or a planned romantic centerpiece.
- Diet-Flexible: Easily adaptable for vegetarian preferences or with gluten-free flour blends, so everyone can enjoy a slice.
Ingredients You’ll Need
- Let’s gather our ingredients—this is where simple pantry staples transform into a show-stopping romantic meal. Quality matters here, especially with so few components. For the flour, a good all-purpose like King Arthur works perfectly. The instant yeast is our secret for speed. For the sauce, I recommend a high-quality jarred marinara (Rao’s is excellent) or take 5 minutes to simmer canned San Marzano tomatoes with a pinch of salt and a garlic clove. Fresh mozzarella, torn by hand, melts into creamy pools far better than pre-shredded. For toppings, classic pepperoni is always a win, but this is your chance to get creative with prosciutto, mushrooms, or roasted peppers.

Note: You’ll find the complete list of ingredients, along with their exact measurements, in the printable recipe card at the bottom of this post.
Kitchen Equipment Needed
You don’t need professional gear to make professional-tasting pizza. Essential tools include a large mixing bowl, a rolling pin (a wine bottle works in a pinch), and a pizza cutter. The single most impactful item is a pizza stone or steel; it radiates intense heat for a crisp bottom crust.
If you don’t have one, use an inverted heavy-duty baking sheet. Parchment paper is non-negotiable—it makes shaping and transferring the delicate heart shape foolproof. You’ll also need a rimless baking sheet or pizza peel to slide the pizza onto the hot stone.
How to Make Valentine Pizza Recipe
Step 1: Mix and Knead the Dough
In your mixing bowl, combine the dry ingredients. Make a well and add the warm water and oil. Stir until a shaggy ball forms, then turn it out onto a floured surface.
Now, knead for 5-7 minutes. You’re not aiming for windowpane perfection, just a smooth, elastic dough that springs back lightly when poked. This brief kneading session develops the gluten just enough for structure without requiring a long rise.
Place the dough in an oiled bowl, cover it, and let it rest. Trust me, this 15-minute rest relaxes the gluten, making the next step—shaping the heart—much easier.
Step 2: Shape the Heart on Parchment
This is the fun part! Roll your dough into a rough circle on a large piece of parchment paper. Now, using your fingers, gently pull and shape the top center inward to create the distinctive dip of a heart.
Taper and pinch the bottom to a point. Don’t worry if it’s not geometrically perfect; a rustic, hand-formed look is beautiful. Tip from me: If the dough resists and shrinks back, simply walk away for five minutes.
Letting the gluten relax is the secret to easy shaping.
Step 3: Sauce and Top with Confidence
Leaving a clear border for the crust, spread your sauce in an even layer. Tear the fresh mozzarella into small, uneven pieces and scatter them generously. The irregular shapes create gorgeous molten pockets.
Now, add your chosen toppings. Believe me, less is more here. Overloading will steam the crust and make it soggy.
A final drizzle of olive oil on the exposed crust edges will promote a deep, golden brown color as it bakes.
Step 4: Bake on a Blazing Hot Surface
Carefully slide the parchment paper (with the pizza on it) directly onto your preheated pizza stone or inverted baking sheet. The high heat—475°F (245°C)—is crucial. It immediately sets the crust and creates those desirable air bubbles.
Bake for 12-15 minutes. You’ll know it’s done when the cheese is gloriously bubbly with some browned spots and the crust is a deep, appetizing gold.
Step 5: Garnish, Slice, and Serve Immediately
Use the parchment to pull the pizza back onto a cutting board. Let it rest for just 2-3 minutes; this allows the cheese to set slightly so it doesn’t slide off when you slice. Now, scatter over fresh basil leaves, a snow of grated Parmesan, and red pepper flakes for those who like heat.
Use a sharp pizza cutter to slice your masterpiece. Step back and admire your work, then dig in while it’s hot, crisp, and utterly delicious.
A few chef-approved insights will elevate your pizza from good to unforgettable:
- Temperature is Key: Ensure your oven and pizza stone are fully preheated. I recommend a full 45-minute preheat for the stone to reach thermal saturation.
- The Flour Trick: When shaping, keep a small bowl of flour nearby to dust your hands. This prevents sticking without incorporating too much extra flour into the dough, which can make it tough.
- Sauce Application: Use the back of a spoon to spread the sauce thinly and evenly. A thick layer of sauce is the most common culprit for a soggy pizza center.
- Cheese Wisdom: Always tear, don’t slice, fresh mozzarella. Pre-shredded cheese contains anti-caking agents that prevent it from melting into those lovely, creamy pools.
- The Resting Rule: Letting the baked pizza rest for a few minutes on the cutting board allows the molten cheese to firm up slightly, giving you cleaner slices.
Recipe Variations
- This heart-shaped canvas is perfect for personalization. Here are some tested and delicious variations:
- The White Heart: Skip the red sauce. Spread a base of ricotta cheese mixed with lemon zest, garlic, and salt. Top with mozzarella, sautéed spinach, and mushrooms.
- Spicy Amore: Use a spicy arrabbiata sauce. Top with spicy Italian sausage, sliced jalapeños, and mozzarella. Finish with a drizzle of hot honey after baking.
- Caprese Classic: After baking, top the hot pizza with slices of fresh tomato, torn basil, and small dollops of fresh burrata cheese. Drizzle with a balsamic glaze.
- Prosciutto & Arugula: Bake the pizza with just sauce and cheese. As soon as it comes out of the oven, drape with prosciutto and a huge handful of fresh arugula tossed in lemon juice.
- Vegetarian Garden: Load up with roasted red peppers, artichoke hearts, kalamata olives, and red onion. Consider using a mix of mozzarella and feta cheese.
- Breakfast for Dinner: Use a white sauce or olive oil base. Top with scrambled eggs, cooked bacon or pancetta, and cheddar cheese. Bake until bubbly.
What to Serve With This Recipe
This Valentine pizza is a hearty main, but a well-chosen side and drink can turn it into a full menu. For a simple salad, toss peppery arugula with a lemon vinaigrette and shaved Parmesan—the brightness cuts through the pizza’s richness perfectly. If you want something more substantial, garlic bread knots or roasted asparagus are excellent companions.
For drinks, a light-bodied red wine like a Chianti or Pinot Noir pairs beautifully, or try a sparkling rosé for extra celebration. Non-alcoholic options like sparkling water with a twist of blood orange or craft ginger beer are also fantastic. Serve it on a cozy coffee table for a relaxed picnic-style dinner.
Storage & Make-Ahead Instructions
- While pizza is always best fresh, here’s how to manage leftovers or get a head start:
- Short-Term Storage: Cool leftover pizza completely, then store slices in an airtight container in the refrigerator for up to 3 days.
- Reheating for Best Results: To recapture crispness, reheat slices in a 375°F (190°C) oven or toaster oven on a baking sheet for 5-8 minutes. Avoid the microwave, which makes the crust rubbery.
- Freezing: You can freeze the unbaked, shaped dough on its parchment paper. Once solid, wrap it tightly in plastic wrap and foil. Thaw in the refrigerator overnight before topping and baking.
- Make-Ahead Dough: The dough can be made, kneaded, and placed in an oiled bowl. Cover tightly and refrigerate for up to 24 hours. Let it sit at room temperature for 30 minutes before shaping.
Frequently Asked Questions
Q: Can I use pre-made pizza dough from the store?
Absolutely! It’s a great shortcut. Let the store-bought dough come to room temperature for about an hour before attempting to shape it into the heart.
This makes it much more pliable.
Q: My dough is too sticky to handle. What did I do wrong?
This usually means a bit too much water or not enough kneading. Don’t add more flour all at once. Instead, dust your work surface and hands lightly and continue kneading; the dough will often absorb the excess moisture as you work.
Q: I don’t have a pizza stone. What’s the best alternative?
An inverted heavy-gauge rimmed baking sheet is the next best thing. Preheat it in the oven just like you would a stone. The key is using a thick, heavy metal that holds and transfers heat well.
Q: How do I know when the pizza is done baking?
Look for three signs: the crust should be a deep golden brown, the cheese should be fully melted with some bubbly, browned spots, and the bottom (you can peek with a spatula) should be crisp and spotted with darker brown.
Q: Can I make this vegetarian or vegan?
Easily! For vegetarian, use the vegetable-based variations. For vegan, use a plant-based cheese that melts well (I’ve tested and like Miyoko’s mozzarella) and ensure your sauce and dough are vegan-friendly (check the sugar in the dough).
Q: Why is my pizza crust soggy in the middle?
The two most common causes are too much sauce or toppings that release a lot of water (like fresh mushrooms or tomatoes). Use sauce sparingly and consider pre-cooking very wet vegetables to remove moisture.
Q: Can I prepare the whole pizza ahead of time and bake it later?
I don’t recommend assembling more than 30 minutes before baking, as the sauce will start to soak into the dough. Instead, prep all your components (dough shaped, sauce ready, cheese torn, toppings chopped) and assemble just before baking.
Final Thoughts
This Valentine pizza is more than just a meal; it’s a chance to connect, create, and share something made with a little extra love (and a fun shape!). The recipe is deliberately straightforward, focusing on technique over complexity to ensure your dinner is a success, not a project. The joy of pulling that beautiful, bubbling heart from your own oven is a feeling that beats any restaurant reservation.
I’ve tested every step to make it foolproof for you. So, this Valentine’s Day—or any night you want to make special—gather your ingredients, put on some music, and make a memory along with a delicious pizza. I’d love to hear how it turns out!
Share your creations with me on social media or leave a comment below. Happy cooking, and enjoy every bite
Valentine’s Heart-Shaped Pizza
Ingredients
Equipment
Method
- Make the dough. In a medium bowl, whisk together the flour, instant yeast, sugar, and salt. Create a well in the center and pour in the warm water and olive oil. Using a fork, stir from the center outward until a shaggy dough forms. Turn it out onto a lightly floured surface and knead for 5-7 minutes until smooth and elastic. Trust me, this short knead develops the gluten for a perfect chew. Place the dough in a lightly oiled bowl, cover with a damp towel, and let it rest for 15 minutes while you prep your toppings.
- Shape the heart. Preheat your oven to 475°F (245°C) with a pizza stone or inverted baking sheet inside. On a large piece of parchment paper, roll the rested dough into a rough 12-inch circle. Now, using your hands, gently pull and shape the top center inward to form the top of the heart. Pinch the bottom to a point. Don’t stress about perfection—rustic charm is part of the appeal. Tip from me: If the dough springs back, let it rest for 5 more minutes before final shaping.
- Assemble the pizza. Leaving a 1/2-inch border, spread the pizza sauce evenly over the shaped dough. Scatter the torn fresh mozzarella over the sauce, then arrange your pepperoni or other toppings. Believe me, tearing the mozzarella, rather than slicing, creates those beautiful, melty pockets. Drizzle the edges of the crust with a little extra olive oil for a golden finish.
- Bake to perfection. Carefully slide the parchment paper with the assembled pizza onto the preheated pizza stone or baking sheet. Bake for 12-15 minutes. You’re looking for a deeply golden, crisp crust and bubbly, slightly browned cheese. The high heat is key for professional-style results at home.
- Garnish and serve. Remove the pizza from the oven and let it cool on the parchment for 2-3 minutes—this prevents a soggy crust. Scatter fresh basil leaves over the top, sprinkle with grated Parmesan, and add red pepper flakes if desired. Use a pizza cutter to slice and serve immediately. Step back and admire your delicious, heartfelt creation!


