
Strawberry Shortcake Layer Cake (Sponge Cake)
Imagine biting into a slice of cake where the delicate sponge melts in your mouth, perfectly complemented by the freshness of strawberries and the richness of whipped cream. This Strawberry Shortcake Layer Cake is a dessert that embodies the joy of spring and summer gatherings, offering a taste that’s both comforting and celebratory. Whether you’re marking a special occasion or simply indulging in a sweet treat, this recipe promises a delightful experience with every bite.
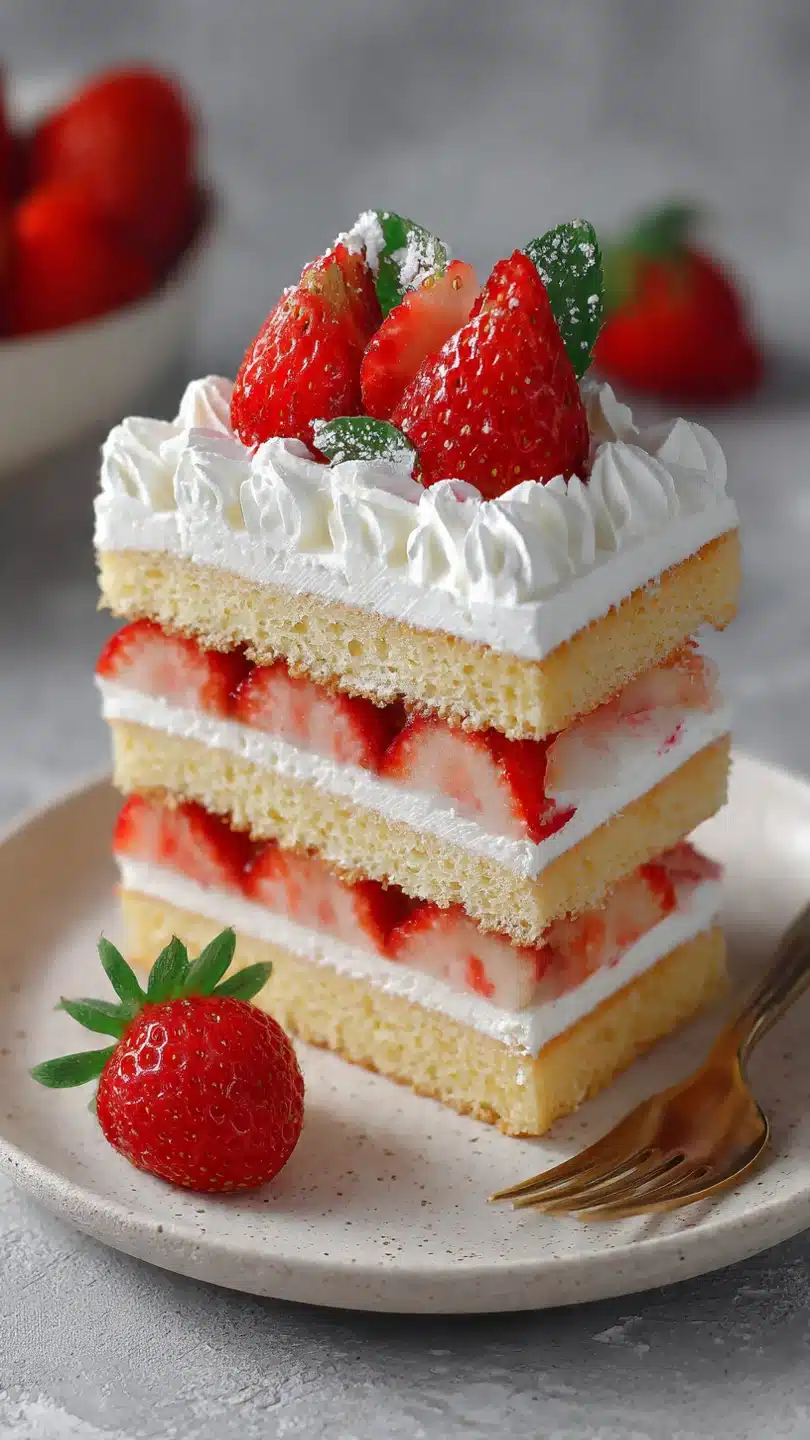
The light, airy sponge cake, layered with fresh strawberries and creamy filling, is a testament to the magic that simple ingredients can create when combined thoughtfully.
Why You’ll Love This Recipe- Easy Elegance: Impress your guests with a dessert that looks sophisticated but is surprisingly simple to make.
- Fresh Flavor: The vibrant taste of fresh strawberries elevates the classic shortcake into something special.
- Light Texture: The sponge cake is light and fluffy, providing the perfect base for the rich whipped cream and juicy strawberries.
- Versatile: Perfect for any occasion, from casual family dinners to elegant celebrations.
- Customizable: Easily adapt the recipe with different fruits or flavors to suit your preferences.
- Diet-Friendly: Suitable for vegetarians and can be adjusted for other dietary needs.
Let’s gather our ingredients—these simple pantry staples create magic together, resulting in a dessert that’s both delicious and visually appealing.
For the Sponge Cake:- All-purpose flour: Sifted to ensure a light texture.
- Baking powder: Helps the cake rise and become fluffy.
- Salt: Enhances the overall flavor.
- Large eggs: Room temperature for better incorporation and volume.
- Granulated sugar: Sweetens the cake and aids in achieving a tender crumb.
- Vanilla extract: Adds a subtle, aromatic flavor.
- Unsalted butter: Melted and cooled, for richness without weighing down the cake.
- Heavy whipping cream: Chilled for the best results in whipping.
- Powdered sugar: Sweetens the cream and stabilizes it.
- Fresh strawberries: Sliced for a burst of flavor and color.
When selecting your ingredients, opt for high-quality vanilla extract and fresh, ripe strawberries for the best taste. If you’re looking for substitutions, you can use cake flour instead of all-purpose flour for an even lighter texture, or try different berries like raspberries or blueberries for a twist.

Note: You’ll find the complete list of ingredients, along with their exact measurements, in the printable recipe card at the bottom of this post.
To create this Strawberry Shortcake Layer Cake, you’ll need a few essential pieces of equipment:
- 8-inch round cake pans
- Parchment paper for lining the pans
- An electric mixer for beating the eggs and whipping the cream
- Mixing bowls and a whisk for combining ingredients
- A spatula for folding and spreading
- A wire rack for cooling the cakes
- A serving plate for assembling and presenting your masterpiece
If you don’t have an electric mixer, a hand whisk can work, though it will require more effort to achieve the desired volume in the egg mixture.
How to Make Strawberry Shortcake Layer Cake Recipe
Step 1: Prepare the Cake Pans
Preheat your oven to 350°F (175°C). Grease two 8-inch round cake pans and line them with parchment paper. Trust me, this step ensures your cakes won’t stick and makes them easier to handle.
Step 2: Mix the Dry Ingredients
In a medium bowl, whisk together the sifted flour, baking powder, and salt. Set this aside while you prepare the wet ingredients. Believe me, sifting the flour makes a difference in the texture of your cake.
Step 3: Beat the Eggs and Sugar
In a large mixing bowl, beat the eggs and granulated sugar with an electric mixer on high speed until the mixture is thick and pale, about 5 minutes. Add the vanilla extract and continue beating until combined. Tip from me: room temperature eggs will whip up better and faster.
Step 4: Combine Wet and Dry Ingredients
Gently fold the dry ingredients into the egg mixture in three additions, being careful not to deflate the batter. Fold in the melted butter until just combined. Now comes the fun part—watching your batter come together into a light and airy mixture.
Step 5: Bake the Cakes
Divide the batter evenly between the prepared pans and smooth the tops. Bake for 20-25 minutes, or until the cakes are golden and a toothpick inserted into the center comes out clean. Step back and admire your cakes as they bake to perfection.
Step 6: Cool the Cakes
Allow the cakes to cool in the pans for 10 minutes, then transfer to a wire rack to cool completely. Patience is key here—cooling the cakes properly ensures they won’t fall apart when you assemble the layers.
Step 7: Whip the Cream
While the cakes cool, prepare the whipped cream. In a chilled bowl, beat the heavy whipping cream and powdered sugar until stiff peaks form. Chilling the bowl and beaters helps the cream whip up faster and more efficiently.
Step 8: Assemble and Serve
To assemble the cake, place one cake layer on a serving plate. Spread half of the whipped cream over the top and arrange half of the sliced strawberries on the cream. Place the second cake layer on top and repeat with the remaining whipped cream and strawberries.
Refrigerate the cake for at least 1 hour before serving to allow the flavors to meld. Slice and enjoy the fruits of your labor!
Professional Tips & Techniques Pro tip: When folding the dry ingredients into the egg mixture, use a gentle, sweeping motion to maintain the airiness of the batter. Overmixing can lead to a dense cake. Temperature matters: Ensure your eggs are at room temperature before beating. Cold eggs won’t whip up as well, resulting in a less voluminous cake. Visual cues: The cake is done when it’s golden brown and springs back when lightly touched. A toothpick inserted into the center should come out clean. Common mistake to avoid: Don’t open the oven door too early in the baking process, as this can cause the cakes to fall. Wait until at least 15 minutes have passed before checking. Storage & Make-Ahead InstructionsStore any leftovers in an airtight container in the refrigerator for up to 3 days. For a make-ahead option, you can bake the cake layers a day in advance and store them wrapped tightly at room temperature. Assemble the cake with the whipped cream and strawberries the day you plan to serve it for the freshest taste and texture.
Recipe Variations & Customizations Berry Medley: Instead of just strawberries, try a mix of berries like raspberries, blueberries, and blackberries for a colorful and flavorful twist. Lemon Zest: Add the zest of one lemon to the cake batter for a citrusy note that pairs beautifully with the strawberries. Chocolate Drizzle: Drizzle melted dark chocolate over the top of the assembled cake for an indulgent touch. Gluten-Free Option: Substitute the all-purpose flour with a gluten-free blend to accommodate dietary restrictions. Vegan Adaptation: Use a plant-based butter and a non-dairy whipping cream alternative to make this cake vegan-friendly. What to Serve With This RecipeThis Strawberry Shortcake Layer Cake pairs wonderfully with a cup of tea or coffee for an afternoon treat. For a more elaborate dessert spread, serve it alongside other fruit-based desserts or ice cream. It’s also a perfect centerpiece for a summer picnic or barbecue, complementing grilled foods and fresh salads.
Frequently Asked Questions Q: Can I make this ahead of time?A: Yes, you can bake the cake layers a day ahead and store them at room temperature. Assemble the cake with the whipped cream and strawberries the day you plan to serve it.
Q: Can I use frozen strawberries?A: Fresh strawberries are best for this recipe, but you can use thawed, drained frozen strawberries if fresh aren’t available.
Q: How do I know when the cake is done?A: The cake is done when it’s golden brown, springs back when lightly touched, and a toothpick inserted into the center comes out clean.
Q: Can I freeze this cake?A: You can freeze the unfrosted cake layers for up to 3 months. Thaw them at room temperature before assembling with the whipped cream and strawberries.
Q: What can I use instead of heavy whipping cream?A: You can use a non-dairy whipped topping or coconut cream as a substitute for heavy whipping cream.
Q: How can I adjust the sweetness?A: Adjust the amount of sugar in both the cake and the whipped cream to your taste. You can also use less sweet strawberries or add a bit of lemon juice to balance the sweetness.
Q: Can I make this cake in a different size?A: Yes, you can use 9-inch pans, but the baking time may need to be adjusted. Keep an eye on the cakes and test for doneness with a toothpick.
Final ThoughtsThis Strawberry Shortcake Layer Cake is a delightful dessert that combines the lightness of a sponge cake with the freshness of strawberries and the richness of whipped cream. Its versatility makes it suitable for any occasion, from casual gatherings to special celebrations. The recipe’s ease of preparation, combined with its impressive presentation, makes it a favorite among both novice and experienced bakers.
I encourage you to try this recipe and share your experience with us. Don’t forget to rate the recipe and share it on social media to inspire others to create their own delicious layer cake. Enjoy every bite and explore more of our recipes for further culinary adventures!
Strawberry Shortcake Layer Cake
Ingredients
Equipment
Method
- Preheat your oven to 350°F (175°C). Grease and line two 8-inch round cake pans with parchment paper.
- In a medium bowl, whisk together the sifted flour, baking powder, and salt. Set aside.
- In a large mixing bowl, beat the eggs and granulated sugar with an electric mixer on high speed until the mixture is thick and pale, about 5 minutes. Add the vanilla extract and beat until combined.
- Gently fold the dry ingredients into the egg mixture in three additions, being careful not to deflate the batter. Fold in the melted butter until just combined.
- Divide the batter evenly between the prepared pans and smooth the tops. Bake for 20-25 minutes, or until the cakes are golden and a toothpick inserted into the center comes out clean.
- Allow the cakes to cool in the pans for 10 minutes, then transfer to a wire rack to cool completely.
- While the cakes cool, prepare the whipped cream. In a chilled bowl, beat the heavy whipping cream and powdered sugar until stiff peaks form.
- To assemble the cake, place one cake layer on a serving plate. Spread half of the whipped cream over the top and arrange half of the sliced strawberries on the cream. Place the second cake layer on top and repeat with the remaining whipped cream and strawberries.
- Refrigerate the cake for at least 1 hour before serving to allow the flavors to meld. Slice and enjoy!


