
Mexican pizza
There’s something incredibly satisfying about the perfect bite of Mexican pizza. You get the audible crunch of a fried tortilla, the savory warmth of seasoned beef and beans, the gooey stretch of melted cheese, and the bright, cool finish of fresh tomato and sour cream. It’s a textural and flavor symphony that feels like a treat, yet is deceptively simple to create in your own kitchen.
As a chef who has spent years perfecting fusion dishes, I can tell you that the secret to a great homemade version lies in a few key techniques that ensure your crust stays crisp and your flavors stay bold from the first slice to the last. Let’s make a pizza that’s even better than the drive-thru classic.
This recipe is designed for maximum flavor with minimal fuss, using smart techniques I’ve honed in professional kitchens.
- Double-Crispy Crust: By frying individual tortillas and stacking them with a bean layer, we create a sturdy base that won’t buckle under the weight of toppings.
- 30-Minute Timeline: From skillet to table in half an hour, this is a realistic and delicious solution for busy weeknights.
- Endlessly Customizable: The template is perfect for using what you have—swap proteins, cheeses, and sauces to make it your own.
- Crowd-Pleasing Comfort: It’s the ultimate fusion food that appeals to both pizza lovers and taco enthusiasts, making it a guaranteed hit with families.
- Perfect Texture Balance: The method ensures every component—crispy, melty, savory, and fresh—shines in each bite without becoming soggy.
Ingredients You’ll Need
- Let’s gather our ingredients. This is where we build layers of flavor, so each component matters. Using a thinner, restaurant-style flour tortilla is my top tip; it fries up crispier than a thick, burrito-sized one. For the beef, an 85/15 lean-to-fat ratio gives you great flavor without being overly greasy. The refried beans act as both a flavorful glue and a moisture barrier to protect the bottom tortilla. Don’t be tempted to skip the frying step—it’s the culinary technique that transforms a soft tortilla into a sturdy, flavorful crust that can hold its own.

Note: You’ll find the complete list of ingredients, along with their exact measurements, in the printable recipe card at the bottom of this post.
Kitchen Equipment Needed
You don’t need any special equipment. A large skillet (I prefer cast iron for even heat) is your workhorse for both browning meat and frying tortillas. A standard baking sheet lined with parchment paper is essential for easy cleanup and even baking.
A pizza cutter makes clean slicing a breeze, but a sharp chef’s knife works just as well. Having a spatula and a plate lined with paper towels for the fried tortillas will keep the process smooth and organized.
How to Make Mexican Pizza Recipe
Step 1: Cook and Season the Beef
Heat your skillet over medium-high heat and add the ground beef. Use your spatula to break it into small crumbles as it cooks—this ensures every bite has perfectly distributed meat. Once no pink remains, drain the excess fat.
This is a crucial step; too much grease will make the final pizza soggy. Stir in the taco seasoning and water, then let it simmer. Believe me, those few minutes of simmering allow the spices to bloom and fully coat the meat, creating a deeply flavorful base layer.
Step 2: Fry the Tortillas to Perfection
Wipe out the skillet and add a tablespoon of neutral oil over medium heat. You’re not deep-frying; you’re giving each tortilla a quick, shallow fry. Slide one in and let it cook for about 30-45 seconds until it puffs slightly and develops light golden spots.
Flip and repeat. Trust me, this transforms the texture from soft and pliable to crisp and sturdy. Transfer them to a paper towel-lined plate.
This step is non-negotiable for the signature crunch.
Step 3: Build the Double-Decker Base
Place two fried tortillas on your prepared baking sheet. Spread a thin, even layer of refried beans over each—this is your edible mortar. Now, press a second fried tortilla on top of each bean-covered one.
You’ve just created a fortified foundation that will stand up to the juicy toppings without getting soggy in the center. This chef’s trick is the key to structural integrity.
Step 4: Layer on the Saucy Toppings
Now for the fun part! Spread a thin layer of enchilada sauce over the top tortilla. This adds moisture and tang.
Divide the seasoned beef evenly between the two pizzas, spreading it out gently. Finally, blanket everything with a generous amount of shredded cheese. Tip from me: take the cheese all the way to the edges.
As it melts and bubbles in the oven, it will create those delicious, crispy cheese frico edges.
Step 5: Bake, Garnish, and Serve
Slide your assembled pizzas into the preheated 400°F oven. Bake for 8-10 minutes. You’re looking for fully melted, bubbly cheese and the tortilla edges to turn a deeper golden brown.
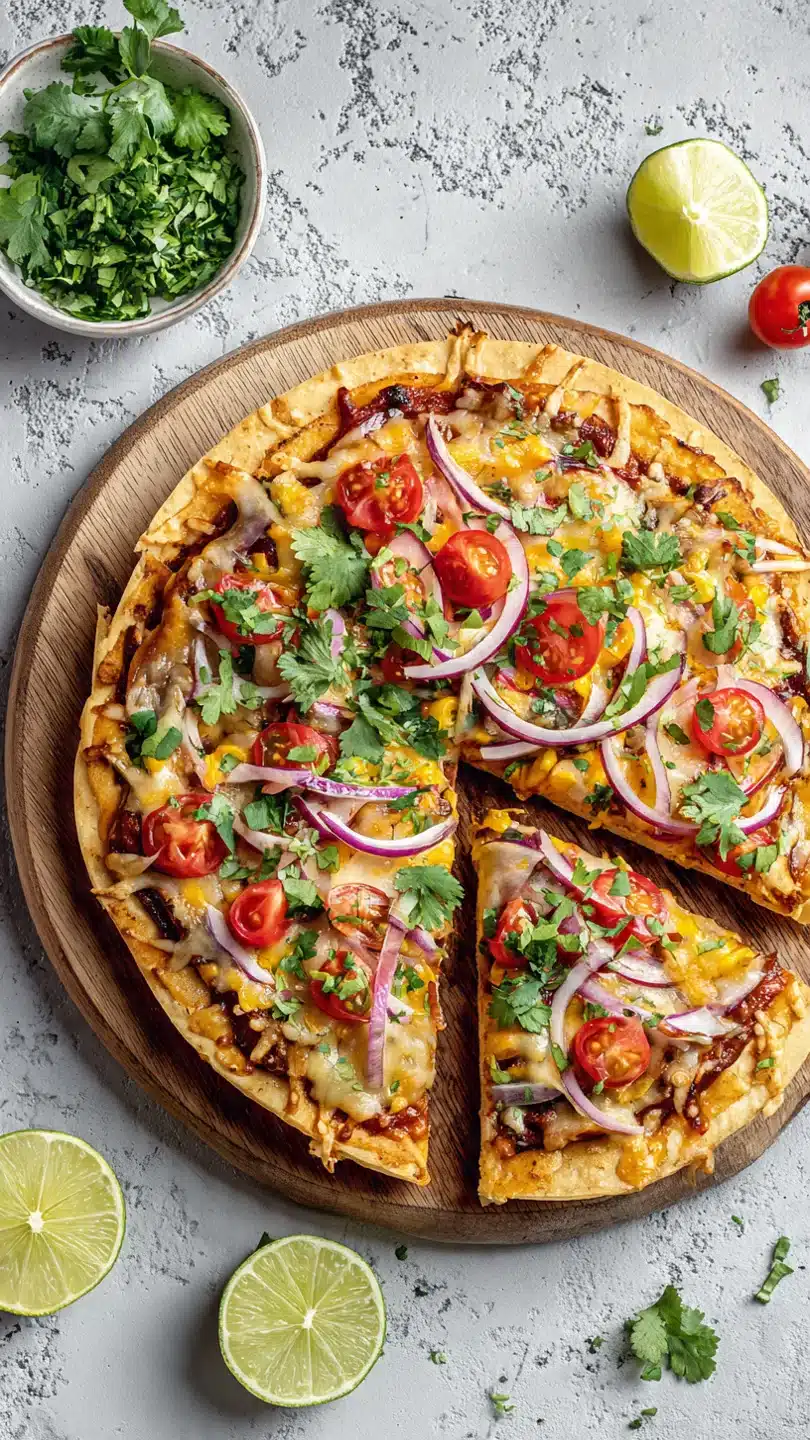
Remove them and let them rest for 2-3 minutes—this allows the cheese to set slightly so your fresh toppings won’t sink. Finally, scatter on the diced tomato, olives, and green onions. Slice, serve immediately with sour cream, and step back to admire your beautiful, crispy, loaded creation.
A few insights from the pro kitchen will guarantee your success every time.
- Tortilla Texture is Key: The fry time is critical. Under-fry, and the tortilla will be leathery; over-fry, and it can become brittle. Look for a pliable crispness with light browning.
- Manage Moisture: Always drain your cooked beef and use seeded tomatoes. Excess moisture is the enemy of a crisp crust. The bean layer also acts as a protective barrier.
- Cheese Selection: A pre-shredded Mexican blend works, but for superior melt, buy blocks of sharp cheddar and Monterey Jack and grate them yourself. Pre-shredded cheese contains anti-caking agents that can inhibit a smooth melt.
- The Resting Period: Letting the baked pizza cool for 2-3 minutes before adding cold toppings and slicing is a small step with a big payoff. It allows the layers to fuse and prevents a messy slide-off when you cut it.
Recipe Variations
- This recipe is a fantastic template for creativity. Here are some of my tested favorite twists.
- Chicken Fiesta: Substitute the ground beef with 1.5 cups of shredded rotisserie chicken mixed with 1/4 cup of green salsa.
- Fully Loaded Vegetarian: Swap the beef for a mixture of sautéed bell peppers, onions, corn, and black beans seasoned with taco spices.
- Breakfast Pizza: Use scrambled eggs, crumbled cooked chorizo, and a cheese blend. Top after baking with pico de gallo.
- Spicy Diablo: Use spicy chorizo instead of beef, pepper jack cheese, and a drizzle of chipotle crema after baking.
- Green Chile & Pork: Use shredded carnitas or pulled pork and top with roasted Hatch green chiles before baking.
- Taco Salad Pizza: After baking, top heavily with shredded lettuce, extra tomato, and crushed tortilla chips for ultimate crunch.
- Gluten-Free Version: Use sturdy corn tortillas. You may need to bake them a minute or two longer to achieve optimal crispness.
What to Serve With This Recipe
While this pizza is a complete meal, a few simple sides can turn it into a feast. A light, crisp salad is the perfect counterpoint. Try a simple mix of romaine lettuce, red onion, and cilantro with a tangy lime vinaigrette.
For a heartier meal, serve it with a side of Mexican rice or a small bowl of black bean soup. Beverage-wise, a cold Mexican lager, a citrusy margarita, or even a refreshing agua fresca all pair beautifully. It’s ideal for casual weeknight dinners, game day gatherings, or a fun weekend cooking project with kids.
Storage & Make-Ahead Instructions
- This pizza is best enjoyed immediately, but you can manage leftovers with a specific strategy.
- Refrigeration: Store any cooled leftovers in an airtight container in the refrigerator for up to 2 days.
- Reheating: Re-crisp is the goal. Never use the microwave alone. Reheat slices on a baking sheet in a 375°F oven for 8-10 minutes, or in an air fryer for 4-5 minutes.
- Freezing: I do not recommend freezing the fully assembled baked pizza, as the fresh toppings and crisp crust suffer. However, you can freeze the cooked, seasoned beef for up to 3 months.
- Make-Ahead: You can fry the tortillas and cook the beef filling up to a day in advance. Store the tortillas layered between paper towels at room temperature and the beef in the fridge. Assemble and bake just before serving.
Frequently Asked Questions
Q: Can I bake the tortillas instead of frying them?
A: For authenticity and crucial texture, I strongly recommend frying. Baking alone will dry them out and make them brittle, not crisp. For a lighter version, you can brush them lightly with oil and bake at 400°F for 3-4 minutes per side until firm, but the result will be different.
Q: What’s the best substitute for refried beans?
A: You can use plain mashed pinto or black beans. If you want to skip beans altogether, a thin layer of full-fat sour cream or cream cheese can act as the moisture barrier, though the flavor profile will change.
Q: My pizza got soggy. What happened?
A: The most common culprits are under-frying the tortillas, not draining the beef adequately, or adding the cold toppings immediately after baking (which creates steam). Ensure each layer is as moisture-managed as possible and let the pizza rest before garnishing.
Q: Can I make this vegetarian or vegan?
A: Absolutely. For vegetarian, use plant-based ground “meat” or extra beans and veggies. For vegan, use plant-based meat, vegan cheese, and vegan sour cream.
Ensure your refried beans are labeled vegetarian (they often are).
Q: How do I get the cheese to melt perfectly without burning the crust?
A: The high heat (400°F) for a short time is key. It melts the cheese quickly before the crust has time to over-brown. Also, spreading the beef evenly ensures the cheese is insulated and melts uniformly.
Q: Can I use a different size tortilla?
A: Yes, but adjust cooking times. For larger 10-inch tortillas, you’ll need more filling and may need to bake for 12-14 minutes. For small street-taco size, they make perfect appetizer portions.
Q: What other sauces can I use besides enchilada sauce?
A: Mild taco sauce, salsa verde, or even a thin layer of chipotle peppers in adobo sauce (blended smooth) are excellent alternatives. Avoid chunky salsa at this stage, as it adds too much liquid.
Final Thoughts
This Mexican pizza recipe is more than just a copycat; it’s a home-kitchen improvement on a fast-food favorite. By taking the time to fry the tortillas and build in layers, you’re rewarded with a dinner that has incredible structural integrity and a party of textures in every single bite. It’s the kind of recipe that feels special but is built on simple, smart techniques.
I hope it becomes a regular in your rotation for its ease, its crowd-pleasing power, and its pure deliciousness. Give it a try this week, and don’t forget to customize it with your favorite toppings. I’d love to hear how it turns out—share your creations and any clever twists you come up with!
Ultimate Mexican Pizza
Ingredients
Equipment
Method
- Preheat your oven to 400°F (200°C). In a skillet over medium-high heat, cook the ground beef until no pink remains, breaking it into small crumbles. Drain excess fat. Stir in the taco seasoning and water. Reduce heat and simmer for 3-4 minutes until the liquid is absorbed. Set aside.
- Heat 1 tbsp of oil in a clean skillet over medium heat. Working one at a time, fry each tortilla for about 30-45 seconds per side until lightly golden and crisp. Transfer to a paper towel-lined plate. This step is non-negotiable for a sturdy, non-soggy base.
- Place two fried tortillas on a parchment-lined baking sheet. Spread about 2 tablespoons of refried beans evenly over each. Top each with a second fried tortilla to create a double-decker crust. This is your pizza base.
- Spread a thin layer of enchilada sauce over the top tortilla of each base. Divide the seasoned beef mixture evenly between the two pizzas, spreading it out. Sprinkle the shredded cheese generously over the beef, covering to the edges.
- Bake for 8-10 minutes, or until the cheese is fully melted, bubbly, and the edges of the tortillas are deep golden brown. Remove from the oven and let cool for 2-3 minutes to set before adding fresh toppings.
- Carefully top each pizza with diced tomato, sliced olives, and green onion. Slice into quarters with a pizza cutter or sharp knife. Serve immediately with dollops of sour cream and avocado on the side.


