Pink strawberry cake
There’s something undeniably special about a pink cake. It promises celebration, joy, and a flavor that’s as delightful as its appearance. But too often, that beautiful hue comes from a bottle of artificial dye, leaving the taste lagging far behind.
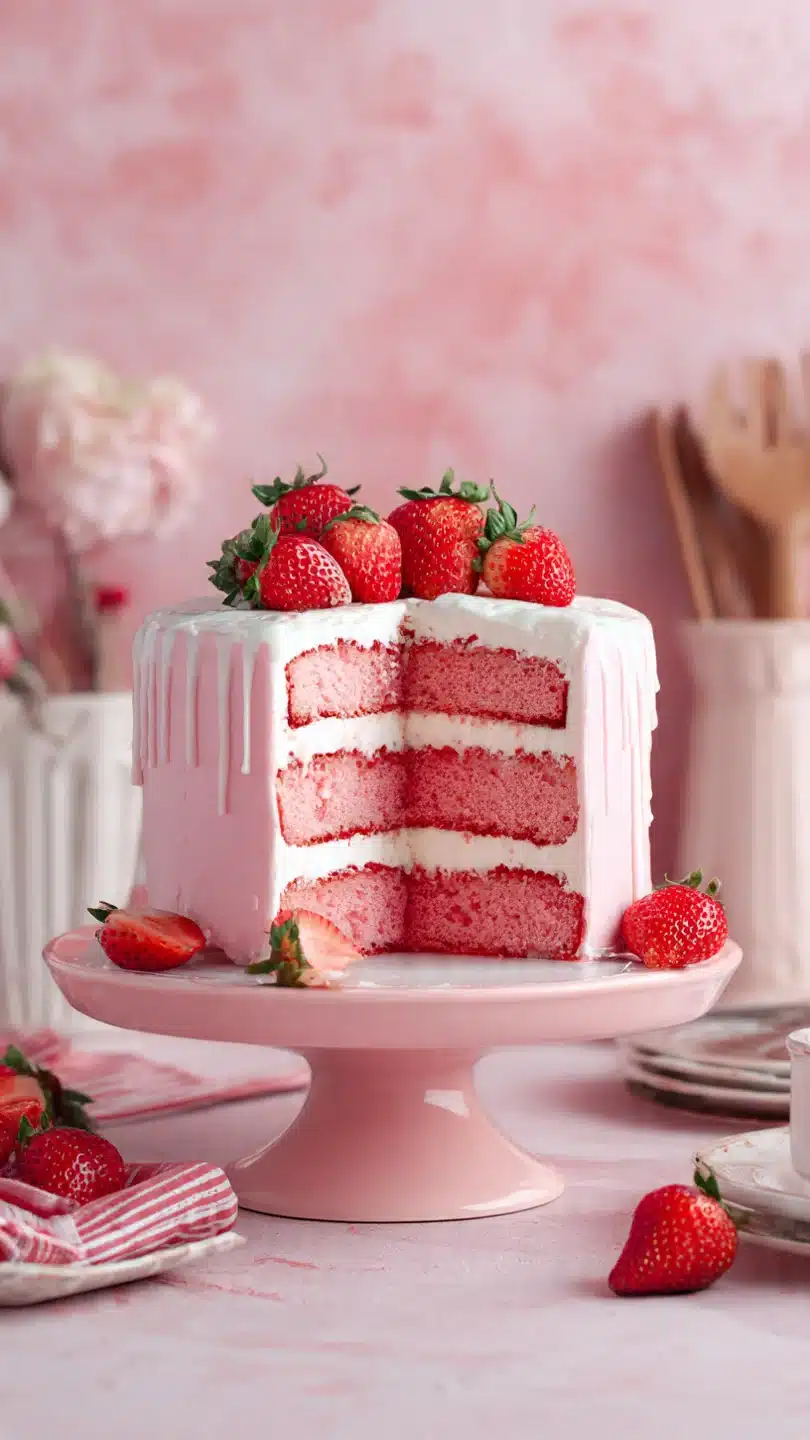
As a chef who has tested countless versions, I set out to create a strawberry cake that earns its color and its flavor honestly—from real, ripe strawberries. The result is this incredibly moist, tender layer cake with a vibrant pink crumb and a frosting that tastes like a fresh strawberry field. It’s a project that’s absolutely worth the effort for birthdays, anniversaries, or any day that calls for a showstopping dessert.
- Real Strawberry Flavor: Unlike cakes that rely on extract or jam, we use a homemade strawberry reduction that packs an intense, natural berry taste into every single bite.
- Vibrant Natural Color: The reduction gives the cake a gorgeous, pink-from-the-inside-out color without a single drop of artificial food coloring.
- Superior Texture: By using the reverse creaming method and room-temperature ingredients, we achieve a cake that is exceptionally moist, tender, and fine-crumbed.
- Professional-Grade Frosting: The accompanying strawberry cream cheese frosting is silky, pipeable, and perfectly balanced—not too sweet, with a lovely tang.
- Make-Ahead Friendly: Both the strawberry reduction and the baked cake layers can be prepared a day in advance, making assembly on the day of your event stress-free.
- Universal Crowd-Pleaser: This cake has a magical way of delighting both kids and adults, making it the perfect centerpiece for any gathering.
Ingredients You’ll Need
Let’s gather our ingredients. This recipe is built on a foundation of quality pantry staples, with the star being fresh, ripe strawberries. The magic happens when we concentrate their flavor into a reduction, which becomes the secret weapon for both color and taste.
For the best results, I highly recommend using full-fat dairy products at true room temperature (about 70°F)—this is non-negotiable for proper emulsification and a light, even crumb.
- Fresh Strawberries: You’ll need about a full pound. Look for berries that are fragrant and deeply red. Frozen strawberries can work in a pinch for the reduction, but fresh will give you the brightest flavor.
- All-Purpose Flour: I use a reliable, unbleached brand. Be sure to spoon it into your measuring cup and level it off—don’t scoop directly from the bag, as this can compact the flour and lead to a dry cake.
- Leavening Agents: Both baking powder and baking soda are used. The baking soda helps neutralize the acidity from the strawberries and sour cream, ensuring a good rise.
- Unsalted Butter: This gives you control over the salt level. It must be softened to the consistency of smooth peanut butter.
- Granulated Sugar: For sweetness and structure.
- Eggs & Vanilla: Large eggs and pure vanilla extract form the flavor backbone.
- Sour Cream: The hero for moisture and tenderness. Its fat content and acidity create an incredibly soft crumb.
- Whole Milk: Adds necessary liquid. The fat content contributes to a richer texture than skim or low-fat milk would.

Note: You’ll find the complete list of ingredients, along with their exact measurements, in the printable recipe card at the bottom of this post.
Kitchen Equipment Needed
You don’t need any specialty gadgets, but a few key tools will make the process smoother. First, you’ll need two 8-inch round cake pans. I prefer light-colored aluminum pans for even baking.
Parchment paper is essential for guaranteeing your layers release perfectly. A stand mixer or a sturdy hand mixer is highly recommended for creaming the butter and sugar to the right consistency. For the reduction, a medium saucepan and a fine mesh sieve are necessary.
Finally, have cooling racks ready for the cakes and an offset spatula for frosting. If you want to pipe decorations, fit a piping bag with your favorite tip before you start frosting.
How to Make Pink Strawberry Cake Recipe
Step 1: Create the Strawberry Reduction
Start by making the heart of this cake. In a medium saucepan, combine the chopped strawberries and one tablespoon of sugar. Cook over medium heat, stirring frequently, for about 12-15 minutes.
The berries will break down and release their juices, which will then thicken and reduce by about half. Trust me, the smell is incredible. Once the mixture is jam-like and measures roughly 1/2 cup, press it through a fine mesh sieve into a bowl to remove the seeds.
You should have a smooth, vibrant puree. Let it cool slightly—using it while still a bit warm helps it incorporate more easily into the batter later.
Step 2: Prepare the Dry Ingredients and Pans
While the reduction cools, preheat your oven to 350°F (175°C). This ensures a stable temperature for baking. Grease your two 8-inch cake pans, line the bottoms with parchment paper circles, and grease the parchment as well.
This double insurance guarantees easy release. In a medium bowl, whisk together the flour, baking powder, baking soda, and salt. Whisk for a full 30 seconds to ensure the leavening agents are evenly distributed—this is a small step that makes a big difference in achieving an even rise.
Step 3: Mix the Cake Batter
Here’s where we use the “reverse creaming” method for ultimate tenderness. In the bowl of your stand mixer fitted with the paddle attachment, combine the room-temperature butter and sugar. Mix on medium-low speed for about 2 minutes until it looks like wet sand.
Tip from me: Don’t cream it until fluffy here; we want a fine crumb. With the mixer on low, gradually add the dry ingredients in three additions, mixing just until combined after each. The mixture will be very thick and crumbly, which is exactly what you want.
Step 4: Combine Wet Ingredients and Finish the Batter
In a separate bowl or large measuring cup, whisk together the room-temperature eggs, vanilla, sour cream, milk, and the 1/2 cup of strawberry reduction until smooth. With the mixer on low, slowly pour about half of this wet mixture into the dry ingredients. Mix on medium speed for 90 seconds to develop the structure—this is a key step for a stable cake.
Believe me, it works. Scrape down the bowl, then add the remaining wet ingredients in two parts, mixing just until the batter is smooth and homogenous. It will be a beautiful pink color.
Step 5: Bake, Cool, and Frost
Divide the batter evenly between your prepared pans. Bake for 28-32 minutes, or until a toothpick inserted into the center comes out clean and the tops spring back when lightly touched. Let the cakes cool in their pans for 15 minutes, then run a knife around the edges and invert them onto cooling racks.
They must cool completely before frosting—warm cake will melt the frosting. While they cool, prepare your strawberry cream cheese frosting. Once everything is cool, level the cakes if needed, then frost and decorate as desired.
Step back and admire your gorgeous, naturally pink creation!
- Temperature is Everything: All refrigerated ingredients (butter, eggs, sour cream, milk, cream cheese) must be at true room temperature (about 70°F). Cold ingredients won’t emulsify properly, leading to a dense or curdled batter and frosting.
- Don’t Overmix: Once the final wet ingredients are added, mix only until the last streak of flour disappears. Overmixing develops gluten, which makes cakes tough.
- Test for Doneness Correctly: The toothpick test is best, but also press the center gently. If it springs back immediately, it’s done. If your fingerprint remains, it needs more time.
- Cool Completely: This is the hardest part! Frosting a warm cake is a recipe for a sliding, melting mess. Let the layers cool on a wire rack for at least 2 hours.
- For the Pinkest Color: The color can vary based on your strawberries. For a more vibrant pink, you can add 1-2 teaspoons of beet powder to the dry ingredients. It’s a natural color booster without altering flavor.
Recipe Variations
- Strawberry Lemonade Cake: Add the zest of one lemon to the dry ingredients and use lemon juice instead of milk in the batter. Pair with a lemon cream cheese frosting.
- Chocolate-Dipped Strawberry Cake: Add 1/2 cup of sifted cocoa powder to the dry ingredients, replacing an equal amount of flour. Frost with the strawberry frosting and garnish with chocolate-dipped strawberries.
- Mini Layer Cakes: Bake the batter in a greased cupcake pan (fill cups 2/3 full) for about 18-20 minutes. Frost individually for adorable personal desserts.
- Dairy-Free/Vegan Adaptation: Use plant-based butter, yogurt, and milk. For the eggs, a commercial egg replacer or flax eggs work best in this dense cake. Use vegan cream cheese for the frosting.
- Strawberry Shortcake Style: Bake the cake in a 9×13 inch pan. Once cool, top with a layer of sweetened whipped cream and fresh sliced strawberries instead of frosting.
- Almond Strawberry Cake: Replace the vanilla extract with 1 1/2 teaspoons of pure almond extract. Add 1/2 cup of finely ground almonds to the dry ingredients for a lovely nutty flavor.
What to Serve With This Recipe
This cake is a celebration in itself, but it pairs beautifully with a few simple accompaniments. For a classic pairing, serve each slice with a scoop of high-quality vanilla bean ice cream or a dollop of freshly whipped cream. The cold creaminess is a perfect contrast to the rich cake.
Beverage-wise, it’s fantastic with a glass of sparkling rosé for adults, or sparkling lemonade for all ages. For a brunch or afternoon tea, it stands proudly on its own. If you’re building a dessert table, consider lighter options like a fresh fruit salad or berry compote alongside it.
It’s the ideal birthday, Mother’s Day, Valentine’s Day, or bridal shower dessert.
Storage & Make-Ahead Instructions
- Storage: Once frosted, the cake should be stored covered in the refrigerator due to the cream cheese frosting. It will keep beautifully for up to 4 days. Let slices sit at room temperature for 20-30 minutes before serving for the best texture and flavor.
- Freezing: Unfrosted cake layers freeze exceptionally well. Wrap each cooled layer tightly in two layers of plastic wrap, then a layer of aluminum foil. Freeze for up to 3 months. Thaw overnight in the refrigerator before frosting.
- Make-Ahead Strategy: The strawberry reduction can be made up to 3 days in advance and stored in an airtight container in the refrigerator. The cake layers can be baked, cooled, wrapped, and stored at room temperature overnight before frosting. I do not recommend making the frosting more than a day ahead.
Frequently Asked Questions
Q: Can I use frozen strawberries for the reduction?
A: Yes, you can. Thaw them completely and drain any excess liquid before cooking. The flavor may be slightly less bright than fresh, but it will still be delicious.
Do not use frozen strawberries directly in the batter.
Q: My cake batter isn’t very pink. What happened?
A: The color intensity depends entirely on your strawberries. Some varieties are more pigmented than others. For a guaranteed vibrant pink, you can add 1-2 teaspoons of natural beet powder to the dry ingredients without affecting the flavor.
Q: Can I make this into cupcakes?
A: Absolutely. Fill lined cupcake pans 2/3 full and bake at 350°F for 18-22 minutes. This recipe will yield about 24 cupcakes.
Q: Why did my cake layers sink in the middle?
A: This is usually caused by underbaking, opening the oven door too early (before the 25-minute mark), or using expired baking powder/soda. Ensure your leavening agents are fresh and use an oven thermometer to verify your oven temperature is accurate.
Q: Can I use strawberry extract or jam instead of the reduction?
A: I don’t recommend it. Extract often tastes artificial and won’t provide color. Jam contains pectin and extra sugar that can throw off the texture and sweetness of the cake.
The reduction is key for authentic flavor and moisture.
Q: How do I get my frosting so smooth?
A: The secrets are room-temperature ingredients and patience. Ensure your butter and cream cheese are truly soft. Beat them together for a full 3-4 minutes until completely smooth and fluffy before slowly adding the powdered sugar and reduction.
Q: Is there a way to make this cake less sweet?
A: You can reduce the sugar in the cake by 1/4 cup. For the frosting, using full-fat cream cheese and a tangy strawberry reduction already balances the sweetness well. You could also use a whipped cream frosting instead.
Final Thoughts
This Pink Strawberry Cake is the culmination of many tests in my kitchen, and it represents everything I love about baking: transforming simple, real ingredients into something extraordinary. The process of making the reduction is a labor of love that pays off tenfold in flavor and color. It’s a cake that looks impressive but is built on solid, professional techniques that any home baker can master.
I hope it brings as much joy to your kitchen as it has to mine. When you slice into that vibrant pink interior and see the smiles around your table, you’ll know it was worth every minute. I’d love to hear how it turns out for you—please share your creations and any questions in the comments below.
Happy baking