
Japanese strawberry shortcake
There’s a certain magic to a perfectly executed Japanese strawberry shortcake. It’s not just a dessert; it’s an experience of contrasting textures and balanced flavors. Imagine slicing into a cloud-like sponge, revealing layers of fresh, juicy strawberries enveloped in a silky, not-too-sweet whipped cream.
Unlike its denser Western counterparts, this cake is celebrated for its elegant simplicity and incredible lightness. Having worked in pastry kitchens where precision is everything, I’ve refined this recipe to help you achieve that iconic, bakery-quality result at home. It’s the show-stopping centerpiece for birthdays, holidays, or any occasion that calls for something truly special.
- Feather-Light Texture: The secret is in the meringue-based sponge, which bakes up incredibly airy and tender, melting in your mouth with every bite.
- Perfectly Balanced Sweetness: The whipped cream is lightly sweetened, allowing the natural flavor of the strawberries and the delicate sponge to shine through without being cloying.
- Elegant & Impressive Presentation: With its clean, white frosting and bright red berry garnish, this cake looks professionally made and is guaranteed to draw compliments.
- Celebration-Worthy: This is the quintessential birthday cake in Japan for a reason—it feels festive, special, and universally appealing.
- Make-Ahead Friendly: The components can be prepared in stages, and the assembled cake benefits from chilling, making it ideal for planning ahead for events.
Ingredients You’ll Need
Let’s gather our ingredients—this is where quality truly matters. Japanese baking is a study in precision, and each component plays a specific role in creating the final, harmonious dessert. Using room-temperature eggs is non-negotiable for maximum volume in your meringue.
For the flour, I insist on cake flour; its lower protein content is essential for that signature soft, fine crumb. If you can’t find it, make a substitute by replacing 2 tablespoons of all-purpose flour from every cup with cornstarch and sifting it well. For the strawberries, seek out the freshest, most aromatic berries you can find, as they are a star ingredient.
The heavy cream should be very cold and have a fat content of at least 36% to whip up stable and lush.

Note: You’ll find the complete list of ingredients, along with their exact measurements, in the printable recipe card at the bottom of this post.
Kitchen Equipment Needed
You don’t need specialized gear, but a few key tools will make the process smoother. An 8-inch round cake pan is the ideal size. Parchment paper is essential for easy release.
A stand mixer or hand mixer is highly recommended for achieving the stable meringue that gives the cake its structure. You’ll also need a fine-mesh sieve for sifting the flour, large mixing bowls, a flexible rubber spatula for gentle folding, a wire cooling rack, and an offset spatula for frosting. A long, serrated bread knife is the best tool for cleanly splitting your cooled cake into layers.
How to Make Japanese Strawberry Shortcake Recipe
Step 1: Building the Foundation with Meringue
Preheat your oven to 340°F (170°C). This slightly lower temperature is key for a gentle, even rise without excessive browning. Line only the bottom of your cake pan with parchment—leaving the sides ungreased helps the batter cling and climb as it bakes.
Now, for the most critical step: the meringue. In a scrupulously clean, grease-free bowl, start beating the room-temperature egg whites on medium-low. Once foamy, begin adding the sugar one tablespoon at a time.
Trust me, this slow incorporation is what builds a strong, glossy meringue that won’t weep or collapse. Whip to stiff, glossy peaks.
Step 2: Creating the Velvety Yolk Base
In another bowl, whisk the yolks with their portion of sugar. You’re looking for them to become pale, thick, and form a “ribbon” that holds its shape for a moment when the whisk is lifted—this takes a good 3-4 minutes of whisking. This step incorporates air and helps emulsify the fat.
Whisk in the milk, cooled melted butter, and vanilla. Then, sift the cake flour, cornstarch, and salt directly over this mixture. Fold gently just until the dry ingredients are absorbed.
A few tiny lumps are better than overmixing here.
Step 3: The Delicate Art of Folding
This is where the cake’s texture is made or broken. Tip about one-third of your beautiful meringue into the yolk batter. Fold this portion in quite vigorously to loosen and lighten the thick base.
Now, add the remaining meringue in two additions. Switch to a very gentle hand, using a large spatula to cut down through the center and sweep up the sides in a “J” motion. Believe me, you must stop the moment the last white streak disappears.
Over-folding deflates the precious air bubbles.
Step 4: Baking and the Crucial Cool-Down
Pour the batter into your prepared pan, smooth the top, and give the pan two firm taps on the counter to dislodge any large air pockets. Bake for 23-25 minutes. The cake is done when the top is a light golden brown and springs back immediately when lightly pressed.
Here’s my professional tip: the moment it comes out of the oven, invert the entire pan onto a wire rack. Let it cool completely upside down. This uses gravity to prevent the delicate structure from collapsing as it cools, ensuring maximum height.
Step 5: Assembly and the Frosting Finish
Once completely cool, run a thin spatula around the edges to release the cake. Using a serrated knife and a slow sawing motion, split it horizontally into two even layers. Whip your very cold heavy cream with powdered sugar just to medium-stiff peaks—over-whipped cream becomes grainy and hard to spread.
Place the bottom layer on your serving plate. A light brush of strawberry jam adds a subtle fruitiness. Spread a layer of cream, arrange a ring of sliced strawberries in the center, and cover with more cream.
Top with the second layer.
Step 6: The Final Chill and Serve
Apply a thin “crumb coat” of whipped cream over the entire cake and chill for 20 minutes. This seals in crumbs. Then, apply your final, smooth, beautiful layer of cream.
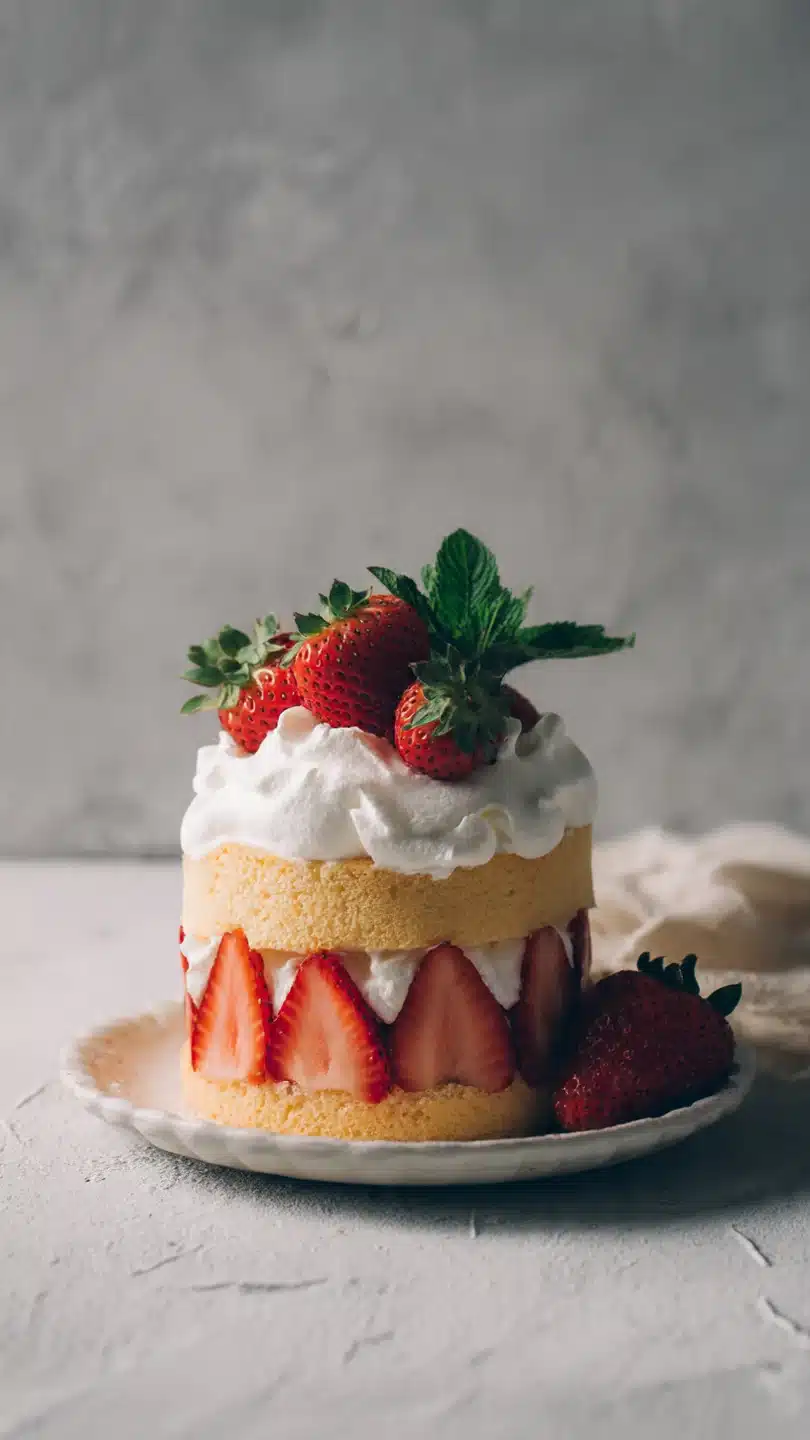
Decorate with halved strawberries and a delicate dusting of powdered sugar. Now, the hardest part: patience. Chill the assembled cake for at least 3 hours, or ideally overnight.
This allows the flavors to meld and the cake to set for perfect, clean slices. Step back and admire your creation before serving.
- Egg Temperature is Key: Room temperature egg whites whip to a much greater volume than cold ones. Take your eggs out at least an hour before you start.
- The “Ribbon” Stage: Don’t rush whisking the yolks and sugar. When the mixture falls from the whisk and sits on the surface for a few seconds before dissolving, you’ve achieved the right consistency for optimal emulsification.
- Folding Fundamentals: Use a large, flexible spatula and fold with a light hand. Scrape from the bottom of the bowl up and over the top, rotating the bowl with your other hand.
- Cooling Upside Down: This technique, borrowed from angel food cakes, is the best insurance against a dense or sunken sponge. The cake’s own weight stretches it gently as it sets.
- Slicing for Service: For impeccably clean slices, dip your sharp knife in hot water and wipe it dry between each cut. This cleanly slices through the cream and berries.
Recipe Variations
- Matcha Shortcake: Add 1 1/2 tablespoons of high-quality culinary-grade matcha powder to the cake flour before sifting. Pair with whipped cream and raspberries for a beautiful color contrast.
- Citrus-Infused: Add the zest of one lemon or yuzu to the egg yolk mixture. Complement it with a layer of mandarin orange segments inside the cake.
- Chocolate Strawberry: Replace 20g of the cake flour with unsweetened cocoa powder, sifted. The rich chocolate sponge pairs wonderfully with the strawberries and cream.
- Individual Servings: Bake the sponge in a 9×13-inch sheet pan for about 18 minutes. Once cool, use a round cutter to create individual cake rounds for a plated dessert.
- Dairy-Free/Vegan: This is a challenging but possible adaptation. Use a commercial vegan egg substitute for the meringue, a plant-based milk and butter, and a high-fat coconut cream or vegan whipping cream, chilled thoroughly.
What to Serve With This Recipe
Japanese strawberry shortcake is a complete dessert on its own, but you can build a lovely menu around it. For a traditional Japanese-inspired tea time, serve it with a pot of fragrant green tea (sencha or gyokuro) or hojicha (roasted green tea). The slight bitterness of the tea beautifully offsets the cake’s sweetness.
For a more Western pairing, a glass of sparkling wine or Prosecco adds a festive touch. If serving as part of a larger dessert spread, keep other items light, such as fruit sorbet, matcha cookies, or a fresh fruit platter. This cake is perfect for birthdays, Mother’s Day, Christmas, or as a refined finish to any special dinner.
Storage & Make-Ahead Instructions
- Refrigeration: Due to the fresh whipped cream and fruit, this cake must be stored in the refrigerator. Cover it loosely with a cake dome or invert a large bowl over it. It is best consumed within 2 days.
- Freezing: You can successfully freeze the unfrosted sponge cake layers. Wrap each cooled layer tightly in two layers of plastic wrap and one layer of foil. Freeze for up to 1 month. Thaw, wrapped, in the refrigerator overnight before assembling.
- Make-Ahead Strategy: The sponge cake can be baked 1 day ahead. Once completely cool, wrap the whole cake (or layers) tightly in plastic wrap and store at room temperature. The whipped cream and sliced strawberries should be prepared the day of assembly for the best texture and freshness.
- Do Not Freeze the assembled cake, as the whipped cream will separate and become watery upon thawing.
Frequently Asked Questions
Q: Can I use all-purpose flour instead of cake flour?
A: I don’t recommend it for the authentic texture. Cake flour has less protein, leading to a more tender crumb. If you must substitute, for every 100g of cake flour, use 85g of all-purpose flour plus 15g of cornstarch, sifted together several times.
Q: Why did my sponge cake collapse or become dense?
A: The most common culprits are under-whipped meringue, over-mixing when folding, or not cooling the cake upside down. Ensure your meringue reaches stiff peaks and fold with a very gentle hand until just combined.
Q: My whipped cream is runny or won’t hold peaks. What happened?
A: Ensure your cream, bowl, and beaters are very cold. The fat content should be 36% or higher. Also, avoid overloading the bowl—whip in batches if necessary.
A stable room temperature (not too warm) also helps.
Q: Can I use frozen strawberries?
A: For the interior layers, fresh is best as frozen berries release too much water. You can use thawed and well-drained frozen berries for a compote to brush on the layers, but fresh is ideal for decoration and interior slices.
Q: How do I get my whipped cream frosting perfectly smooth?
A: The crumb coat is essential. Chill after the thin first layer to set any loose crumbs. For the final coat, dip your offset spatula in hot water, wipe it dry, and use it to smooth the surface in one confident stroke.
Q: Can I make this cake gluten-free?
A: Yes. Substitute the cake flour with a 1:1 gluten-free baking blend that contains xanthan gum. Be extra gentle when folding, as GF batters can be more delicate.
Q: Is there a way to stabilize the whipped cream for a longer time?
A: For added stability, you can whip in 1 tablespoon of instant vanilla pudding powder (powder only, not prepared) or 1/2 teaspoon of cream of tartar along with the powdered sugar.
Final Thoughts
Mastering this Japanese strawberry shortcake is a rewarding journey into the art of precision baking. It teaches you the importance of technique—the gentle fold, the patient cool-down, the balanced sweetness. When you present this cake, with its cloud-like layers and elegant simplicity, you’re sharing more than a dessert; you’re offering a moment of delicate, joyful indulgence.
It’s a testament to how a few quality ingredients, treated with care, can create something truly extraordinary. I encourage you to take your time, trust the process, and most importantly, enjoy the beautiful result with your loved ones. I’d love to hear how your cake turns out—share your creations and any questions you have.
Happy baking
Japanese Strawberry Shortcake
Ingredients
Equipment
Method
- Preheat oven to 340°F (170°C). Line the bottom of an 8-inch (20cm) round cake pan with parchment paper. Do not grease the sides. In a large, impeccably clean bowl, beat the egg whites on medium-low speed until foamy. Gradually add 100g of the granulated sugar, 1 tablespoon at a time, increasing speed to medium-high. Whip until you achieve stiff, glossy peaks that hold their shape when the whisk is lifted. This meringue is the foundation of your cake’s lift.
- In a separate bowl, whisk the egg yolks with the remaining 20g of sugar until pale, thick, and ribbon-like, about 3-4 minutes. Whisk in the milk, melted butter, and vanilla until just combined. Sift the cake flour, cornstarch, and salt over the yolk mixture. Gently fold with a spatula until no dry streaks remain, being careful not to deflate the mixture.
- Add about 1/3 of the meringue to the yolk batter and fold vigorously to lighten it. Then, carefully fold in the remaining meringue in two additions, using a large, gentle J-folding motion. Stop as soon as the batter is uniform and no white streaks remain. Pour the batter into the prepared pan and smooth the top. Tap the pan firmly on the counter twice to release large air bubbles.
- Bake for 23-25 minutes, or until the top is golden and springs back when lightly touched. A skewer inserted should come out clean. Immediately invert the pan onto a wire rack. Let it cool completely upside down (about 2 hours) to prevent collapse. This step is non-negotiable for the perfect height.
- Once cool, run a thin offset spatula around the edges to release the cake. Slice it horizontally into two even layers. Whip the cold cream and powdered sugar to medium-stiff peaks. Place one cake layer on a serving plate. Brush lightly with strawberry jam (if using). Spread a thin layer of whipped cream, then arrange a ring of sliced strawberries in the center. Cover with more cream.
- Carefully place the second cake layer on top. Apply a thin ‘crumb coat’ of whipped cream over the entire cake and chill for 20 minutes. Apply the final, smooth layer of whipped cream. Decorate with halved or whole strawberries and a dusting of powdered sugar. Chill for at least 3 hours before slicing with a hot, dry knife for clean cuts.


