
Keto pizza
There’s a specific kind of craving that only pizza can satisfy—the combination of a crispy, chewy base, tangy sauce, and stretchy, molten cheese. For years on a keto diet, that seemed like a distant memory, replaced by sad, floppy attempts. After countless tests in my professional kitchen, I cracked the code.
This isn’t a compromise; it’s a celebration. You get a crust that holds its structure, browns beautifully, and supports a generous load of toppings, all while keeping you firmly in ketosis. Let’s make pizza night a reality again.
This recipe solves the classic keto pizza dilemmas. You’ll appreciate the thoughtful details that make it a weekly staple.
- Authentic Texture: The combination of melted cheese, almond flour, and xanthan gum creates a pliable, bread-like dough that bakes up crisp on the outside and tender within.
- Quick & Simple: From bowl to table in 30 minutes with no yeast, no waiting for dough to rise, and minimal cleanup.
- Incredibly Customizable: The neutral-flavored crust is the perfect canvas for any topping combination you love, from classic Margherita to a fully-loaded supreme.
- Meal-Prep Friendly: The crust can be pre-baked and frozen, or whole slices store and reheat remarkably well for easy lunches.
- Family-Approved: This pizza is so satisfying that even non-keto eaters will happily devour it, making family dinners effortless.
- No Cauliflower Required: While I love cauliflower, this crust uses simple pantry flours for a consistent, predictable result every time.
Ingredients You’ll Need
- Let’s gather our ingredients—this is where kitchen science makes low-carb magic happen. The right components in the right proportions are the secret to a crust that doesn’t taste “alternative.”
You’ll need two types of flour. Finely ground almond flour is the star, providing fat, protein, and structure. Please don’t use almond meal, as its coarser grind will give you a gritty texture.
Coconut flour is our backup singer; it’s incredibly absorbent and helps soak up moisture from the eggs and cheese, preventing a soggy base. The xanthan gum is non-negotiable—it acts as the gluten substitute, giving the dough elasticity and preventing a crumbly mess.
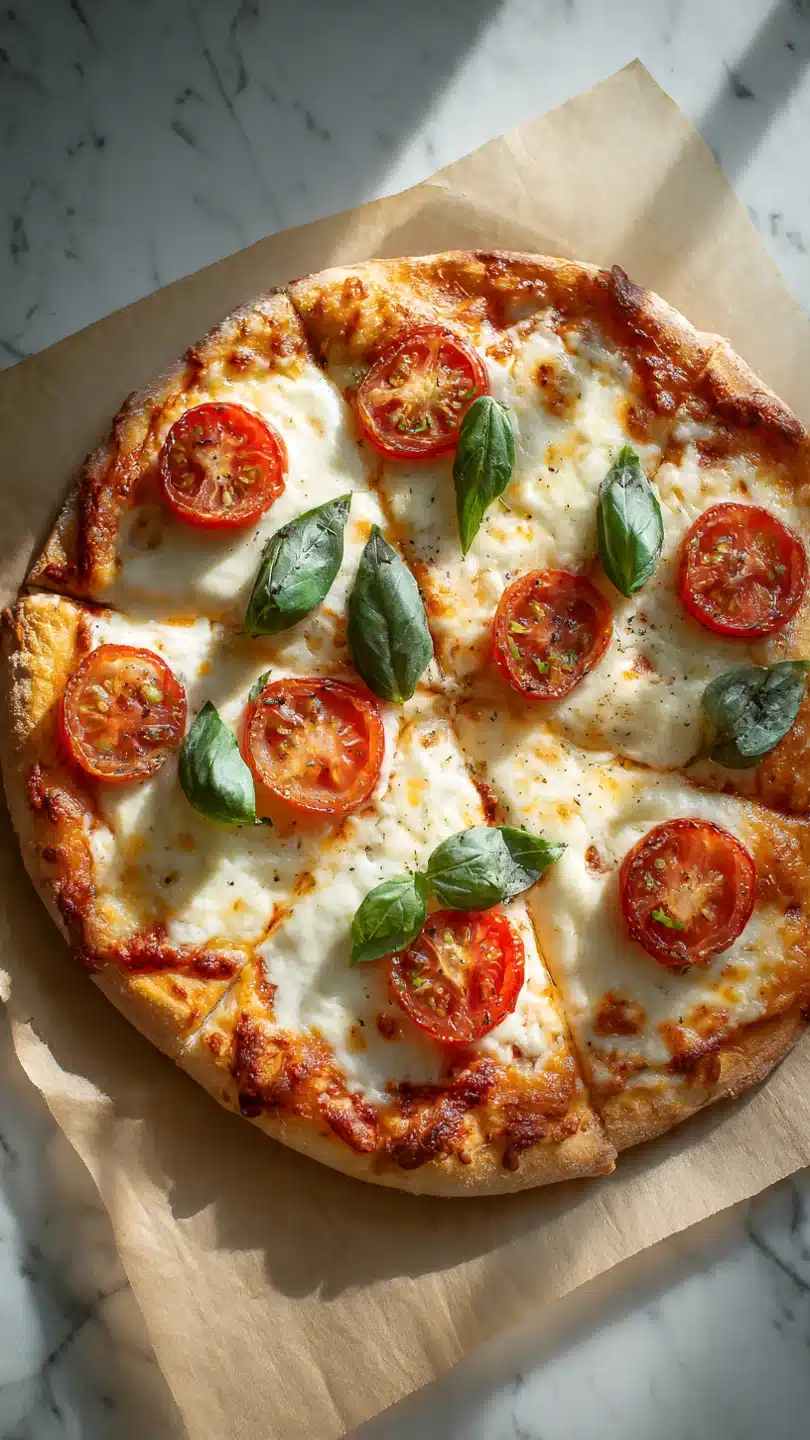
For the cheesy binder, use low-moisture, part-skim mozzarella (the pre-shredded kind works perfectly here) and full-fat cream cheese. The fat content is crucial for flavor and pliability. For toppings, choose a sugar-free pizza sauce—many popular brands have added sugar, so read labels carefully.
Then, go wild with pepperoni, mushrooms, bell peppers, olives, or cooked sausage.

Note: You’ll find the complete list of ingredients, along with their exact measurements, in the printable recipe card at the bottom of this post.
Kitchen Equipment Needed
You don’t need any specialty gear. A large baking sheet or pizza pan is essential. I prefer a baking sheet for its versatility.
Parchment paper is your best friend here; it prevents sticking and makes transferring the dough effortless. A microwave-safe bowl for melting the cheese and a spatula for mixing are all you need for the dough. While a rolling pin can help, you can easily press the dough into shape with your hands—just use a second sheet of parchment on top to prevent sticking.
How to Make Keto Pizza Recipe
Step 1: Mix Your Dry Ingredients
Preheat your oven to 400°F (200°C) and line your pan with parchment. In a medium bowl, take a moment to thoroughly whisk together the almond flour, coconut flour, baking powder, xanthan gum, Italian seasoning, and salt. This isn’t just mixing; you’re ensuring the leavening and binder are evenly distributed, which is critical for a uniform rise and texture.
A few extra whisks here pay off in the final bite. Set this aromatic dry mix aside.
Step 2: Create the Cheese “Glue”
In a large microwave-safe bowl, combine most of the mozzarella (reserve some for topping) and all of the cream cheese. Microwave in 30-second intervals, stirring well after each, until the mixture is completely smooth and molten. Believe me, patience here is key—stirring well prevents hot spots and ensures even melting.
Let this cheesy pool cool for just a minute. If it’s too hot, it will cook the eggs in the next step, so a quick cool-down is a simple but vital pause.
Step 3: Form the Dough
Crack the two eggs into the warm cheese mixture. At first, it might look a bit curdled or separate, but don’t worry. Stir vigorously with a spatula until it becomes a homogeneous, pale yellow mixture.
Now, tip in all of your pre-mixed dry ingredients. Use the spatula to fold and press until no dry spots remain and a soft, slightly sticky dough ball forms. Tip from me: If the dough feels too wet, let it sit for 2-3 minutes; the coconut flour will absorb excess moisture.
Step 4: Shape and Pre-Bake the Crust
Place the dough ball on your prepared parchment. Top it with a second sheet of parchment. Using your hands or a rolling pin, press and roll it into a 12-inch circle, aiming for an even 1/4-inch thickness.
Remove the top parchment. Now, take a fork and dock the entire surface—poking holes all over. This allows steam to escape and prevents the crust from puffing up like a balloon in the oven.
Bake this naked crust for 8-10 minutes until firm and just beginning to color.
Step 5: Top, Finish Baking, and Serve
Now comes the fun part! Pull the hot crust from the oven. Spread your sauce evenly, then sprinkle on the remaining cheese and your chosen toppings.
Return the pizza to the oven for 5-7 final minutes, until the cheese is gloriously bubbly and spotted with gold. For a perfect finish, I often switch to the broiler for the last 60 seconds—watch it like a hawk! Let the pizza rest for 5 full minutes on the pan.
This rest allows the structure to set, ensuring you get clean, crisp slices instead of a cheesy landslide. Slice, serve, and enjoy that first, triumphant bite.
A few chef-level insights will elevate your pizza from good to exceptional every single time.
- Ingredient Temperature is Key: Using room-temperature eggs and cream cheese helps them incorporate smoothly into the melted mozzarella, creating a more cohesive dough without overworking it.
- The Thickness Sweet Spot: Rolling the dough to a consistent 1/4-inch thickness is the ideal balance. Any thicker, and the center may stay soft; any thinner, and it can become too crisp and cracker-like.
- Maximize Crispiness: For an extra-crisp bottom crust, after the initial pre-bake, carefully slide the parchment paper with the crust directly onto the oven rack for the final bake. This improves air circulation dramatically.
- Prevent Sogginess: If using watery toppings like fresh mushrooms or zucchini, sauté them first in a dry pan to drive off excess moisture before adding them to the pizza.
- The Cooling Rest: Resist the urge to slice immediately! Letting the pizza cool for 5 minutes allows the melted cheese to set slightly and the crust to finish firming up, guaranteeing perfect slices.
Recipe Variations
- The basic recipe is a flawless template. Once you’ve mastered it, try these tested variations to keep pizza night exciting.
- Everything Bagel Pizza: Before the first bake, brush the shaped crust with an egg wash and sprinkle generously with everything bagel seasoning for a savory, crunchy finish.
- Pesto & Chicken: Swap the red sauce for a layer of basil pesto. Top with shredded rotisserie chicken, mozzarella, and sun-dried tomatoes.
- Breakfast Pizza: After the pre-bake, spread with a thin layer of softened cream cheese, top with cooked crumbled sausage and cheddar, then crack a few eggs on top and bake until the eggs are set.
- Taco Pizza: Use a layer of seasoned taco meat instead of sauce. Top with cheddar cheese, and after baking, add fresh lettuce, diced tomato, avocado, and a dollop of sour cream.
- Veggie Lover’s: Load it up with pre-sautéed spinach, mushrooms, bell peppers, onions, and black olives. Consider adding goat cheese crumbles after baking.
- Spicy Supreme: Mix red pepper flakes into your sauce and top with pepperoni, jalapeños, and spicy Italian sausage. A drizzle of sugar-free ranch after baking cools it down perfectly.
- White Garlic Pizza: Sauté minced garlic in olive oil, brush it over the pre-baked crust, then top with ricotta, mozzarella, and fresh rosemary.
What to Serve With This Recipe
This pizza is a complete meal on its own, but it pairs beautifully with simple sides that complement its richness. A classic Italian garden salad with romaine, red onion, and a tangy vinaigrette cuts through the cheese perfectly. For a heartier meal, serve it alongside a bowl of zucchini noodle soup or creamy keto broccoli salad.
Beverage-wise, a crisp sparkling water with lemon, an iced herbal tea, or a glass of dry red wine (if it fits your macros) are all excellent choices. It’s the ideal centerpiece for a casual Friday night dinner, game day gathering, or a quick weeknight solution that feels special.
Storage & Make-Ahead Instructions
- This pizza’s make-ahead potential is a huge win. For the fully baked pizza, let it cool completely, then store slices in an airtight container in the refrigerator for up to 4 days. To reheat, place slices on a parchment-lined baking sheet in a 350°F oven for 5-8 minutes, or until hot and crisp. The microwave will make the crust soft. You can also freeze baked slices. Separate them with parchment paper in a freezer bag for up to 2 months. Reheat from frozen in the oven. For a brilliant make-ahead crust, pre-bake the crust as directed, let it cool, and freeze it flat on a baking sheet before transferring to a freezer bag. When ready, top it straight from the freezer, adding a few extra minutes to the baking time.
Frequently Asked Questions
Q: Can I make this dough without a microwave?
A: Absolutely. Use a double boiler on the stovetop. Place the cheese and cream cheese in a heatproof bowl over a pot of simmering water, stirring until melted and smooth.
Proceed with the recipe as written.
Q: My dough is too sticky to handle. What did I do wrong?
A: This usually means the cheese mixture was too warm when the eggs were added, or the coconut flour hasn’t had its full 2-3 minutes to absorb moisture. Wet your hands lightly with water or oil to press the dough, and let it rest briefly before shaping.
Q: Can I substitute the xanthan gum?
A: Xanthan gum is critical for structure in gluten-free baking. Psyllium husk powder can sometimes work, but it alters the texture and may require more liquid. For guaranteed results, I strongly recommend sticking with xanthan gum.
Q: Why is my crust soggy in the middle?
A: The most common culprits are under-pre-baking the crust or using toppings with high water content (like raw vegetables) without pre-cooking them. Ensure the crust is firm before adding toppings, and always sauté veggies first.
Q: How do I calculate net carbs for my custom toppings?
A: The base nutrition is for a plain cheese pizza. Simply add the net carbs (total carbs minus fiber) from any additional toppings you use, dividing by the number of slices for an accurate count.
Q: Can I make this crust dairy-free?
A: It’s challenging because the cheese is the primary binder. I’ve tested vegan cheese alternatives with mixed results—they often don’t melt and bind the same way. For a dairy-free option, I’d recommend seeking a dedicated nut-and-seed-based keto crust recipe.
Q: Is pre-shredded cheese okay to use?
A: Yes, it works perfectly fine and is a great time-saver. Just be aware that pre-shredded cheese often contains anti-caking agents like potato starch, which can add a trivial amount of carbs—usually negligible per serving.
Final Thoughts
This keto pizza recipe is the culmination of professional testing and a deep understanding of how ingredients behave under heat. It delivers on every promise: a satisfying crunch, a cheesy pull, and the freedom to enjoy a classic comfort food without derailing your goals. It’s proof that a restrictive diet doesn’t have to mean restrictive flavors.
I encourage you to make it your own—try the variations, find your favorite topping combo, and relish the fact that pizza night is officially back on the menu. I’d love to hear how it turns out for you. Share your creations online and tag me, and if you have any questions, don’t hesitate to ask in the comments below.
Now, go preheat that oven. Your perfect slice awaits.
Ultimate Keto Pizza
Ingredients
Equipment
Method
- Preheat your oven to 400°F (200°C). Line a large baking sheet or pizza pan with parchment paper. In a medium bowl, whisk together the almond flour, coconut flour, baking powder, xanthan gum, Italian seasoning, and salt until thoroughly combined. Set this dry mix aside.
- In a large, microwave-safe bowl, combine 1 1/2 cups of the shredded mozzarella and the cream cheese. Microwave in 30-second bursts, stirring well between each, until completely melted and smooth. This should take about 90 seconds total. Let it cool for just a minute so you don’t scramble the eggs.
- Add the two eggs to the warm cheese mixture and stir vigorously with a spatula until fully incorporated. It will look slightly separated at first but will come together. Now, add the entire bowl of dry ingredients. Mix and fold until a uniform, slightly sticky dough forms. Trust me, the xanthan gum is working its magic here.
- Place the dough ball onto the prepared parchment paper. Top with a second sheet of parchment. Using your hands or a rolling pin, press and roll the dough into a 12-inch circle or rectangle, about 1/4-inch thick. Remove the top parchment. Use a fork to dock the crust all over to prevent large bubbles.
- Bake the naked crust for 8-10 minutes, until it is firm to the touch and just starting to turn golden at the edges. Remove from the oven. Spread the pizza sauce evenly over the hot crust, leaving a small border. Sprinkle with the remaining 1/2 cup of mozzarella and add your desired toppings.
- Return the pizza to the oven and bake for another 5-7 minutes, or until the cheese is bubbly and golden. For extra browning, you can broil for the final 1-2 minutes, watching closely. Let it cool on the pan for 5 minutes before slicing with a pizza cutter or sharp knife. This rest is key for a crisp slice.


