
Detroit style pizza
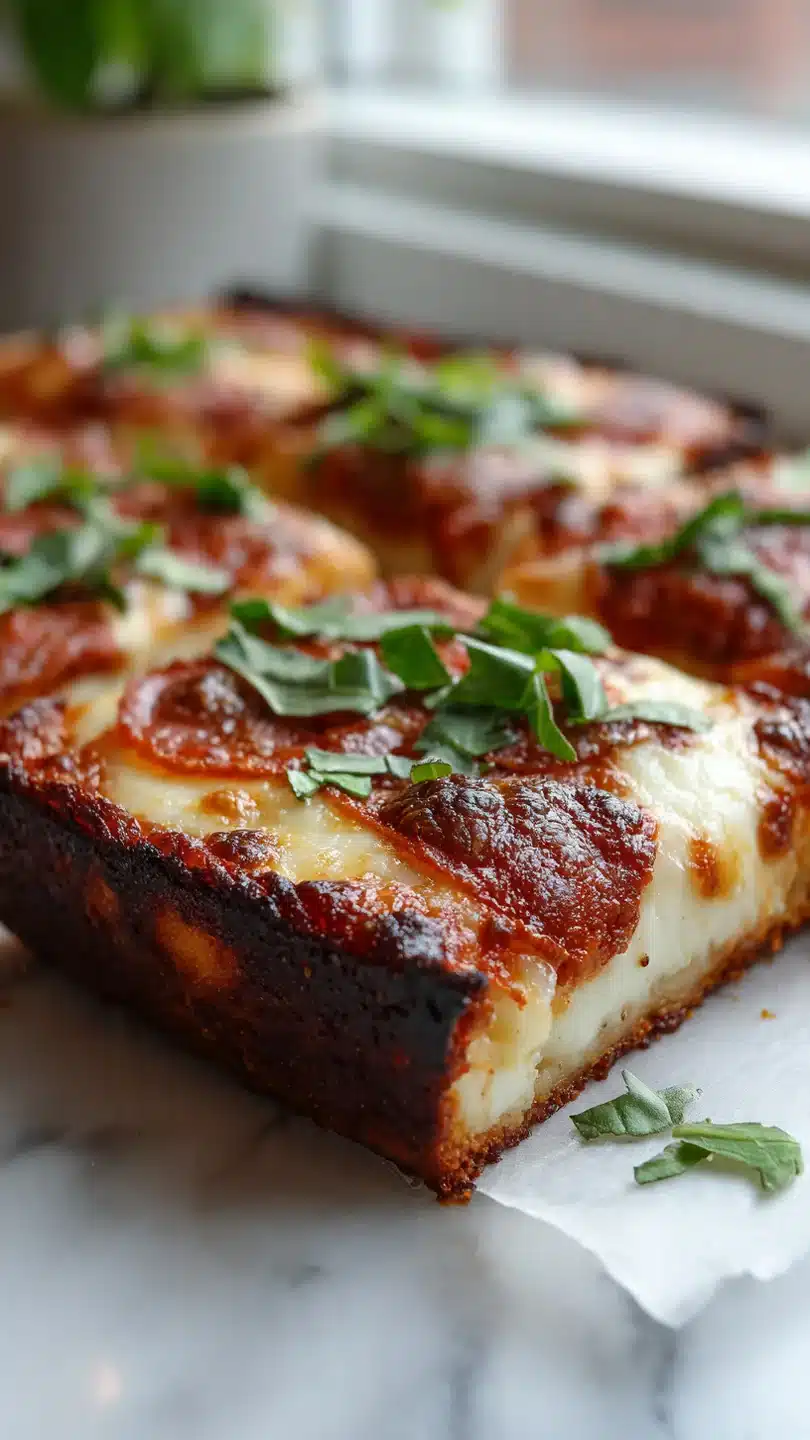
There’s something uniquely satisfying about pulling a pan of pizza from the oven where the cheese has fused into a crispy, caramelized crown around a soft, airy interior. Detroit style pizza isn’t just another pie; it’s a textural masterpiece born from the automotive city’s blue-collar ingenuity. As a chef who has spent years perfecting doughs, I can tell you this recipe captures the soul of the original: a thick, focaccia-like crust with a crackling edge of cheese, topped with bold sauce applied in iconic stripes.
Making it at home is a project, but the reward—a square of cheesy, saucy, crispy-edged bliss—is absolutely worth it. Let’s build that iconic pizza together.
- Signature Crispy Edges: The magic happens when cheese meets the well-oiled steel pan, creating a crispy, flavorful “frico” crust that’s the hallmark of true Detroit pizza.
- Focaccia-Like Crust: This isn’t a dense dough. A high-hydration recipe and double rise yield a light, airy, and chewy interior with a perfectly crisp bottom.
- Authentic Flavor Profile: Using Wisconsin brick cheese (or a tested blend) and the “racing stripe” sauce method delivers the genuine taste you’d find in a Detroit pizzeria.
- Make-Ahead Friendly: The dough can be prepared a day in advance and refrigerated for slow fermentation, which develops even more complex flavor.
- Visually Stunning: The contrast of red sauce stripes against a field of melted cheese makes for a show-stopping centerpiece at any gathering.
- Deeply Customizable: While the base is classic, this recipe is a perfect canvas for your favorite toppings, from classic pepperoni to gourmet combinations.
Ingredients You’ll Need
Let’s gather our ingredients. The beauty of this pizza lies in the quality and specific application of a few simple components. The right flour, cheese, and pan work in concert to create something greater than the sum of its parts.
For the dough, bread flour is non-negotiable for its higher protein content, which builds the strong gluten network needed to trap air and support the thick crust. Instant yeast makes the process straightforward. For the cheese, authentic Wisconsin brick cheese is the traditional choice, prized for its high fat content and excellent melt that browns beautifully.
If you can’t find it, a 50/50 blend of whole-milk, low-moisture mozzarella and Monterey Jack is my tested and approved substitute that mimics its flavor and melt. For the pan, a blue steel Detroit pizza pan is ideal because it conducts heat aggressively, creating that perfect crispy bottom and edge. A heavy-duty anodized aluminum pan is a good second choice.
Avoid glass or ceramic, as they won’t deliver the same crunch. For the sauce, a simple, uncooked-style sauce made from high-quality crushed tomatoes (I prefer San Marzano for their sweetness and low acidity) lets the bright tomato flavor shine against the rich cheese.

Note: You’ll find the complete list of ingredients, along with their exact measurements, in the printable recipe card at the bottom of this post.
Kitchen Equipment Needed
The right tools make this process seamless. The most critical piece is a 10×14-inch blue steel Detroit pizza pan. This specific pan is responsible for the iconic crust texture.
A stand mixer with a dough hook is highly recommended for kneading the wet, sticky dough efficiently, though you can certainly knead by hand—just be prepared for an arm workout. You’ll also need a large bowl for the dough to rise, plastic wrap, a small saucepan for the quick sauce, and a sturdy metal spatula to loosen the crispy pizza from the pan after baking. An instant-read thermometer is helpful to ensure your water is at the perfect temperature to activate the yeast.
How to Make Detroit Style Pizza Recipe
Step 1: Develop the Dough Structure
In your stand mixer bowl, combine the warm water, yeast, and sugar. Giving it five minutes to foam confirms your yeast is active. Add the bread flour, salt, and olive oil.
Mix on low until a shaggy mass forms, then let the mixer knead on medium for a solid 5-6 minutes. Believe me, this kneading time is crucial for developing the gluten that will give your crust its chewy, airy structure. The dough will be quite sticky and tacky—this is correct.
A wetter dough means bigger air pockets in your finished crust.
Step 2: The First Rise and Pan Prep
Lightly oil a large bowl, place your sticky dough ball in it, and turn to coat. Cover it tightly with plastic wrap. Let it rise in a warm, draft-free spot until it’s roughly doubled in size.
This usually takes 1 to 1.5 hours. Meanwhile, pour a generous 2 tablespoons of olive oil into your Detroit pan. Use a pastry brush or your fingers to coat the bottom and all the way up the sides.
This oil bath is what fries the cheese and dough edges into crispy perfection, so don’t be shy.
Step 3: Shape with Patience
Once risen, punch down the dough to release the large air bubbles. Transfer it to the center of your oiled pan. Using oiled fingertips, gently press and stretch the dough outward.
It will be very elastic and will likely spring back, refusing to reach the corners. Tip from me: This is completely normal. Cover the pan with plastic and walk away for 30-45 minutes.
This second, shorter rest allows the gluten to relax. When you return, you’ll find the dough much more compliant and easy to press fully into the pan’s corners.
Step 4: Prepare the Toppings and Oven
While the dough rests, make your simple sauce. Sauté garlic and oregano in olive oil just until fragrant, then stir in the crushed tomatoes and sugar. Let it simmer briefly to meld flavors and thicken slightly, then cool completely.
A cold sauce won’t melt the cheese prematurely. Preheat your oven to a blazing 500°F (260°C) with a rack in the lower third. This high, direct heat is essential for the proper oven spring and browning.
Shred your brick cheese or cheese blend.
Step 5: Assemble the Signature Layers
Now for the fun, defining step. After its rest, the dough will look puffy. Sprinkle every single shred of cheese evenly over the dough, ensuring it goes all the way to the edges and into the oiled corners.
This is the secret to the crispy cheese wall. Add pepperoni if using. Then, dollop your cooled sauce in three thick, bold stripes lengthwise over the cheese.
Trust me, do not spread it. The “racing stripe” look is traditional and ensures every bite has the perfect cheese-to-sauce ratio.
Step 6: Bake to Crispy Perfection
Carefully place the loaded pan on the lower oven rack. Bake for 12-15 minutes. You’re looking for the cheese edges to be a deep, dark, caramelized brown and the center to be bubbly.
The pan and oil will be extremely hot, so use caution. Let the pizza cool in the pan for exactly 5 minutes—this lets the structure set. Then, run a thin metal spatula around the edges to release the crispy cheese frico.
Transfer the whole pizza to a cutting board, slice into squares, and serve immediately. Step back and admire your creation.
- Dough Hydration is Key: This dough is intentionally wet. Resist the urge to add more than a dusting of flour during handling. The stickiness translates to an open, airy crumb.
- The Pan Makes the Pizza: If you’re serious about this style, invest in the blue steel pan. Its heat conduction and seasoning properties are unmatched for achieving the authentic crispy, fried crust edge.
- Cold Sauce, Hot Oven: Always cool your sauce before applying it. A hot sauce will start melting the cheese before baking, preventing proper layering and edge formation.
- Don’t Rush the Rises: The first rise develops flavor, and the second rise in the pan ensures a light texture. Skipping or shortening these leads to a dense, tough crust.
- The Corner Pieces are Gold: In Detroit pizzerias, the corner slices with extra crispy edges are prized. To maximize these, you can gently mound a little extra cheese into the corners of the pan during assembly.
Recipe Variations
- Double Pepperoni: For the classic “Detroit Red Top,” use twice the pepperoni, placing one layer under the cheese and one layer on top of the sauce stripes. The cupping pepperoni on top crisps beautifully.
- Spicy Soppressata & Honey: Swap pepperoni for spicy soppressata and, after baking, drizzle the pizza with a thin stream of hot honey for a perfect sweet-heat balance.
- Vegetarian Supreme: Top with sautéed mushrooms, bell peppers, and red onions under the cheese, keeping the sauce stripes on top for a loaded veggie version.
- White Pizza: Omit the tomato sauce. Instead, mix ricotta cheese with minced garlic, lemon zest, and black pepper. Dollop this mixture in the signature stripes over the brick cheese.
- Breakfast Pizza: After the final dough rise, top with shredded cheese, crumbled cooked sausage, and crack a few eggs into wells made in the toppings before baking until the eggs are just set.
- Gluten-Free Adaptation: Use a reliable gluten-free bread flour blend (like Caputo Fiore Glut) and follow the package’s yeast dough instructions. The results can be surprisingly good in the right pan.
- Bacon & Caramelized Onion: Top with a generous layer of crispy bacon bits and deeply caramelized onions beneath the cheese for a sweet and savory combination.
What to Serve With This Recipe
Detroit style pizza is a hearty, rich main event. To balance its intensity, serve it with a simple, crisp green salad dressed with a bright vinaigrette—the acidity cuts through the cheese beautifully. For a casual gathering, garlic knots or breadsticks make a fun, carb-on-carb pairing.
Beverage-wise, a hoppy IPA or a crisp lager complements the pizza’s richness, while a medium-bodied Chianti or Sangiovese stands up to the tomato sauce and cheese. This pizza is perfect for game day, family movie night, or any occasion where you want to serve something impressively delicious and satisfyingly shareable.
Storage & Make-Ahead Instructions
- Refrigeration: Leftover pizza can be stored in an airtight container in the refrigerator for up to 3 days.
- Freezing: For longer storage, wrap individual slices tightly in plastic wrap and then foil before freezing for up to 2 months.
- Reheating for Best Results: To recapture the crispness, reheat slices in a preheated 375°F oven on a baking sheet for 8-10 minutes, or in a skillet on the stovetop over medium-low heat with a lid until the cheese melts and the bottom re-crisps. Avoid the microwave, which makes the crust soggy.
- Make-Ahead Dough: The dough can be made 1-2 days ahead. After the first rise, punch it down, place it in an oiled container, cover, and refrigerate. When ready to use, let it sit at room temperature for an hour before proceeding with shaping in the pan.
Frequently Asked Questions
Q: I can’t find brick cheese. What’s the best substitute?
A: A 50/50 blend of whole-milk, low-moisture mozzarella and Monterey Jack is my top recommendation. The mozzarella provides the stretch, and the Monterey Jack mimics brick cheese’s buttery flavor and excellent browning.
Q: Can I use a different pan, like a regular baking sheet or cast iron?
A: A heavy-duty anodized aluminum baking sheet of similar size can work in a pinch, but the crust won’t be as authentically crispy. A cast iron skillet will give you a great crust but will result in a round, deeper-dish pizza, not the traditional rectangular shape.
Q: Why is my dough so sticky and hard to handle?
A: This is by design! A high-hydration (wet) dough is essential for the light, airy, focaccia-like texture. Use oil on your hands and work surface instead of flour to manage it.
The stickiness is a sign you’re on the right track.
Q: My cheese edges aren’t getting dark and crispy. What went wrong?
A: The most likely culprit is not using enough oil in the pan. The cheese needs to fry in the oil to caramelize. Also, ensure your oven is fully preheated and you’re baking on a lower rack for maximum bottom heat.
Q: Can I make the dough ahead of time?
A: Absolutely. After the first rise, punch down the dough, place it in an oiled container, and refrigerate for up to 48 hours. This slow, cold fermentation actually develops more flavor.
Let it come to room temperature for an hour before shaping.
Q: Is it normal for the sauce to be on top of the cheese?
A: Yes! This is the defining “Detroit style” assembly. Cheese goes directly on the dough to create the crispy edge, and sauce is applied in stripes on top.
It protects the cheese from burning and creates a fantastic flavor layer.
Q: How do I know when the pizza is done baking?
A: Look for the cheese around the edges to be a deep, caramelized brown, almost dark amber. The center should be bubbly, and the bottom crust (you can peek with a spatula) should be a rich golden brown.
Final Thoughts
Mastering this Detroit style pizza recipe is a rewarding culinary project that brings a taste of a beloved American tradition into your kitchen. The process—from nurturing the sticky dough to witnessing the cheese transform into a crispy, golden crown—is as satisfying as the first bite. Remember, the keys to success are the right pan, plenty of oil, cold sauce stripes, and the patience to let the dough rise fully.
Once you experience that perfect combination of crispy, cheesy edge, soft airy crumb, and tangy sauce, you’ll understand why this pizza has such a devoted following. I encourage you to make it your own with the variations provided. Please share your results and any creative twists you try.
Happy baking
Authentic Detroit Style Pizza
Ingredients
Equipment
Method
- Make the dough. In the bowl of a stand mixer fitted with the dough hook, combine the warm water, yeast, and sugar. Let sit for 5 minutes until foamy. Add the bread flour, salt, and 2 tbsp olive oil. Mix on low speed until a shaggy dough forms, about 2 minutes. Increase speed to medium and knead for 5-6 minutes until the dough is smooth, elastic, and clears the sides of the bowl. The dough will be quite sticky. Tip from me: Don’t be tempted to add too much extra flour; a wetter dough creates those coveted air pockets.
- First rise. Lightly oil a large bowl. Place the dough in the bowl, turning to coat. Cover tightly with plastic wrap and let rise in a warm place until doubled in size, about 1 to 1.5 hours. Meanwhile, generously coat a 10×14-inch blue steel Detroit pizza pan or similar anodized aluminum pan with about 2 tablespoons of olive oil, making sure to coat the sides well.
- Shape the dough. Punch down the risen dough. Transfer it to the oiled pan. Using oiled fingertips, gently press and stretch the dough to fit the pan. It will be springy and may not reach the corners immediately. Trust me, this is normal. Cover the pan with plastic wrap and let the dough relax and rise a second time for 30-45 minutes. After this rest, you should be able to easily press it fully into the corners.
- Prepare toppings and preheat. While the dough rises, make the sauce. In a small saucepan, heat 1 tbsp olive oil over medium. Add minced garlic and oregano, cooking for 30 seconds until fragrant. Stir in crushed tomatoes and sugar. Simmer for 10-15 minutes until slightly thickened. Season with salt and pepper. Let cool. Preheat your oven to 500°F (260°C) with a rack in the lower third. Shred the brick cheese.
- Assemble the pizza. After the second rise, the dough should be puffy. Top the dough evenly with all of the shredded cheese, going all the way to the edges and into the corners—this creates the signature crispy ‘frico’ edge. Add pepperoni if using. Dollop the cooled sauce in three thick stripes lengthwise over the cheese. Do not spread it; this is the authentic Detroit ‘racing stripe’ method.
- Bake and finish. Place the pan on the lower oven rack and bake for 12-15 minutes. The pizza is done when the edges are a deep, caramelized brown and the center is bubbly. Carefully remove the pan (the oil will be very hot) and let the pizza cool in the pan for 5 minutes. Then, run a thin spatula around the edges to loosen. Transfer the pizza to a cutting board, slice into squares, and serve immediately.


