
Chicago style pizza
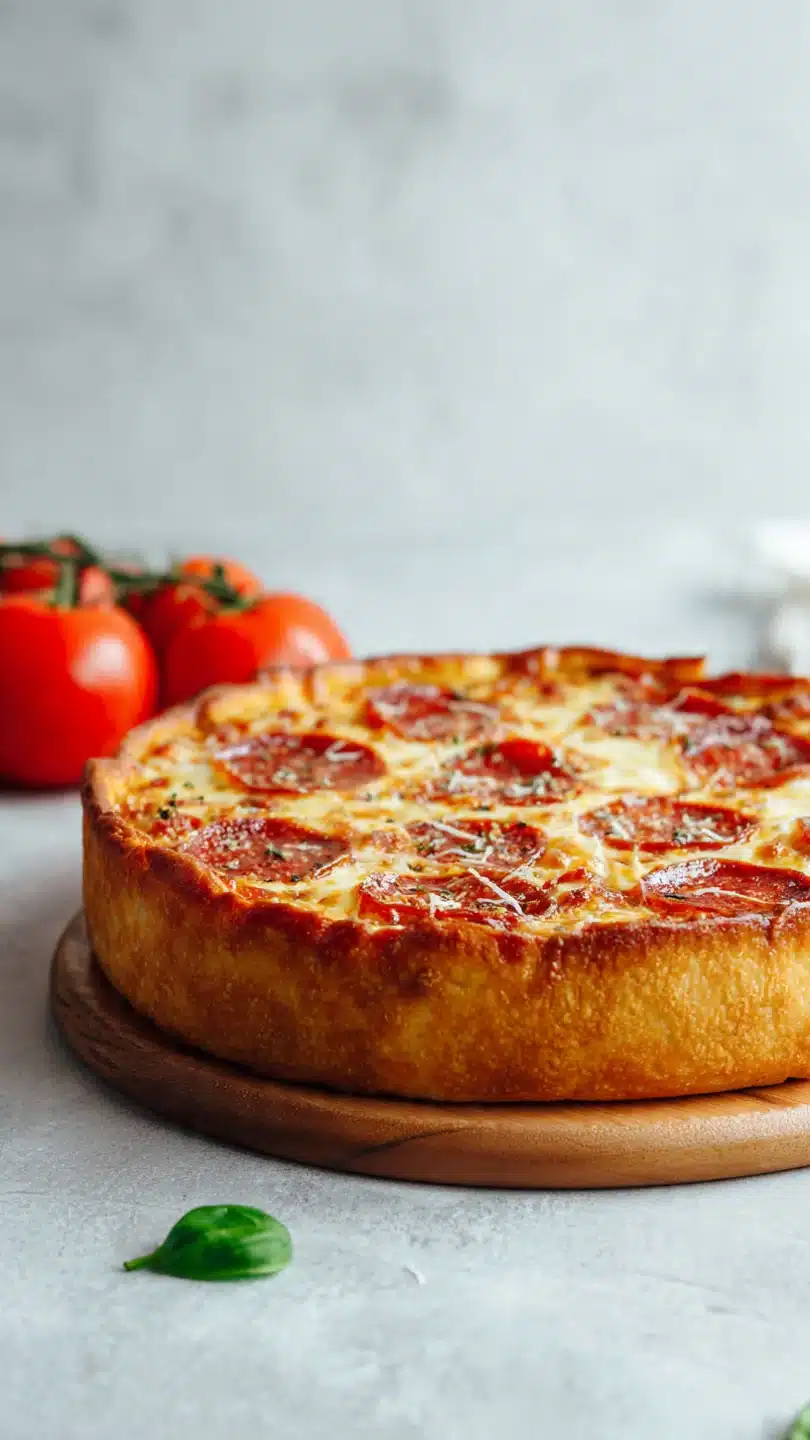
There’s something uniquely satisfying about lifting a slice of Chicago deep dish pizza. It’s not a floppy triangle you fold; it’s a substantial, golden-crusted wedge that requires a fork and knife, or at least two hands. The contrast of the buttery, crisp-edged crust with the molten layer of cheese and the bright, chunky tomato sauce on top is a masterpiece of Italian-American comfort food.
While a trip to the Windy City might not be on the calendar, I’m here to show you that creating this iconic dish in your own kitchen is not only possible but incredibly rewarding. This recipe distills years of professional kitchen testing into a reliable, step-by-step guide for a pizza that’s worthy of any Chicagoan’s approval.
- Authentic Texture & Flavor: Achieves the signature buttery, crisp-yet-tender cornmeal crust and the classic “cheese first, sauce on top” structure that defines true Chicago deep dish.
- Make-Ahead Friendly: Both the dough and sauce can be prepared a day in advance, making assembly and baking a breeze for dinner or game day.
- Forgiving Dough: The high-hydration dough might feel sticky at first, but it’s designed to be pliable and results in a wonderfully flaky crust—no need for perfect kneading skills.
- Crowd-Pleasing Centerpiece: This is a show-stopping dish that feeds a group. Its impressive height and rich flavor make it perfect for gatherings.
- Customizable Foundation: While classic is best, this recipe provides a perfect base for adding your favorite meats, veggies, or extra cheeses.
- Science of Success: I’ve included the professional “whys” behind each step, so you understand the method, not just memorize a list.
Ingredients You’ll Need
Let’s gather our ingredients. This recipe uses simple components, but their quality and the specific technique of combining them create the magic. The cornmeal in the dough isn’t just for flavor; it gives the crust its essential gritty texture and helps manage the dough’s hydration.
Using a blend of mozzarella for stretch and provolone for a sharper, meltier quality builds a more complex cheese layer than one cheese alone. For the sauce, good canned whole tomatoes are key—I prefer San Marzano for their sweet, low-acid flavor. Crushing them by hand gives you the ideal chunky texture.
For the Dough:- All-purpose flour: The backbone of our crust. Don’t substitute bread flour; we want tenderness, not excessive chew.
- Yellow cornmeal: Use fine or medium grind. It provides the signature texture and flavor.
- Unsalted butter & vegetable oil: This dual-fat system is the secret. Butter gives flavor and flakiness, while oil keeps the crust tender.
- Instant yeast: Makes the rise quick and reliable.
- Low-moisture mozzarella: Pre-shredded bags often contain anti-caking agents that can make the cheese layer greasy. Trust me, shredding a block yourself is worth the extra minute.
- Provolone cheese: Adds a tangy, creamy depth that complements the mozzarella beautifully.
- Whole peeled tomatoes: The foundation of a great sauce. We’ll season them simply to let the tomato flavor shine.
- Pepperoni (optional): If using, place it under the sauce for the authentic Chicago-style topping method.

Note: You’ll find the complete list of ingredients, along with their exact measurements, in the printable recipe card at the bottom of this post.
Kitchen Equipment Needed
You don’t need a professional pizza oven, but a few key tools will set you up for success. The most important is a 10-inch cast iron skillet. Its ability to retain and distribute heat evenly is unmatched for achieving that crisp, golden-brown crust all the way up the sides.
A stand mixer with a dough hook makes the dough process effortless, but you can absolutely mix and knead it by hand in a large bowl—just plan on about 10 minutes of kneading. You’ll also need a rolling pin for shaping, a medium saucepan for the sauce, and a large mixing bowl for the dough to rise. Having a thin metal spatula on hand is helpful for loosening and removing the finished pizza from the pan.
How to Make Chicago Style Pizza Recipe
Step 1: Mix the Dough
In your stand mixer bowl, combine the dry ingredients—flour, cornmeal, salt, sugar, and yeast. Give them a quick mix on low to distribute everything evenly. With the mixer running on low, slowly stream in the lukewarm water, melted butter, and oil.
Once incorporated, increase the speed to medium-low and let it knead for 5 to 7 minutes. The dough will be very soft, sticky, and will cling to the hook. Tip from me: This is exactly what you want.
A wetter dough hydrates the cornmeal fully and creates steam during baking, leading to a lighter, flakier interior. Resist the urge to add more flour.
Step 2: First Rise and Simple Sauce
Transfer the soft dough to a large, lightly oiled bowl. Cover it tightly with plastic wrap and let it rise in a warm spot. It needs about 1 to 1.5 hours to nearly double.
This slow rise develops flavor. Meanwhile, make the sauce. In your saucepan, sauté the garlic in olive oil just until fragrant—about 30 seconds.
Add the canned tomatoes, crushing them with your hands as you go for a rustic, chunky texture. Stir in the oregano, red pepper flakes, and sugar. Let it simmer for 20-25 minutes until it thickens slightly.
Season with salt, then let it cool. A cool sauce won’t start cooking the cheese when you assemble.
Step 3: Shape the Crust
Once the dough has risen, punch it down to release the gas. On a lightly floured surface (the cornmeal will help prevent sticking), roll it into a 14-inch circle. Generously grease your cast iron skillet with the softened butter, coating the bottom and sides thoroughly.
This creates an incredible, almost fried crust edge. Carefully lift the dough and lay it into the pan. Gently press and coax the dough up the sides, forming a tall, even lip that comes about 1.5 inches up.
Don’t stretch it thin; you want an even thickness.
Step 4: The Chicago-Style Assembly
Here’s where we break the rules of other pizzas. First, evenly distribute all the shredded mozzarella and provolone cheese over the bottom of the dough crust, right to the edges. This layer is crucial—it protects the crust from getting soggy from the sauce.
If you’re using pepperoni or other toppings like sautéed mushrooms or sausage, layer them over the cheese now. Finally, spoon and spread the cooled tomato sauce over everything in an even layer. Believe me, putting the sauce on top is the authentic signature.
Finish with a sprinkle of Parmesan.
Step 5: Bake, Rest, and Serve
Place your skillet on a baking sheet (this catches any potential butter drips) and into a preheated 425°F oven. Bake for 30-35 minutes. You’re looking for the crust to be a deep, golden brown and the sauce to be bubbling actively.
The aroma will be incredible. Once out of the oven, let the pizza cool in the pan for a full 10-15 minutes. This resting time is non-negotiable; it allows the molten cheese to set so you can get a clean slice.
Use a thin spatula to loosen the edges, then carefully slide the whole pizza onto a cutting board. Slice into wedges and serve immediately.
- Dough Temperature is Key: Use lukewarm water (110°F). Too hot will kill the yeast; too cold will drastically slow the rise. A quick touch test: it should feel warm but not hot.
- The Butter Grease: Don’t be shy with buttering the pan. A well-greased pan is the secret to that irresistible, crispy, fried-like crust edge that everyone fights over.
- Sauce Consistency: Your sauce should be thick, not watery. Simmering it drives off excess liquid. If your canned tomatoes are particularly juicy, you can drain off about 1/4 cup of the liquid before crushing.
- Avoid the Soggy Bottom: The dual barrier of a buttered pan and a layer of cheese directly on the dough is your best defense. Also, ensure your sauce is completely cooled before assembly.
- The Perfect Slice: For picture-perfect wedges, use a sharp chef’s knife or a pizza wheel and a decisive cutting motion. The initial rest period makes all the difference here.
Recipe Variations
- The “Meat Lover’s”: Before adding the cheese, layer on 1/2 pound of cooked Italian sausage (crumbled) and 1/4 pound of diced cooked bacon. The cheese layer will help anchor the meats.
- Loaded Veggie: Sauté 1 cup of sliced mushrooms and 1/2 a diced green bell pepper until soft. Let them cool, then scatter over the cheese layer before adding the sauce. A handful of fresh spinach also works wonderfully.
- Spinach and Artichoke: Mix 1 cup of chopped thawed frozen spinach (squeezed very dry) and 1 cup of chopped marinated artichoke hearts into the cheese blend before sprinkling it over the dough.
- Gluten-Free Adaptation: Substitute the all-purpose flour with a high-quality 1:1 gluten-free flour blend and ensure your cornmeal is certified gluten-free. The dough may be more delicate to handle.
- Spicy Arrabbiata: Add 1/2 teaspoon more crushed red pepper to the sauce and use a spicy provolone or pepper jack cheese in the mix.
- White Pizza: Omit the tomato sauce. Instead, mix the cheese with 1 cup of ricotta, 2 minced garlic cloves, and a handful of chopped fresh basil. Spread this over the dough and bake as directed.
What to Serve With This Recipe
Chicago deep dish is a hearty meal unto itself, but a few light accompaniments can balance the richness perfectly. A simple, crisp green salad with a sharp vinaigrette (think lemon or red wine vinegar) cuts through the pizza’s decadence beautifully. For a classic Chicago tavern-style pairing, serve it with ice-cold beer—a lager or pilsner works well.
If you’re planning a full spread, keep other dishes light: garlic-roasted broccoli or marinated white beans. This pizza is ideal for casual gatherings, game day feasts, or a special weekend family dinner where you want to impress with minimal last-minute effort.
Storage & Make-Ahead Instructions
- Refrigerating Leftovers: Cool slices completely, then store in an airtight container in the refrigerator for up to 4 days. The crust will soften but will still be tasty.
- Freezing for Later: Wrap individual slices tightly in plastic wrap, then place in a freezer bag. Freeze for up to 2 months. Thaw in the refrigerator before reheating.
- Best Reheating Method: To restore crispness, reheat slices in a 375°F oven on a baking sheet for 10-12 minutes, or in an air fryer for 5-7 minutes. Avoid the microwave, which will make the crust rubbery.
- Make-Ahead Strategy: You can prepare the dough and sauce up to 24 hours in advance. After mixing, place the dough in the oiled bowl, cover tightly, and refrigerate. Let it sit at room temperature for 30 minutes before shaping. Refrigerate the sauce in a separate container.
Frequently Asked Questions
Q: Can I use a regular baking pan instead of cast iron?
A: You can use a 9×2 inch round cake pan or a dedicated deep-dish pizza pan. However, cast iron provides superior heat retention for a crispier crust. If using a lighter pan, you may need to extend the baking time by a few minutes.
Q: Why is my dough so sticky and hard to handle?
A: This is normal! The high moisture content is intentional. Use plenty of flour on your work surface and hands when shaping.
The cornmeal in the dough also helps. Embrace the stickiness—it leads to a tender final product.
Q: Can I use pre-shredded cheese?
A: I strongly recommend shredding your own. Pre-shredded cheese is coated with starches to prevent clumping, which can inhibit melting and make the cheese layer oily and separate.
Q: How do I know when the pizza is done baking?
A: Look for three signs: 1) The exposed crust edge is a deep, golden brown. 2) The sauce in the center is bubbling vigorously, not just at the edges. 3) An instant-read thermometer inserted into the cheese layer should read at least 165°F.
Q: My crust didn’t get crispy on the bottom. What happened?
A: The most common culprits are an under-buttered pan or assembling the pizza too far in advance before baking, which lets moisture seep into the crust. Also, ensure your oven is fully preheated and you’re baking on a lower rack.
Q: Is it normal for so much butter to pool in the pan after baking?
A: Yes, especially if you’ve properly greased the pan. This is the butter from the pan coating frying the crust. You can carefully tip the pan to drain off excess butter after removing the pizza, or simply soak it up with the crust as you eat—it’s part of the experience!
Q: Can I make the dough without a stand mixer?
A: Absolutely. Mix the ingredients in a large bowl with a wooden spoon until a shaggy dough forms. Then turn it out onto a floured surface and knead by hand for 8-10 minutes until smooth and elastic.
Final Thoughts
Mastering this Chicago deep dish pizza is about embracing its unique architecture—the buttery cornmeal crust, the protective cheese layer, and the vibrant sauce crowning it all. It’s a project that yields immense satisfaction and a truly spectacular meal. This recipe works because every step, from the sticky dough to the cooled sauce, has a purpose rooted in culinary science.
I encourage you to try it exactly as written the first time to understand the method. Once you’ve got that down, the variations are endless. Whether it’s for a special occasion or just because you deserve a fantastic homemade pizza night, this recipe is built to deliver.
I’d love to hear how your Chicago-style creation turns out—share your photos and experiences, and don’t forget to rate the recipe! Now, go preheat that oven and get ready for one of the most rewarding bakes in your home kitchen repertoire.
Authentic Chicago-Style Deep Dish Pizza
Ingredients
Equipment
Method
- Make the dough. In the bowl of a stand mixer fitted with the dough hook, combine the flour, cornmeal, salt, sugar, and yeast. Mix on low to combine. With the mixer running, slowly pour in the lukewarm water, melted butter, and vegetable oil. Mix on medium-low speed for 5-7 minutes until the dough is smooth, elastic, and pulls away from the sides of the bowl. It will be quite soft and sticky. Tip from me: Don’t be tempted to add more flour; this high-hydration dough is key to a tender, flaky crust.
- Let the dough rise. Transfer the dough to a large, lightly oiled bowl. Cover tightly with plastic wrap and let rise in a warm place for 1 to 1.5 hours, or until nearly doubled in size. While the dough rises, make the sauce. In a medium saucepan, heat the olive oil over medium heat. Add the minced garlic and cook for 30 seconds until fragrant. Add the canned tomatoes with their juices, crushing them with your hands as you add them. Stir in the oregano, red pepper flakes (if using), and 1 tsp sugar. Simmer for 20-25 minutes, stirring occasionally, until slightly thickened. Season with salt to taste. Remove from heat and let cool slightly.
- Prepare the pan and assemble. Generously grease a 10-inch cast iron skillet or deep-dish pizza pan with the 2 tablespoons of softened butter, making sure to coat the sides. Punch down the risen dough. On a lightly floured surface, roll the dough into a 14-inch circle. Trust me, the cornmeal makes it easier to handle. Carefully transfer the dough to the prepared pan, gently pressing it up the sides to form a tall, even edge. It should come about 1.5 inches up the sides.
- Layer the cheese and toppings. Sprinkle the shredded mozzarella and provolone cheese evenly over the bottom of the dough crust, all the way to the edges. This cheese layer acts as a barrier to keep the crust crisp. If using pepperoni, arrange the slices over the cheese. Now, carefully spoon the cooled tomato sauce over the cheese, spreading it into an even layer. Believe me, putting the sauce on top is the authentic Chicago way. Sprinkle the grated Parmesan over the sauce.
- Bake and serve. Preheat your oven to 425°F (220°C). Place the assembled pizza on a baking sheet (to catch any potential drips) and bake for 30-35 minutes. The crust should be a deep golden brown, and the sauce should be bubbling vigorously. Remove from the oven and let the pizza cool in the pan for 10-15 minutes. This resting time is crucial—it allows the cheese to set so you can get a clean slice. Use a thin spatula to loosen the edges, then carefully slide the pizza onto a cutting board. Slice and serve hot.


