
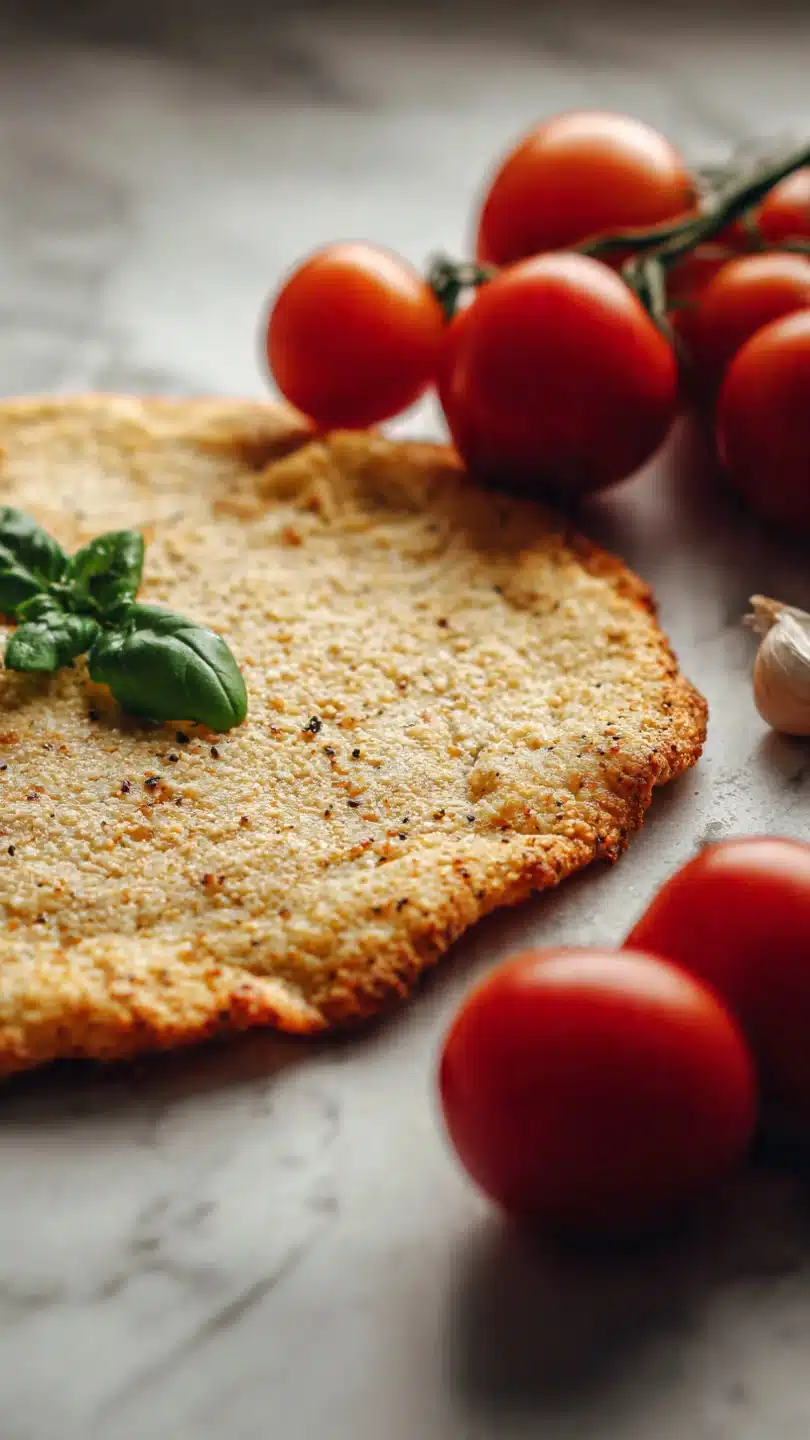
Almond flour pizza crust
There’s a moment of pure satisfaction when you pull a homemade pizza from the oven—the aroma of toasted cheese, the sizzle of toppings, the promise of a perfect slice. For years, that moment felt out of reach for anyone avoiding gluten or grains, with most alternative crusts turning out soggy, crumbly, or just plain sad. After countless tests in my professional kitchen, I’ve cracked the code.
This almond flour pizza crust is a revelation: it’s robust enough to hold a generous layer of toppings, bakes up beautifully crisp, and has a subtly nutty, delicious flavor that stands on its own. It transforms pizza night from a compromise into a genuine celebration.
- Authentic Texture & Hold: Unlike many gluten-free crusts, this one actually holds its shape when you pick up a slice. The psyllium husk creates a flexible, bread-like structure that mimics traditional dough.
- Quick & Simple Process: From bowl to table in under 30 minutes. There’s no yeast, no proofing time, and no complicated techniques—just mix, shape, and bake.
- Naturally Nutritious: Made with whole-food ingredients, this crust is packed with protein, healthy fats, and fiber, making your pizza both satisfying and nourishing.
- Incredibly Versatile Base: This neutral, slightly nutty canvas is perfect for any topping combination, from a classic Margherita to creative pesto and vegetable medleys.
- Meets Dietary Needs: It’s naturally gluten-free, grain-free, and low-carb, fitting seamlessly into various lifestyles without sacrificing flavor or fun.
- Family-Friendly Winner: It’s a guaranteed way to get a wholesome, homemade meal on the table that everyone, from kids to adults, will devour.
Ingredients You’ll Need
Let’s gather our simple ingredients—this is where pantry staples perform some genuine kitchen magic. The beauty of this crust lies in the synergy between a few key components. Almond flour provides the base, but it’s the psyllium husk powder that works as the essential gluten substitute, binding everything together and creating that crucial chewy-crisp texture.
Believe me, don’t skip it or try to substitute with whole husks; the powder is non-negotiable for success.
- Blanched Almond Flour: I recommend a super-fine grind for the smoothest texture. The blanched variety (without almond skins) gives a lighter color and more neutral flavor.
- Psyllium Husk Powder: This is the secret weapon. It absorbs moisture and creates a gel-like structure, giving the crust its flexible, bread-like quality. You can find it in most health food stores or online.
- Baking Powder: This is our leavening agent, providing the slight lift and airy structure that prevents the crust from being dense.
- Fine Sea Salt: Enhances all the other flavors.
- Eggs: They act as a binder and provide richness. Room-temperature eggs incorporate more easily.
- Olive Oil: Adds moisture and helps achieve a golden-brown finish. We’ll also use it to grease our hands—a pro tip for easy handling.
- Apple Cider Vinegar: A small amount reacts with the baking powder for better rise and improves overall browning.

Note: You’ll find the complete list of ingredients, along with their exact measurements, in the printable recipe card at the bottom of this post.
Kitchen Equipment Needed
You don’t need any specialty pizza-making gear for this recipe. A standard large rimmed baking sheet or pizza pan is perfect. Parchment paper is essential—it prevents sticking and makes transferring the shaped crust effortless.
Have a couple of mixing bowls, a whisk, and a spatula ready. A pizza cutter will give you those clean slices, but a sharp chef’s knife works in a pinch. That’s truly all you need to create pizza night magic.
How to Make Almond Flour Pizza Crust Recipe
Step 1: Mix the Dry Ingredients
Preheat your oven to 350°F (175°C) and line your baking sheet with oiled parchment paper. In a medium bowl, take a moment to thoroughly whisk together the almond flour, psyllium husk powder, baking powder, and salt. This isn’t just mixing; you’re ensuring the psyllium is evenly distributed, which is critical for a uniform texture without gummy spots.
Break up any lumps in the almond flour now for a perfectly smooth crust later.
Step 2: Combine Wet & Dry
In a separate bowl, whisk the eggs, olive oil, and apple cider vinegar until completely smooth and emulsified. Pour this mixture into the dry ingredients. Using a sturdy spatula, mix firmly.
It will look shaggy and wet at first, but keep folding. Within about 30 seconds, you’ll see it transform into a thick, sticky, and cohesive dough ball. Trust me, it will come together.
Step 3: Shape the Crust
This is the only hands-on part. Lightly coat your palms and fingers with a bit of olive oil. Place the dough ball onto the prepared parchment and begin pressing it out into your desired shape, aiming for about 1/4-inch thickness.
For a perfectly even round, place a second sheet of parchment on top and use a rolling pin. Then, use your fingers to gently pinch and form a slightly raised edge around the outside—this is your future crispy crust rim.
Step 4: Par-Bake the Base
Slide the shaped crust into the preheated oven. Bake it alone, without toppings, for 10-12 minutes. This par-baking step is the professional secret to a crust that won’t get soggy.
You’re looking for the surface to be dry and matte, and the edges may just be starting to hint at a golden color. This sets the structure.
Step 5: Top and Final Bake
Remove the par-baked crust and increase your oven temperature to 400°F (200°C). Now for the fun part: add your sauce, cheese, and favorite toppings. Be generous but mindful—overloading with very wet ingredients can soften the crust.
Return the pizza to the hot oven for 10-12 final minutes. Watch for the cheese to be beautifully melted and bubbly and the crust edges to become a deep, appetizing golden brown.
Step 6: Rest, Slice, and Serve
Here’s a tip from my restaurant days: let the pizza cool on the pan for a full 5 minutes. This brief rest allows the crust to firm up further, ensuring you get clean, crisp slices that hold their toppings. Then, use a pizza cutter, slice it up, and serve immediately.
Step back and admire your handiwork—a gorgeous, golden, gluten-free pizza that looks and tastes like the real deal.
- The Psyllium Factor: Psyllium husk powder needs a minute to fully hydrate. If your dough seems too wet after initial mixing, let it sit for 2-3 minutes. You’ll see it firm up significantly as the psyllium works its magic.
- Oil is Your Friend: Don’t be shy with oiling your hands before shaping. The dough is sticky, and this is the easiest way to manage it without adding extra flour that could alter the texture.
- Thickness is Key: Aim for a consistent 1/4-inch thickness. If the center is too thick, it may remain soft, while edges that are too thin can over-brown. The parchment-and-rolling-pin method guarantees evenness.
- Watch the Clock: Almond flour can go from perfectly golden to burnt quickly. Set a timer for the par-bake and keep an eye on the final bake, as all ovens vary slightly.
- Crispness Hack: For an extra-crispy bottom, after adding toppings, carefully slide the parchment paper with the pizza directly onto your oven rack for the last 2-3 minutes of baking.
Recipe Variations
- Herb-Infused Crust: Add 1 teaspoon of dried Italian seasoning or 2 tablespoons of finely chopped fresh rosemary or thyme to the dry ingredients for a fragrant, flavorful base.
- Everything Bagel Style: Before the first bake, brush the shaped crust with an egg wash and sprinkle generously with everything bagel seasoning for a savory, crunchy edge.
- Cheesy Garlic Bread Crust: Mix 1/4 cup of grated Parmesan cheese and 1/2 teaspoon of garlic powder into the dry ingredients. After par-baking, brush with garlic-infused olive oil before adding pizza toppings.
- Keto-Friendly Version: Use a no-sugar-added pizza sauce and top with full-fat cheeses, pepperoni, and low-carb vegetables like mushrooms and bell peppers for a perfect keto meal.
- Dairy-Free/Vegan Adaptation: For a vegan crust, replace the eggs with a “flax egg” (2 tbsp ground flaxseed mixed with 5 tbsp water, let sit 5 mins). Top with vegan cheese and your favorite plant-based toppings.
- Sweet Dessert Pizza: Omit the salt and add 1 tablespoon of coconut sugar to the dry ingredients. Par-bake, then top with a layer of mascarpone, fresh berries, and a drizzle of honey before a brief final warm-up.
What to Serve With This Recipe
This pizza is a complete meal on its own, but it shines as part of a larger spread. For a classic Italian trattoria feel, start with a simple arugula salad dressed with lemon juice, olive oil, and shaved Parmesan. The peppery arugula cuts through the richness of the pizza beautifully.
If you’re serving a crowd, a platter of roasted vegetables like broccoli rabe or bell peppers makes a hearty side. For beverage pairings, a light, crisp Pinot Grigio or a hoppy IPA complements the nutty crust, while a sparkling water with lemon is always a refreshing non-alcoholic choice. It’s perfect for casual Friday nights, game day gatherings, or even a fun, interactive dinner party where guests can build their own personal pizzas.
Storage & Make-Ahead Instructions
- Storage: Leftover slices can be stored in an airtight container in the refrigerator for up to 3 days. The crust will soften in the fridge but can be re-crisped.
- Reheating: To restore crispness, reheat slices in a toaster oven, air fryer, or conventional oven at 375°F for 5-7 minutes. Avoid the microwave, as it will make the crust rubbery.
- Freezing: You can freeze the par-baked crust (without toppings) for future convenience. Cool completely, wrap tightly in plastic wrap, and freeze for up to 2 months. Thaw before adding toppings and baking.
- Make-Ahead: The dough does not store well uncooked due to the psyllium. For meal prep, your best strategy is to par-bake 2-3 crusts, let them cool, and store them wrapped at room temperature for up to 2 days before topping and finishing.
Frequently Asked Questions
Q: Can I use coconut flour instead of almond flour?
A: No, they are not direct substitutes. Coconut flour is extremely absorbent and would require a complete reformulation of liquid and egg ratios. Stick with almond flour for this recipe.
Q: My dough is too wet and won’t hold shape. What happened?
A: This usually means the psyllium husk powder hasn’t fully hydrated. Let the mixed dough sit for 3-5 minutes. It will thicken and become much easier to handle.
Also, ensure you’re using powder, not whole husks.
Q: Can I make this crust without eggs?
A: Yes, for a vegan version, use a flax egg substitute as mentioned in the variations. The texture will be slightly more delicate but still very good.
Q: Why do I need to par-bake the crust first?
A: Par-baking sets the structure of the crust. If you add wet toppings to raw dough, the moisture will seep in and you’ll end up with a soft, undercooked center. This step guarantees a crisp base.
Q: Is psyllium husk powder the same as xanthan gum?
A: They are different but both act as binders. I prefer psyllium for this recipe as it creates a more bread-like, flexible texture. I do not recommend substituting with xanthan gum here.
Q: How do I know when the pizza is done baking?
A: Look for three signs: the cheese is fully melted and bubbly, the toppings are cooked, and the exposed crust edge is a deep, golden brown. The bottom should be firm when you lift a corner with a spatula.
Q: Can I use a pizza stone?
A: Absolutely! Preheat your stone with the oven. Shape the crust on parchment, then carefully slide the parchment with the crust onto the hot stone for baking.
This will give you an even crisper bottom.
Final Thoughts
This almond flour pizza crust has been a labor of love and rigorous testing in my kitchen, and I’m thrilled to share it with you. It proves that dietary restrictions don’t mean missing out on the foods you love. With its satisfying crunch, excellent hold, and wholesome ingredients, it’s a recipe you can feel good about serving any day of the week.
I encourage you to make it your own—try the variations, find your favorite topping combo, and enjoy the process. There’s nothing quite like the pride of serving a homemade pizza that’s both delicious and nourishing. If you try it, I’d love to hear how it turned out!
Leave a comment below, rate the recipe, and if you share a photo on social media, tag me so I can see your masterpiece. Happy cooking
Perfect Almond Flour Pizza Crust
Ingredients
Equipment
Method
- Preheat your oven to 350°F (175°C). Line a large baking sheet or pizza pan with parchment paper and lightly brush it with olive oil. In a medium bowl, whisk together the almond flour, psyllium husk powder, baking powder, and salt until thoroughly combined and no lumps remain.
- In a separate small bowl, whisk the eggs, 2 tablespoons of olive oil, and apple cider vinegar until smooth. Pour the wet ingredients into the dry ingredients. Using a spatula, mix until a thick, cohesive dough forms. It will be sticky at first but will come together as you mix.
- Lightly oil your hands. Place the dough ball onto the prepared parchment paper. Press it out into a circle or rectangle, about 1/4-inch thick. For a perfectly even crust, you can place a second sheet of parchment on top and use a rolling pin. Trust me, the oil on your hands is key to preventing sticking.
- Carefully peel off the top parchment if used. Use your fingers to gently form a slightly raised edge around the perimeter to create a classic pizza crust rim. Bake the crust alone for 10-12 minutes, until the surface is dry to the touch and just beginning to turn golden at the edges.
- Remove the par-baked crust from the oven. Increase the oven temperature to 400°F (200°C). Add your desired pizza sauce, cheese, and toppings. Return the pizza to the oven and bake for an additional 10-12 minutes, or until the cheese is melted and bubbly and the crust edges are deep golden brown.
- Let the pizza cool on the pan for 5 minutes to allow the crust to set. This is crucial for a crisp slice that holds its shape. Use a pizza cutter to slice, garnish with fresh herbs, and serve immediately. Step back and admire your perfect, golden, gluten-free creation!


